
-
 Hey Guest!
British Car Forum has been supporting enthusiasts for over 25 years by providing a great place to share our love for British cars. You can support our efforts by upgrading your membership for less than the dues of most car clubs. There are some perks with a member upgrade!**Upgrade Now**
(PS: Upgraded members don't see this banner, nor will you see the Google ads that appear on the site.)

Tips
- We have a special forum called "Member Articles" where you can submit actual articles for consideration for publication. Learn More
- Don't have an Avatar? If not, your avatar will default to the 1st character in your username. Go into "Account Details" to change your Avatar.
- Some basic forum navigation info: click
 Hey - did you know if you click on the title of a thread it will take you to the first unread post since you last visited that thread?
- Hey Guest - Is your British Car Club in our Clubs database? If not, send me a PM - Basil

- Looking for a local club? Click the "Clubs" tab above and browse hundreds of clubs world-wide.
- Add Android or iPhone APP: click
- Did you know - any picture or video you add in your posts in any marque-specific forum will also get added to the Media Gallery automatically.
- A few more tips about posting and replying: click
- Hey there Guest - be sure to keep your profile page up to date with interesting info about yourself: learn more
- More tips and tricks on Posting and Replying: click
 but were afraid to ask:
  STOP!! Never post your email address in open forums. Bots can "harvest" your email! If you must share your email use a Private Message or use the
  smilie in place of the real @
- Want to mention another member in a post & get their attention? WATCH THIS

- So, you created a "Group" here at BCF and would like to invite other members to join? Watch this!
- Hey Guest - A post a day keeps Basil from visiting you in the small hours and putting a bat up your nightdress!
- Hey Guest - do you know of an upcoming British car event?
 Pretty Please - add it to our Events forum(s) and add to the calendar! >> Here's How <<
- Hey Guest - you be stylin' Change the look and feel of the forum to fit your taste. Check it out
- If you run across an inappropriate post, for example a post that breaks our rules or looks like it might be spam, you can report the post to the moderators: Learn More
- If you would like to try some different "looks" or styles for the site, scroll to the very bottom, on the left and click the Style Selector.
You are using an out of date browser. It may not display this or other websites correctly.
You should upgrade or use an alternative browser.
You should upgrade or use an alternative browser.
startech47
Jedi Knight
Offline
Valve not closing may burn out valve and seat. Phil
OP
Tinster
Guest
Guest
Offline
Ok- Here we go!!
I gotta take the valve cover off anyway to try to
find the noisy valve.
Since the Crypt Car kinda functions at present settings,
I am going to mark and tag everything and then rip it all
apart again and attempt to set things according to Art's
detailed instructions.
I will report progress. Sorry no photos, Wendy has her
digital over in the Old City doing charity work and
mine is with the Camera Geeks being repaired.
later,
d
OP
Tinster
Guest
Guest
Offline
Update:
Ok then- Valve cover off, car in neutral
with chocked wheels and hand brake set.
Evertything marked and tagged before I reset anything.
I rotated engine until 2nd valve opened and then began
to close. Rotated until first of two lines on pulley
wheel was in line with marker.
I then removed the dizzy cap as instructed.
Rotor sitting exactly under where I had my # 1 wire.
will continue process.
d
OP
Tinster
Guest
Guest
Offline
Ok-
1.Took off all the spark plug wires and set them aside.
2 Loosened the adjustment clamp on the dizzy as instructed.
3. Attached a test light to the (-) of the coil and the other to the (-) of the battery. As instructed.
4. Turned on the ignition switch.
5. Rotated the dizzy until the light just flickered on
or just flickered off.
6. Tightened the dizzy clamp.
7. Retested the setting with the test light. A-OK.
8. Replaced the dizzy cap so power lead would be
directly over the rotor. That will be my #1 spark
plug wire.
9. Checked timing mark on pulley wheel- lined up.
Now I don't have a camera today so I cannot take of
photo of the new position of my dizzy and #1 spark plug
wire.
But for sure I know Arts' final instruction is correct.
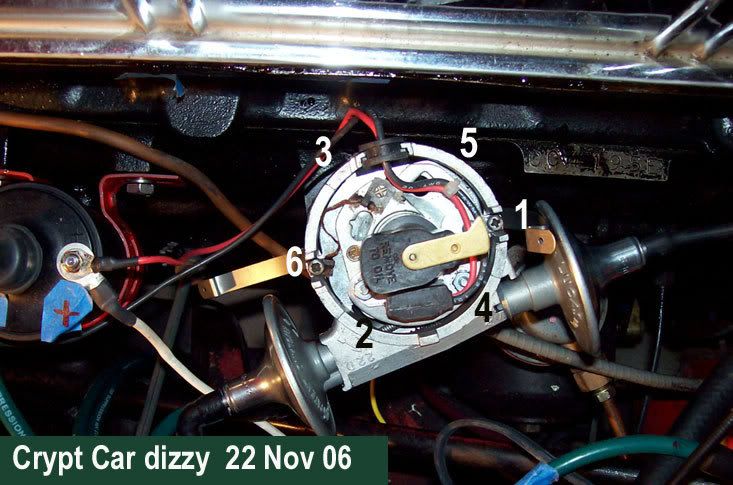
Replace the valve cover and start the car. How do I know this? Because I now have exactly what I started with as shown in this photo from the other day. Except the pully wheel line and the marker are 1/8" different than this morning.
I am like totally confused right now. Can someone please
explain what just happened? Using Art's very informative
process, I ended up with my dizzy at the same crooked angle
as before and with my #1 wire still at 3:00 O'colock, as before.
thanks D
1.Took off all the spark plug wires and set them aside.
2 Loosened the adjustment clamp on the dizzy as instructed.
3. Attached a test light to the (-) of the coil and the other to the (-) of the battery. As instructed.
4. Turned on the ignition switch.
5. Rotated the dizzy until the light just flickered on
or just flickered off.
6. Tightened the dizzy clamp.
7. Retested the setting with the test light. A-OK.
8. Replaced the dizzy cap so power lead would be
directly over the rotor. That will be my #1 spark
plug wire.
9. Checked timing mark on pulley wheel- lined up.
Now I don't have a camera today so I cannot take of
photo of the new position of my dizzy and #1 spark plug
wire.
But for sure I know Arts' final instruction is correct.
Replace the valve cover and start the car. How do I know this? Because I now have exactly what I started with as shown in this photo from the other day. Except the pully wheel line and the marker are 1/8" different than this morning.
I am like totally confused right now. Can someone please
explain what just happened? Using Art's very informative
process, I ended up with my dizzy at the same crooked angle
as before and with my #1 wire still at 3:00 O'colock, as before.
thanks D
OP
Tinster
Guest
Guest
Offline
Yo Paul!!
Susan who??
Well now buddy, the Crypt Car has been timed by ear,
timed by strobe light and timed statically. Three for
three ending up with this crooked looking dizzy.
But since the car operates with this crooked dizzy
and since I personally installed every ignition
component either new or professionally refurbished,
I am left only with the conclusion that the crookedness
has to be a result of something down inside the
engine block that I cannot see.
Since the car seems to run OK with the crooked dizzy,
I don't think I have in me right now to tear apart the engine to find out what the PO has FU inside.
beautiful sunny day here on the island.
regards,
Art! Thanks a bunch pal!! I did not trust at all the
timing I performed by ear. Somewhat confident when
I used the strobe light. I am now 100% convinced I
have the timing set correctly.. even if I have a crooked dizzy.
d
startech47
Jedi Knight
Offline
Dale,
There will be six positions of the distributor, each 60 degrees apart, that will give the same meter reading (i.e. one for each cylinder). You need to crank the distributor around until the vacuum advance canisters are lined up parallel to the edge of the block and than use the meter to set the timing. Your number one spark plug wire will always be at 3 o'clock, unless you pull the spindle out of the engine and rotate it as well.
Phil
Brosky
Great Pumpkin
Offline
Dale, I think that you've over complicated the situation. It was obvious that you had it timed correctly, with the exception of tweaking it to your engine and fuel, etc.
I passed along a set of instructions detailing how to move the distributor away from the engine block to give you more room for adjustment and to have it look more like mine and Bill's and probably all others out there. You will not have to tear the engine apart to fix this small issue, only rotate the wires on the cap after moving the housing.
Here again is the long version followed by the short version:
"Dale, the key here is the position of the distributor housing in the top pic in relation to the bottom pic. Note that the housing is much closer to the block in the bottom picture, so you have moved the cap and wire position, but not the rotor, since the rotor is connected to the shaft and is independent of the housing.
Start by getting the engine and distributor rotor to look just like it does in the bottom picture, aimed at the #1 tower wire.
Put a little mark or dab of paint (Wendy's nail polish will do nicely) on the housing at the bottom of the number one plug tower, or lining up close but not exactly, since you have the timing advanced, with the rotor at TDC in the bottom (now running position) picture.
Now loosen the distributor screw/square nut clamp and turn it to where the distributor/advance is in the same position as the top picture.
Now get the wires back to where they should be, by moving the wires on the cap to get you to the same position as if the rotor were moved clockwise the same amount as the housing has moved the cap, which I approximate to be one plug wire, as pointed out in a previous post.
When you take off the cap you will see the rotor now faces a different spot on the cap than before. Put the number one wire in that spot and move all of the wires over either one or two positions, depending on how much you moved the housing and you'll be back in business with the correct firing order and room to move the distributor for adjustment purposes. "
And now the short version:
"Dale, the 0-60 on your timing light may be for setting total advance and not what we need to explain here at this time. Keep it set at 0 zero for your work."
Next, if you rotate the distributor in a clockwise manner enough to get it away from the block, you can then move the wires on the cap to be at the original #1 position which will probably be your #5. You will only want to move it enough to get the #5 where #1 is now. Then all of the wires can be moved over clockwise one position and then reset the timing with the light and lock it down. "
Harry_Ward
Jedi Knight
Offline
Dale,
I thought you knew, this is and will be your distributor rotor position based on your distributor drive gear and spindle position with-in the motor block. Your rotor will always be in this position because in order to return it to original it requires you to pull the distributor drive gear and spindle assy. and reinstall in the proper position. Startech mentioned this in an earlier post and said he would send you the details if needed. I would suggest you NOT do this at this time but rather drive and enjoy the car as is until you get all the other issues resolved. Paul explained this better than I in an earlier post - You can put your distributor parallel to the block and move #1 wire to where #5 wire is now and then move all wires one spot over. Your #1 wire and rotor will remain at the three O'Clock position though your distributor will appear to be not "so crooked" and be more parallel to the motor block.
[ QUOTE ]
Ok-
1.Took off all the spark plug wires and set them aside.
2 Loosened the adjustment clamp on the dizzy as instructed.
3. Attached a test light to the (-) of the coil and the other to the (-) of the battery. As instructed.
4. Turned on the ignition switch.
5. Rotated the dizzy until the light just flickered on
or just flickered off.
6. Tightened the dizzy clamp.
7. Retested the setting with the test light. A-OK.
8. Replaced the dizzy cap so power lead would be
directly over the rotor. That will be my #1 spark
plug wire.
9. Checked timing mark on pulley wheel- lined up.
Now I don't have a camera today so I cannot take of
photo of the new position of my dizzy and #1 spark plug
wire.
But for sure I know Arts' final instruction is correct.
Replace the valve cover and start the car. How do I know this? Because I now have exactly what I started with as shown in this photo from the other day. Except the pully wheel line and the marker are 1/8" different than this morning.
I am like totally confused right now. Can someone please
explain what just happened? Using Art's very informative
process, I ended up with my dizzy at the same crooked angle
as before and with my #1 wire still at 3:00 O'colock, as before.
thanks D
[/ QUOTE ]
martx-5
Yoda
Offline
Dale,
You missed one of the instructions that I originally wrote in the other thread...
"Now, pull all of the wires from the distributor cap, including the coil wire. Take off the cap. Loosen the distributor and rotate it into position so it looks like the pictures of the other distributors in this thread. They looked like the advance mechanisms were pretty much parallel with the engine block."
The reason I had you remove all of the wires from the cap is that with the distributor in it's new position, #1 will wind up in a different position on the cap, but still be aligned with the rotor.
You can leave things the way they are, or you can follow the procedure again to get the distributor into the preferred orientation. The choice is yours.
OP
Tinster
Guest
Guest
Offline
I must be totally brain dead- None of this makes
a hoot of sense to me.
It just seems to me if I rotate the assembly to be parallel
and then I move my #5 wire onto the #1 cap position. I will
detonate a cylinder no where near TDC. I looked into #5
and saw nothing. I look into #1 and see a piston head.
Like I have said before. I know just about nothing concerning auto mechanics. This electrical stuff escapes my every attempt at understanding.
So what should I attempt now?? I am totally clueless.
My dizzy cap is knotched so it will only go on in one
single position. I cannot rotate the cap relative
to the dizzy body itself.
thanks,
dale
OP
Tinster
Guest
Guest
Offline
Maybe in the future I'll take the engine apart.
For now, I am going to attempt to break the "100
miles driven since owned" record.
That will be one single drive along the beach
highway and then home. 35 miles r/t
d
For now, I am going to attempt to break the "100
miles driven since owned" record.
That will be one single drive along the beach
highway and then home. 35 miles r/t
d
startech47
Jedi Knight
Offline
Dale,
I agree with you. Fine tune the valves and carbs and drive the crypt car for awhile. You deserve it. We can address the clocking of the distributor body and spark plug wires later, if these positions bother you. Changing them will not make the car run any differently.
Phil
I agree with you. Fine tune the valves and carbs and drive the crypt car for awhile. You deserve it. We can address the clocking of the distributor body and spark plug wires later, if these positions bother you. Changing them will not make the car run any differently.
Phil
philknight
Jedi Hopeful
Offline
I second that emotion.
Another Phil
Another Phil
martx-5
Yoda
Offline
[ QUOTE ]
I must be totally brain dead- None of this makes
a hoot of sense to me.
It just seems to me if I rotate the assembly to be parallel
and then I move my #5 wire onto the #1 cap position. I will
detonate a cylinder no where near TDC. I looked into #5
and saw nothing. I look into #1 and see a piston head.
dale
[/ QUOTE ]
Dale, you're over thinking this thing. Yes, if you rotate the distributor, you have to put #1 cylinder in a NEW POSITION ON THE CAP, along with all of the other wires. The postion that the rotor is pointing to when you have it on TDC of #1 cyl, and have set the static timing, becomes the NEW #1 wire position. That's why I had you remove all of the wires, so hopefully you would forget about where they originally were. /ubbthreads/images/graemlins/jester.gif
The distributor can be turned quite a ways, but the rotor will remain stationary. Therefore, the RELATIVE POSITIONS of the rotor and cap change. So, no matter what position the cap is in, the rotor is still ready to fire #1 cylinder. That's the tower on the cap you have to put the #1 wire, with the rest following...1-5-3-6-2-4.
tr6_easyrider
Jedi Hopeful
Offline
Dale
If you move each wire one postion counter- clockwise
in the cap, then rotate the distributor clockwise, so
it is parellel with the block, that should put you in the ballpark and then retime it.
Joe
If you move each wire one postion counter- clockwise
in the cap, then rotate the distributor clockwise, so
it is parellel with the block, that should put you in the ballpark and then retime it.
Joe
martx-5
Yoda
Offline
[ QUOTE ]
Dale
If you move each wire one postion counter- clockwise
in the cap, then rotate the distributor clockwise, so
it is parellel with the block, that should put you in the ballpark and then retime it.
Joe
[/ QUOTE ]
Yes Dale, this is what is going to happen when you rotate the distributor so it's parallel to the block. The positions of the wires will change in the cap, because the cap rotates with the distributor, but the wires will be in their relative positions in relation to the rotor. In other words, they will be in the same ACTUAL positions as before, but not in the same positions in the cap.
OP
Tinster
Guest
Guest
Offline
Hey Art: I forgot to tell you that after pondering
upon it a while, I more or less understand your static
timing concept and it is truly elegant.
I DID remove all the wires and I DID rotate
the unit so it was parallel to the engine.
I then began to rotate the unit until the test
light blinked on. The test light blinked on at
that same odd angle.
When I then re-installed the cap and all the wires,
I ended up with the same configuration I stared with.
A hour has passed..................
OK, I have now torn everything apart and started
over from zero.
Spun the pulley wheel until #2 valve, blah, blah, blah.
Dizzy parallel to engine. Did NOT use test light this go around.
Installed cap and put #1 wire in general direction of
rotor arm. (My new #1 is near 1:00 O'clock)
The rotor is actually mid-way between "new" contacts
for #4 and #1. I re-installed all the wires in their
new locations.
The dizzy is parallel to engine now. Just for the heck
of it, I attached the test light. It is lit up regardless
if I rotate the dizzy or not.
Tomorrow. I'll re-intsall the valve cover and see what happens when I crank it . I think #1 piston will be on
a downstroke by the time the rotor arm makes contact
with plug wire #1.
I post my results.
thanks all,
Dale