• Hi Guest!
    If you appreciate British Car Forum and our 25 years of supporting British car enthusiasts with technical and anicdotal information, collected from our thousands of great members, please support us with a low-cost subscription. You can become a supporting member for less than the dues of most car clubs.

    There are some perks with a member upgrade!
    **Upgrade Now**
    (PS: Subscribers don't see this gawd-aweful banner
Tips
Tips

Crypt Car Brake Failure

Go Dale Go! Go Dale Go!! Go Dale Go!! Go Dale Go!!

Kick Crypty's butt again and again. You can do this, just stay positive. You made a boo-boo that most of us have done over the years.

I agree with Jeff. My first time was youthful ignorance. But the second time I did it was just plain dumb!!

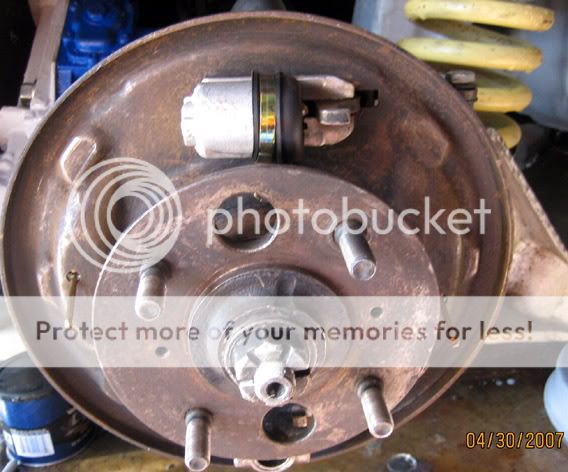
If you can rebuild that rear suspension all on your own, this is nothing for you to finish.
 
I think I've come up with a doable plan for this
recent Crypt Car nightmare set back.

I believe I can remove the existing brake assembly,
shoes, wheel cylinder, etc with a pry bar and small
cutoff saw. That will permit me to reinstall the
brake drum and wheel.

If I pinch the messed up brake's fluid pipe shut, will
the other three functional brakes be enough to get me
safely the 2 miles to Western Auto?

I intend to order every Moss part shown here except the
brake drum. I think this should solve my latest problem.
Can the boys at Western Auto install these parts?

https://www.mossmotors.com/Shop/ViewProducts.aspx?PlateIndexID=32833

Or should I pull the rear wheel hub and send it to David,
in Canada, along with the Moss parts, for the brake system
installation?

Thanks for the advice. I guess I got a little over my head
mechanically with my latest attempt to get the Crypt Car
functional.

Dale
 
Dale
you have already done all the hard work on this repair, and you most certainly have the capability to finish this up by yourself. You have done much more difficult repairs.

As I noted before, there is nothing wrong with the cylinder, and EVEN if the rubber cover is slightly ripped believe me it is in better condition than most cars on the road. Those covers dry out after a while and crack anyway. It just wont hurt anything.

What happened to the brake pipe???? popping the piston out shouldn't have done anything to the pipe or the piston.

In any case, if you just want to let someone else deal with it (and I certainly can understand that feeling!) I would find a shop which deals in hydraulic hoses and get a cap for the hose. Do NOT try to bend it over in order to seal off the hose. If you do this, drive slowly and don't apply the brakes suddenly. These are very simple brakes, and the boys at Western Auto will have no problem with it. Drive slowly with the understanding that you need extra length to stop.

If you can't figure out how to get the brake shoes off, remove the brake hose, and then slide off the two little plates which hold the cylinder in place. It will probably pop right out. Then the shoes will snap together and you can slide the drum back on.
Yisrael
 
Mr Tinster,
You are making too much of this.

It will be easier (and safer) for you to put this brake back together properly than to rig it up for a trip to the mechanic. You don't really need to do much, and you shouldn't need any parts.

1. Take the shoes off (ensure you catch the piston from the slave cylinder as it tries to fall on the floor).

2. Use brake parts cleaner. Clean up the piston, boot, and anything that got soaked with brake fluid. Leave the cylinder installed, but check inside it for gunk or rust.

3. Install the boot on the piston.

4. Gently insert the piston into the cylinder...open the bleeder to allow air to escape from cylinder while pushing piston in.

5. Put the skirt of the rubber boot into the recess on the outside of the cylinder. Push the U-clip on over the boot to secure it.

6. Push the cylinder all the way in and close the bleeder.

7. Install springs on shoes and fenagle shoes into place...first one whole shoe, then the bottom of the other, then the top. (It will take a couple of tries.)

8. Reinstall shoe retainer clips (middle of shoes).

9. Install brake drum (& 2 retaing screws, if applicable).

10. Bleed brakes (both sides now that you lost all your fluid).

11. Reinstall roadwheels. Torque as required.

All Done! Go for a drive.

Len
 
Yisrael/Len-

I didn't quite grasp what or where the clips were. So
before the Boss awoke this morning I got a bigger crowbar
and a bigger hammer to try to remove all the brake parts so
I could put the wheel back on.

The bigger crowbar did the trick and two small black squares
launched into space to join Ship's Engineer Scotty. The pads
fell down and I was able to get them apart.

Len, I followed your list of how-tos and the new wheel
cylinder was not harmed at all nor was the rubber booty
torn. The back side of it has a cutout by design. The wheel
cylinder slides back and forth, is this correct?

Now that I have the bloody thing in pieces, I kinda see how
it operates. I believe I might be able to re-install the
pads myself. Do both springs go behind? On the other side
of my car the top one is behind and the bottom one is in
front.

Progres photo:

Thanks all for the advice! /bcforum/images/%%GRAEMLIN_URL%%/thankyousign.gif

bareplate.jpg
 
Tinster said:
The wheel
cylinder slides back and forth, is this correct?
Yes, it floats so that the shoes press equally against the inside of the drum.

I don't know which side your springs go on...it was mentioned earlier in this thread. (Of course it was mentioned both ways.)

On my Spit, I can install them inside or outside with the same result.

Len
 
Tinster said:
Yisrael/Len-

I didn't quite grasp what or where the clips were. So
before the Boss awoke this morning I got a bigger crowbar
and a bigger hammer to try to remove all the brake parts so
I could put the wheel back on.

The bigger crowbar did the trick and two small black squares
launched into space to join Ship's Engineer Scotty. The pads
fell down and I was able to get them apart.

There is a Hebrew expression: Whatever doesn't move with force, will go with more force. Obviously, you figured it out!

Tinster said:
Len, I followed your list of how-tos and the new wheel
cylinder was not harmed at all nor was the rubber booty
torn. The back side of it has a cutout by design. The wheel
cylinder slides back and forth, is this correct?

Yep!

Tinster said:
Now that I have the bloody thing in pieces, I kinda see how
it operates. I believe I might be able to re-install the
pads myself. Do both springs go behind? On the other side
of my car the top one is behind and the bottom one is in
front.

Not sure if both springs go behind, but I would copy what Dave did! You certainly can put it back together.
 
Dale, are you using the drivers side rear as a guide yet. From what I remember, the springs should go on the back side.
 
You really are going to have a 100% restored TR6 soon. You know whats funny though, at some point you will get done and then you will stand there looking at the car and you are going to feel both proud, then bored because there is nothing left to do to it.
 
Well roofman, I do indeed appreciate the thought
but it ain't gonna be happening any time real soon.

I take it there exists some special brake pad installation
tool of which I am not yet aware? I just wasted an hour of
my time trying to get that little square, black, brake
holding clip over that tiny stud thingy.

No luck using any of the tools I have. Of course Wendy
caught me working on the Beast, when I promised her I would
let it be dead for the next two weeks. So I'm in Dutch over
that.

I am torn between pulling the rear hub out and taking it and
the brake pads over to Western Auto for installation, or
driving the car over with one brake missing.

This is such a hateful, beast of an automobile.

What is the special tool called and where do I buy one?

d
 
Do you mean the spring clip, #70 in the Moss Motors diagram you referenced? If you can't squeeze it with your fingers enough to slip it onto the hold-down pin, you probably could squeeze it with needle-nose pliers. At any rate, your free hand should be reaching around behind the backing plate to hold the pin in place whilst installing the spring clip.
 
Starts at $115,000.
 

Attachments

  • 5297-carcrusher.jpg
    5297-carcrusher.jpg
    9.6 KB · Views: 71
Dale,
I wish I could be there to help you. As Andrew says you push the pin in place from the back of the back plate and hold it there with one hand. Then the wee square clip should slide onto the pin, then push it in sligtly and turn it through 90 degrees so that it catches on the wider bit of the pin. Hope that makes sense. Hopefully your clips are re-useable after your large crowbar treatment.
I have found a picture in a manual of the springs both on the in-bord side of the shoes.
Good luck to you. In years to come you will laugh about this!!
Nick
scan0002.jpg
 
Super graphic Nick- Thanks.

Now I see how everything fits together..

....................................some
time later..............

bummer indeed. I again tried to compress the clip
while holding the the pin in the back. No luck at all.
Needle nosed pliers, vicegrips, screwdriver, nothing
worked. Finally, I was trying to compress the clip and
push it over the pin with a wood chisel when suddenly
it let loose and sprang out of my garage and into the
garden where I cannot find it. It is lost it would seem.

Do you think I can simply thru bolt it with a 1/8" bolt
and lock nut? I have not a clue how to stretch those bloody
springs BEHIND everything. I almost got a hernia stretching
one yesterday on the OUTSIDE!

In hindsight, I should have pulled the entire hub and
taken the brake pieces to Wester Auto. Now I have to make
another order to Moss.

Thanks for the help. I truly lack all skills in the auto mechanics field. I really loathe DPO Pedro.

d /bcforum/images/%%GRAEMLIN_URL%%/frown.gif
 
Hi Dale. Sorry you're having so much trouble with those clips. You should be able to push them down by hand, turn them 90 degrees, and slip them off. Hang in there!
 
Well, David, one of them is now lost in the weeds
somewhere. Would the thru-bolt concept function?

I really, really don't want to pull that hub assembly
and axle out for a third time.

d
 
Dale, I have no doubt that you can do the break thing. I've done many of them, and just ask CheapSnake, I'm not much of a wrench. What I've used with some success on the clips that go over the little pin thingie, is..... I use a square nosed pliers...put the pin in from the back....put the nose of the pliers on the clip.... holding the pin in the back with your fingers.. push the clip down over it and give it a quarter turn. I don't know if this helps, but [censored] man, you have done things far tougher than this. If you want to talk about tough, try putting break shoes on a golf car. No room for tools or fingers.
 
kc_doyle said:
Dale, I have no doubt that you can do the break thing. I've done many of them, and just ask CheapSnake, I'm not much of a wrench. What I've used with some success on the clips that go over the little pin thingie, is..... I use a square nosed pliers...put the pin in from the back....put the nose of the pliers on the clip.... holding the pin in the back with your fingers.. push the clip down over it and give it a quarter turn. I don't know if this helps, but [censored] man, you have done things far tougher than this. If you want to talk about tough, try putting break shoes on a golf car. No room for tools or fingers.
It, {The car} has already done the break thing, on the brakes /bcforum/images/%%GRAEMLIN_URL%%/lol.gif
Those clips can be a bugger, sometimes three hands are better than two. Get someone to hold the retaining pin from the back while you Manipulate the clip.
the "Bolt through" isnt a good idea.
Kerry
 
Back
Top