• Hi Guest!
    You can help ensure that British Car Forum (BCF) continues to provide a great place to engage in the British car hobby! If you find BCF a beneficial community, please consider supporting our efforts with a subscription.

    There are some perks with a member upgrade!
    **Upgrade Now**
    (PS: Subscribers don't see this gawd-aweful banner
Tips
Tips

Carpet snap details needed

Hey Andrea

Thanks for the additional info on carpet quality, etc. from "Ahead". Haven't used them before. I've ordered from AH Spares in past and have been pleased. Years ago, when dinosaurs were still around, I dealt with SC Carbs (Southern Carburettors at the time) a lot, because there were fewer companies out there selling aftermarket Healey stuff, aside from Moss. As to your carpets, I looked at their wool kit, and it was certainly luxurious and well priced, but thought I'd try to get as close to original specification as practical. By the way, I think your photo gallery is terrific and a great guide to other restorers, and I'm a big fan. Give up the Healey business, get into motion pictures and give Steven Speilberg something to think about!

Cheers
Dave
 
For what its worth SC Parts is now owned by a German company called Limora. SC Parts will cease to carry stock in the Uk, it is all being centralised in the German warehouses for 'better' customer services. I ordered triple Weber carburettors from them 3 weeks ago (because they were on sale with 20% off) but they still have not arrived. Needless to say I am not happy.
 
Derek

Not to digress too far from the original subject, I ordered a full set of syncros from SC Parts several years ago in rebuilding my BT7 tranny. They were billing me hundreds of dollars more than I would have paid if sourced locally. I wrote them a letter in complaint, pointing out my loyalty over the years and just generally raising h***. To their credit, they responded with a much more competitive price, which was acceptable. Hope your Webers work out!

Cheers
Dave
 
Andy,
Thanks, could you show a pic of where your trans cover snaps are located (or describe with measurements) There are other holes in the cover so the correct holes should be there, I just have to mark them. Yes I too put the carpet on the cover about 3-4 weeks ago. Regarding the arm rest I was under the impression it used tenax snaps and not regular snaps. I had tenax studs on the rear fixed tunnel when I took the car apart. My carpet set from Moss came with 22 snaps total. 4 on each side floor panels and 4 on the trans cover only is 12. Where would the other 10 go?

drambuie,
I wish my old floors had the snaps in them. They were not rusted out but were a little thin and heavily rust pitted so I just changed them out because they are so easy to change. A prior owner had put in some shag carpet and held it down with screws and finish washers all over the place so I would not have know what was original or not any ways with all the screw holes.
Hi Jim
I have finishet my carpet work-. now I need positioning the snaps, from varuios photo I have argued that phe position of snaps on floor are this +/-
https://picasaweb.google.com/lh/photo/yDZ0GCYBJRp2GgZNTeEiD9MTjNZETYmyPJy0liipFm0?feat=directlink
I am right?
Cheers
 
Hi Andrea,

have a look on the pic you posted further up the thread of the unmolested BN4 rear carpet, you can see a snap ring location there. Also the two front snaps on the drivers side at least are under the Austin logo on the heel mat if the Heritage carpet is correct.

As best as I can make out from my original chassis/floor there is only one snap on the big floor panel pressing for the main carpet and that is forward and outward of the forward/outer seat runner bolt hole by about 1.5" square. The two forward carpet snaps go through the bulkhead metal at floor level (forward of the outrigger) and the rear inner snap goes through the small oddly shaped floor panel next to the driveshaft tunnel. No snaps go into the chassis rails. I don't have the original rear panels to reference the rear carpet off.

Andy.
 
Rear carpet rear inner snaps- can see two shiny screws middle, upper 2/3 in the pic
61ah08.jpg


IMG_0669.jpg


Front carpet forward snaps
c468-rightpans-remote.jpg


Underside view
DSCF0131.JPG


Based on the above image and my chassis/best guess I reckon this is about right for carpet snaps. Open to discussion of course. Yellow front, red rear and O= spotted hole in pic, X= can't see the hole but reckon there should be one there. There may be six snaps on the rear carpet?? There are two holes inner of the outer/forward seat runner bolt hole although these aren't present on my floorpan.
underside%20carpet%20snaps.JPG


Some better detail of rear snap screw holes
DSCF0132.JPG
 
Andrea - who and what is the source of the unmolested Longbridge carpet photo? I also have not seen that binding on the carpet for the Longbridge cars. I will send you some photos of a Longbridge style BN4, that was built in Abingdon, which clearly does not have the binding anywhere on the carpet
jim:driving:
 
Hi Andy
Your photos are probably the definitive word on Snaps position on Longbridge cars floor,Tanks
I follow your indications. that have also pratice and logical confirmation, stopping the floating of the two small parts of the rear cut off
(presence is confirmed on Longbridge original cars)
I agree with you and Jim binding or webbing is the indication of Optional Carpets or substitution of the originals
the only binding for original carpets - is present at the rear part of tunnel carpet
https://picasaweb.google.com/lh/photo/BmBQZ5JAYcfA2ELeGH6wkdMTjNZETYmyPJy0liipFm0?feat=directlink
Cheers
Andrea
 
And binding around gearbox lever, Oops!!! Derek J arrived speedy just few seconds before me
 
Last edited:
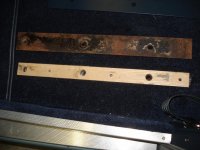
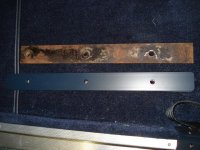
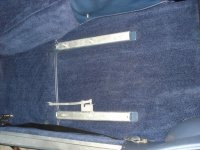
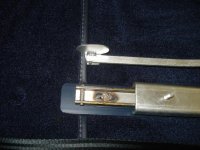
OK I wrapped up the carpet today. I went and cut around the wood spacers for the seat tracks as that is the consensus to what is correct. Then I noticed that the seat runners were going to foul the carpets and I remembered the original setup had some metal plates mounted with the seats. I assume that their purpose was to allow the seats to adjust and not rub on the carpet or get hung up. I test fitted them and decided I could do a little better and extend them to help them clear the front carpets as well. I also decided to make them out of aluminum instead of steel so they would not rust and discolor the carpet as the originals appear to have done. I painted them a matching blue to help them blend in as well. Attached are some pictures of the wood spacers "cut into" the cartpet and a couple pictures of the original vs the replacement runner plates. I also made a 1 inch plate of aluminum with the same bolt pattern to further shim the adjustable runners up away from the carpet. Now that the carpets are done I can finish up the seat upholstery.

Jim
 

Attachments

  • 2013-02-05 002.jpg
    2013-02-05 002.jpg
    96.7 KB · Views: 170
  • 2013-02-05 001.jpg
    2013-02-05 001.jpg
    96.8 KB · Views: 168
  • 2013-02-05 003.jpg
    2013-02-05 003.jpg
    95.9 KB · Views: 179
  • 2013-02-05 005.jpg
    2013-02-05 005.jpg
    96.9 KB · Views: 172
An eye for detail, I love it.

Hans
 
Back
Top