
-
 Hey Guest!
British Car Forum has been supporting enthusiasts for over 25 years by providing a great place to share our love for British cars. You can support our efforts by upgrading your membership for less than the dues of most car clubs. There are some perks with a member upgrade!**Upgrade Now**
(PS: Upgraded members don't see this banner, nor will you see the Google ads that appear on the site.)

Tips
- We have a special forum called "Member Articles" where you can submit actual articles for consideration for publication. Learn More
- Don't have an Avatar? If not, your avatar will default to the 1st character in your username. Go into "Account Details" to change your Avatar.
- Some basic forum navigation info: click
 Hey - did you know if you click on the title of a thread it will take you to the first unread post since you last visited that thread?
- Hey Guest - Is your British Car Club in our Clubs database? If not, send me a PM - Basil

- Looking for a local club? Click the "Clubs" tab above and browse hundreds of clubs world-wide.
- Add Android or iPhone APP: click
- Did you know - any picture or video you add in your posts in any marque-specific forum will also get added to the Media Gallery automatically.
- A few more tips about posting and replying: click
- Hey there Guest - be sure to keep your profile page up to date with interesting info about yourself: learn more
- More tips and tricks on Posting and Replying: click
 but were afraid to ask:
  STOP!! Never post your email address in open forums. Bots can "harvest" your email! If you must share your email use a Private Message or use the
  smilie in place of the real @
- Want to mention another member in a post & get their attention? WATCH THIS

- So, you created a "Group" here at BCF and would like to invite other members to join? Watch this!
- Hey Guest - A post a day keeps Basil from visiting you in the small hours and putting a bat up your nightdress!
- Hey Guest - do you know of an upcoming British car event?
 Pretty Please - add it to our Events forum(s) and add to the calendar! >> Here's How <<
- Hey Guest - you be stylin' Change the look and feel of the forum to fit your taste. Check it out
- If you run across an inappropriate post, for example a post that breaks our rules or looks like it might be spam, you can report the post to the moderators: Learn More
- If you would like to try some different "looks" or styles for the site, scroll to the very bottom, on the left and click the Style Selector.
You are using an out of date browser. It may not display this or other websites correctly.
You should upgrade or use an alternative browser.
You should upgrade or use an alternative browser.
Carpet snap details needed
- Thread starter healeyblue
- Start date
OP
healeyblue
Jedi Warrior
Offline
I believe that may be determined by the model. I am sure my BN4 cannot be removable with snaps because the seats both bolt through the carpet (the pass side is not adjustable like the 100's) I think the later cars with the carpets cut and bound around the seat rail mountings, may be removable.I'm also doing the carpeting at the moment. After all I've read until now it seems that the gearbox carpet and the front floor carpets are held in place with snaps. But what about the rear floor carpets? Should they be removable like the front floor carpet?
andrea
Jedi Knight
Offline
The beginning work of my Google album, for CARPETS on Longbridge cars
https://picasaweb.google.com/112770819864514987162/BN4LongbridgeCARPETS?authuser=0&feat=directlink
https://picasaweb.google.com/112770819864514987162/BN4LongbridgeCARPETS?authuser=0&feat=directlink
OP
healeyblue
Jedi Warrior
Offline
OK guys had a pretty productive week with the carpeting.
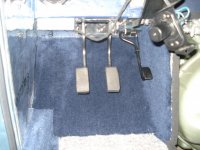
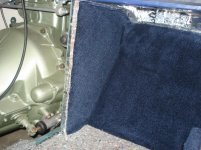
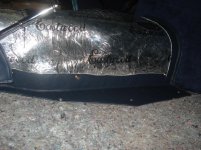
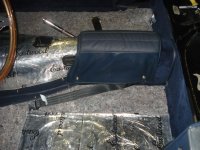
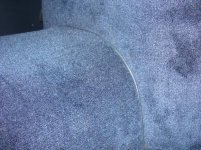
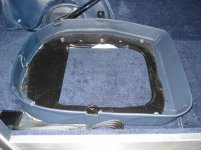
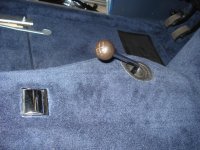
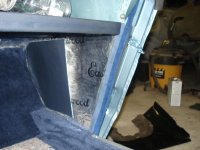
I started with the trans cover. in order to put the carpet on I wanted to insulate it first (still trying to prevent the hot feet with every step). I heard people say to not put dynamat on the underside of the cover because it can heat up and come loose and end up wrapped around the trans causing it to over heat. To prevent this I put it on in one piece and then put rivets with large fender washers to prevent it ever coming loose. I then wrapped the topside as well. Then I glued the jute padding to the underside and installed my snaps and test fit the carpet. Once I was satisfied with its fit I put the vinyl on the front bellhousing area and down each side of the "feet" of the cover. Then I set it aside and worked on the padding of the car. I finished what ever dynamat was needed on the floors and then put 1/4 jute on all surfaces. I then worked on the bellhousing panel. I put back on the rubber flap that seals of the top half of the bellhousing and wrapped the inside surface (the side that faces the interior) with dynamat and jute padding. I did not put any dynamat on the engine side because I did not want any dynamat visible once the car is done. I then screwed the bellhousing cover in place ensuring it was sealed tightly so no hot air will go around the cover. I put 1/2 foam weather stripping at the top where it seals to the body and at the bottom where it seals to the frame rails. The foam continues on the frame rails all the way back so the trans cover will also seal when screwed down. I also installed 1/4 foam stripping on the underside and front edge of the trans cover where it will seal against the bellhousing cover and driveshaft tunnell respectively. Once all that was sealed up I covered the foot wells in the carpeting and the bellhousing area in carpeting. Actually now that I think of it I put the carpet on the footwells before the bellhousing cover was screwed in place. I then screwed down the trans tunnel for good making sure that it was completely sealed for air leaks. I was pleasantly surprised at how tight everything fits and how insulated everything is going to be. The only place I saw that was no sealed was the gap between the bellhousing cover and the trans cover. The gap was about 1/4 inch by 1 1/2 inch long. A piece of foam weather strip filled the gap nicely. I then layed a piece of 1/2 inch jute padding on the floors from front to back on each side. This adds one more layer of insulation and covers all and any gaps and seams from the many layers. It also levels out the layers of carpet edges for when the floor carpet goes down. I then glued the rear floor carpet down and punched the holes for the seat rails and seat on the passenger side (fixed seat, non adjustable). Then I screwed down the snaps for the front carpets and fit them with the snaps. I also had to fit the arm rest pad which is held on with 4 tenax snaps. The rear two are in the driveshaft tunnel and the front two are on the trans cover. I marked the front two and pulled the carpet off the trans cover and punched a 1/4 hole for each tenax snap to protrude through. Now that I am done with the carpeting I can start with the seats. I already covered the passengers seat pan so I could bolt it down.
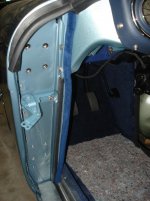
I also had put the everflex widlace down the sides of the door openings so I could screw in the kick panels. The original windlace stopped at the door sill but I thought it might seal slightly better if extended down to the actual door seal on the face of the sill. If I see that it interferes with the closing of the door (it may be too much thickness with the door panel in place) then I can always cut it back short.
O.K. now on to the pictures. I hope you can see all the details I was trying to explain. If not ask, and I will try and explain it better.
I started with the trans cover. in order to put the carpet on I wanted to insulate it first (still trying to prevent the hot feet with every step). I heard people say to not put dynamat on the underside of the cover because it can heat up and come loose and end up wrapped around the trans causing it to over heat. To prevent this I put it on in one piece and then put rivets with large fender washers to prevent it ever coming loose. I then wrapped the topside as well. Then I glued the jute padding to the underside and installed my snaps and test fit the carpet. Once I was satisfied with its fit I put the vinyl on the front bellhousing area and down each side of the "feet" of the cover. Then I set it aside and worked on the padding of the car. I finished what ever dynamat was needed on the floors and then put 1/4 jute on all surfaces. I then worked on the bellhousing panel. I put back on the rubber flap that seals of the top half of the bellhousing and wrapped the inside surface (the side that faces the interior) with dynamat and jute padding. I did not put any dynamat on the engine side because I did not want any dynamat visible once the car is done. I then screwed the bellhousing cover in place ensuring it was sealed tightly so no hot air will go around the cover. I put 1/2 foam weather stripping at the top where it seals to the body and at the bottom where it seals to the frame rails. The foam continues on the frame rails all the way back so the trans cover will also seal when screwed down. I also installed 1/4 foam stripping on the underside and front edge of the trans cover where it will seal against the bellhousing cover and driveshaft tunnell respectively. Once all that was sealed up I covered the foot wells in the carpeting and the bellhousing area in carpeting. Actually now that I think of it I put the carpet on the footwells before the bellhousing cover was screwed in place. I then screwed down the trans tunnel for good making sure that it was completely sealed for air leaks. I was pleasantly surprised at how tight everything fits and how insulated everything is going to be. The only place I saw that was no sealed was the gap between the bellhousing cover and the trans cover. The gap was about 1/4 inch by 1 1/2 inch long. A piece of foam weather strip filled the gap nicely. I then layed a piece of 1/2 inch jute padding on the floors from front to back on each side. This adds one more layer of insulation and covers all and any gaps and seams from the many layers. It also levels out the layers of carpet edges for when the floor carpet goes down. I then glued the rear floor carpet down and punched the holes for the seat rails and seat on the passenger side (fixed seat, non adjustable). Then I screwed down the snaps for the front carpets and fit them with the snaps. I also had to fit the arm rest pad which is held on with 4 tenax snaps. The rear two are in the driveshaft tunnel and the front two are on the trans cover. I marked the front two and pulled the carpet off the trans cover and punched a 1/4 hole for each tenax snap to protrude through. Now that I am done with the carpeting I can start with the seats. I already covered the passengers seat pan so I could bolt it down.
I also had put the everflex widlace down the sides of the door openings so I could screw in the kick panels. The original windlace stopped at the door sill but I thought it might seal slightly better if extended down to the actual door seal on the face of the sill. If I see that it interferes with the closing of the door (it may be too much thickness with the door panel in place) then I can always cut it back short.
O.K. now on to the pictures. I hope you can see all the details I was trying to explain. If not ask, and I will try and explain it better.
Attachments


OP
healeyblue
Jedi Warrior
Offline

OP
healeyblue
Jedi Warrior
Offline


OP
healeyblue
Jedi Warrior
Offline


andrea
Jedi Knight
Offline
OK guys had a pretty productive week with the carpet......
....O.K. now on to the pictures. I hope you can see all the details I was trying to explain. If not ask, and I will try and explain it better.
Hi Jim
Very good and correct work, compliments --also explication are easy to follow, I will add your solution to avoid that insulation collapse on trans
I will ask you the permit to put all yours photo on my CARPET Google album- with the relative text correlated to the photo, obviously with attribution
to Healey Blu or Jim, as you prefer-
Only one basic question, some carpet kit for BN4 are sell from British vendors in ONE piece trans and tunnel as this two ex.
https://picasaweb.google.com/lh/photo/bCu80h_i9uPntHKTvVx1ZNMTjNZETYmyPJy0liipFm0?feat=directlink
https://picasaweb.google.com/lh/photo/v35VtuONeoOv1bbgL6GEY9MTjNZETYmyPJy0liipFm0?feat=directlink
is this the kit for the Abington Cars (and earli 3000) and incorrect for Longbridge ??
https://picasaweb.google.com/lh/photo/D_ly3S9lKSFAlHr0d9hmZNMTjNZETYmyPJy0liipFm0?feat=directlink
(praticaly the TWO pieces solution are better for easy remove only the trans cover for works)
Cheers
PS what solution have you find for the TRANS oil level control? there are a window or NOT?
OP
healeyblue
Jedi Warrior
Offline
Andrea,
Yes of course you may use any photos I post. If you need more photos I can send more as well. I post the ones that best explain what I am referring to but I have many more for my reference. This carpet set is from Moss motors, and I am no expert, but I have concluded that the longbridge cars had the drive shaft tunnel and trans cover pieces seperate and the later cars (abingdon and on) were one piece. The sewn on arm rest pad is different and the rear floor carpet pieces are cut and bound to go around the seat slides. I think this is actually more convenient for trrans service as it allows the entire carpeting to be removed for service, where as the longbridge cars can only remove the trans cover and front floor carpets.
For checking the trans level I will have to pull the ash tray out and then unsnap the arm rest and unsnap the trans cover carpeting. Then I can access the rubber square plug over the dipstick. I suppose I could also just unsnap the front portion of the trans cover carpet and fold it back enough to remove the square rubber plug to gain access.
JIM
andrea
Jedi Knight
Offline
Tanks Jim
I beginning to work on my carpet and your work is very helpful for me
I have also charged your photos on my Google album, combined with Rich Chrysler notes
https://picasaweb.google.com/112770819864514987162/BN4LongbridgeCARPETS?authuser=0&feat=directlink
My car is NOT a concurs car so in more parts I will add Velcro, your works appear very professional and flawless to me
Cheers
Andrea
OP
healeyblue
Jedi Warrior
Offline
So your saying a Longbridge car should have cut outs like later cars?
5
57_BN4
Guest
Guest
Offline
P107 of the bible: Floor carpeting under and behind the seats was held in place by two snaps at the rear corner like those on the front mats. OTOH the Heritage carpet kit doesn't have any cutouts for the seat runners in the rear carpets. Interesting.
andrea
Jedi Knight
Offline
P107 of the bible: Floor carpeting under and behind the seats was held in place by two snaps at the rear corner like those on the front mats. OTOH the Heritage carpet kit doesn't have any cutouts for the seat runners in the rear carpets. Interesting.
But Chris (CH) photos of one Unmolested? BN4 longbridge have the cutouts
https://picasaweb.google.com/lh/photo/RxEWq9_yXOJd4GC7suxMx9MTjNZETYmyPJy0liipFm0?feat=directlink
Cheers
5
57_BN4
Guest
Guest
Offline
I'd be fairly sure that isn't an original carpet set as there is no mention of binding on any floor carpets that I know of. Interesting though.
OP
healeyblue
Jedi Warrior
Offline
P107 of the bible: Floor carpeting under and behind the seats was held in place by two snaps at the rear corner like those on the front mats. OTOH the Heritage carpet kit doesn't have any cutouts for the seat runners in the rear carpets. Interesting.
By "the bible" are you referring to the restoration guide? If so I find they leave a lot of the longbridge features out.
DerekJ
Luke Skywalker
Offline
I think the reason that Heritage dont have the cut outs is because every car is slightly different in the positioning of the seat rails and they leave it to you to fit it exactly to your own car. The only place there was binding was on the transmission tunnel. Any carpet with binding elsewhere is not original.
davidb
Jedi Trainee
Offline
Well this is obviously a topic of considerable interest, and deservedly so, given the great job that "healey blue" is doing, and the number of excellent photos, which, like Andrea, I've saved to my file as well. It got me to thinking that I might refresh my tired interior as well, so I did a little hunting around for carpet kits, and found that a company called Ahead 4 Healeys had a kit using the same "Karvel" ribbed carpeting that was used originally on Healeys. Most other Brit specialists currently use a plush or a loop type carpet (which is what I currently have on mine). I have absolutely no affiliation with this company whatsoever, nor can I speak to it's quality or fit, but if anyone is sourcing original type material, you might want to check it out. I plan to. https://www.ahead4healeys.co.uk/CARPET-ct160.html
Maybe I should have posted this elsewhere, but this just came to mind, and given my many "senior moments", I thought I'd better get it in print before it became another victim of my age-addled brain.
Cheers
Dave
Maybe I should have posted this elsewhere, but this just came to mind, and given my many "senior moments", I thought I'd better get it in print before it became another victim of my age-addled brain.
Cheers
Dave
andrea
Jedi Knight
Offline
Hi Dave
I have acquired my carpet kit from AHead-not the Karvel, but the Wool best quality (my car is not a concurs car) just for my better comfort.
it is right for BN4 Abington cars-- for Longbridge some modification is needed, I have just cut in TWO pieces the single piece Trans-tunnel,
and some other easy modification needed,
the quality is excellent and dimension correct, only the rear cut out for seat rail was too short for my car
I have acquired a lot of my spares for engine -gearbox-OD-interiors- very friendly and supportive people, few problems, and all well solved
Cheers