• Hi Guest!
    You can help ensure that British Car Forum (BCF) continues to provide a great place to engage in the British car hobby! If you find BCF a beneficial community, please consider supporting our efforts with a subscription.

    There are some perks with a member upgrade!
    **Upgrade Now**
    (PS: Subscribers don't see this gawd-aweful banner
Tips
Tips

Carb Swap: HD6 to HS6

Wylecoyote

Freshman Member
Bronze
Country flag
Offline
Evening all,
I am having some carburation issues and was wondering if swap from my current HD6 set up to a pair of HS6 would it raise any issues other than some pipe rework?
I am asking because I can purchase a pair of HS6 refurbished at a reasonable price, alternatively could buy a refurb kit and do it myself and find I still have problems because my existing ones are worn out being 65+ years old. I am making the assumption that HS6 are better than HD6???
Any thoughts appreciated
Cheers Phil
 
Suggest you refurbish your HD6 carbs to avoid complication with routing fuel lines and linkages for replacement HS6s. Delrin bushings, new throttle plates and shafts could be done, professionally and quickly, by Thomas Bryant (East Coast, US) or by your rebuilder of choice. Good luck, Gonzo
 
Thanks Gonzo, I had already decided to follow your guidance and have just received the two refurb kits and was reading the instructions as your reply came through. All looks doable with my limited skillset but time will tell:unsure:
Cheers Phil
 
Good afternoon folks,
well the carb rebuild has come to a halt and I need some advice re centering the jet on my HD carbs.
The info in the refurb box states it is for a HD but the words and pictures are actually for a HS?
My problem seems to stem from tightening the jet holder nut, as you all know on the HD model the nut and holder are hidden inside the housing and are not accessible once reassembly has finished but the HS adjustment is available at all times.
the question is should the jet holder nut be left a little bit loose to allow movement of the jet when the needle enters as when I tighten everything back up the slide is sticking a bit and not falling back down, I know its the needle sticking because if I remove it all works fine.
Any advice appreciated. sorry for long winded post:cry:
 
This is what I do.
Initially leave the jet nut slightly loose so the jet bearing can move around. Make sure the needle is the correct dept in the piston and then install the vacuum piston with needle and spring into the dashpot and install the dashpot with screws. Now, with the piston all the way down, slide the jet all the way into the jet bearing and move the jet bearing as needed to find a location where you feel no drag on the needle when you slide the jet into it's bearing - tighten the nut enough to hold the position and, holding the carb at approximately the installed angle, raise the piston (you can do this by pushing upwards on the end of the needle gently), and let it fall. You want it to fall and land with a slight click and no friction on the needle in the jet. I may take several tries to find the sweet spot where there is no drag. Fully tighten the nut and make sure nothing has shifted. The finish assembling the carb.
 
This little kit is surprisingly useful. The stubbie little thing is for centering jets--it subs for a needle--the wrench is handy and the bent wire pointers tell you if your pistons are rising in sync (plus, the wire is about 1/32" dia. to help with using the lifting pin for setting mixture).

 
Many thanks guys, have now refitted all parts and needle nicely centered.
One question re tuning, the instructions tell me to screw down the slow running valves! and use the throttle adjusting screws to adjust the idling.
Once the idling speed is adjusted what are you supposed to do with the slow running valves, set them back to 3.5 turns or leave them screwed down? What is their function as they do not appear to make any difference one way or the other??
 
The HD carbs do use the slow running passage/screws - the butterflies should be fully closed and then you control the amount of air/fuel (idle speed) with the slow run passages, which are simply a bypass of the throttle.
 
Thanks for the reply and have got it running reasonably ok will take it for a test drive tomorrow and see what transpires on the road.
One thing I have noticed is the front carb sucks quite hard and no matter what I do with the rear its never quite as hard when you cover the inlet what could be the reason for this??
 
It sounds like the front carb butterfly is not closing all the way. Could be worn shaft/bushings, could be linkage hang-up, could be adjustment.

I hope you are using a Uni-Syn Carb Synchronizer or some similar flow meter to set the idle speed, if not get one.

It is essential that both carbs are flowing the same volume of air at idle and off-idle (slight throttle). Start with throttles completely closed and the screws out about 3.5 turns and see what the carbs flow with a meter - if one is significantly greater than the other, try screwing that bypass screw in. If you get the screw seated and still have air flow, that tells you the butterfly is not fully closed - look for why.

Sameness is important - the air flow needs to be the same, the distance the jets are down from the bridge needs to be the same, the spring tension on top of the vacuum piston need to be the same, float levels need to be the same - all elements need to be the same for it to work well.
 
Right all back together and runs well, got a carb flow meter from Germany neat little thing and made adjustment much easier so thanks for heads up on that.
One thing though I had changed the needles to make it run leaner as running quite rich but could not find a setting where tickover was not really fast, changed back to original needles and got a nice tickover around 10k. How could I get it to run leaner without altering needles as still quite rich?
 
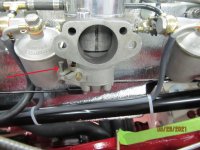
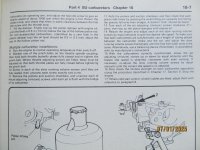
You adjust rich/lean by the jet adjusting screws (see picture) to raise or lower the jets as spelled out in the manual (if you don't have a manual, you really need to get one). After you have achieved the best mixture, you need to remove the dashpots and pistons and measure the distance each jet is down from the bridge - they need to be the same.
 

Attachments

  • IMG_5290-2.JPG
    IMG_5290-2.JPG
    642.5 KB · Views: 8
Back
Top