• Hi Guest!
    You can help ensure that British Car Forum (BCF) continues to provide a great place to engage in the British car hobby! If you find BCF a beneficial community, please consider supporting our efforts with a subscription.

    There are some perks with a member upgrade!
    **Upgrade Now**
    (PS: Subscribers don't see this gawd-aweful banner
Tips
Tips

Brush paint for engine bay?

KLUTZ

Luke Skywalker
Country flag
Offline
Well, I got the underside of my hood cleaned up nicely for painting, and just kept going onto the engine bay. There there is only flat black paint, no undercoating. I don't like the black and would like to paint it white to match the car too. It isn't worth it to me to yank the engine out and spend a lot of time on it, so, I think I read somwhere here that there is a paint that can be put on with a brush for this purpose, that looks fine.
If anyone can steer me in the right direction....
Thanks

Paul
 
I have not seen any brushable paints that I would use for sheet metal. Automotive paint stores do sell stuff called "trunk paint" that is similar to what GM used to use. It's grey with fleck of color in it. I'm not a big fan of it but I've seen it used in engine bays.

My solution to this problem has been to completely degrease the engine bay and all the things in it. I use cleanser to scrub and roughen the old paint. Then I mask off the stuff I don't want painted and air brush the engine bay. For tasks like this I use a small, single-acting Badger (a.k.a. cheap) air brush that can get into very small places. It works like a charm and will give you much better looking results than a brush. As always, the results you get when painting are proportional to what you put into it.
 
Painted my engine bay with a brush (3 size foam brushes actually)

results were great. just don't backbrush or apply too much. I used Centari paint matched.

Pictures here: https://home.comcast.net/~phantomracer/engine3/

Just painted
photo028.jpg


New motor in bay
photo001.jpg

Paul
 
Rattle cans of matching paint are available. The ones I got from Tower paint in Oshkosh were a perfect match and had one of those nozzles that twist to change the fan pattern. Not the big blasting spray you get with some hardware store paint so I think tight areas could be tackled w/o runs.

As noted, degreasing/prepping is critical however you paint.
 
Paul,

Couldn't resist a before and after motor compartment shot for my TR-6.

Mark
 

Attachments

  • 111139-OldMotorCompartment.jpg
    111139-OldMotorCompartment.jpg
    106.2 KB · Views: 327
Here is the after....

Mark
 

Attachments

  • 111140-NewEngCompt.jpg
    111140-NewEngCompt.jpg
    97.5 KB · Views: 315
Thanks Shannon, it's much easier to paint the motor compartment when the body is off the frame! Here is the finished engine compartment...

Mark
 

Attachments

  • 111191-Dec19-04.jpg
    111191-Dec19-04.jpg
    110.2 KB · Views: 298
Mark,
I like the authentic details, like the green coolant hoses. Looks GREAT!
 
Wow!

I'm very impressed by how good those engine bays look... makes me want to get out from behind the computer, out in the garage and work on the old TR!

Interesting that there are a number of different approaches to the problem, all apparantly giving good results.

Cheers!

Alan
 
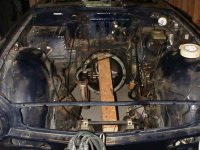
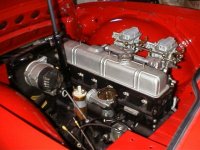
Both Phantomracer & mark have had great results, the engine bays look pristine. Many years ago there was an article in one of the British car mag's describing a home mechanics guide to painting his engine bay. I wish I could give the author credit but I can't find the article. Anyway to make a long story longer , this inspired me to transform my flatblack sprayed engine bay to the red color of the car. From tips in the article like using tin foil to protect parts not being sprayed & how to pull the wiring harness into the driver footwell, to primer tips from a bodyshop friend, you can achive remarkable results. Enough so that by using spray etching primer, base primer, three coats of Plastickote spray & two clear coats I took a first in class at a local LBC event. Like the author & the pro stated , "it's all in the preperation". The toughest part as you might guess is the sanding & old paint removal. Needless to say, my total cost with paint and materials was well under what a proffesional would have charged, about $100.00.
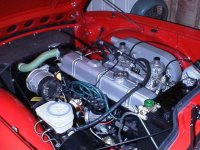
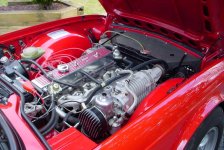
On most LBC's simply removing the carbs & manifold will give you plenty of room to work making the job much easier. This is a very satisfying project that really makes your eyes pop every time your hood is open. The only real problem is this generaly brings on Shipwrights disease & all heck breaks loose in the engine bay /ubbthreads/images/graemlins/cool.gif
 

Attachments

  • 111216-engbay1.jpg
    111216-engbay1.jpg
    111.1 KB · Views: 301
Who will notice the paint! It took me a long time to get my eyes off that enormous super charger.

It really looks like ashow car. I wish you would detail your unders hood paint rehab so I could dream about my next project.

Great job.
 
Jim,

It can be done, but on a TR-6 there are quite a few areas behind the engine and down along the sides where the body mounts to the frame that would be tough to get to. My paint job consisted of having the engine compartment media blasted and then pulling the body off the frame. My painter used urethane on the engine compartment, passenger compartment, and trunk area. The outside of the car is signal red base/clear. If you're careful and take your time, I'm sure you could do a good job with the motor still in. The key is it being free from any dirt/oil, or the paint won't stick for long! Good luck...

Mark
 
Thanks Vett,
I'll dig for the article & see if I can post it somewhere or just list the highlights.
By the way, the blower came free with the purchase of 20 cans of Plastickote /ubbthreads/images/graemlins/grin.gif
 
[ QUOTE ]
Anyone had any luck painting with the engine still installed?

[/ QUOTE ]

I painted my engine bay with the engine in place. See:
https://home.mindspring.com/~dklawson/minipics/EngineCompartment1.jpg
That's why I used the cheap Badger air brush... it's small. I used the same 2-componenet urethane as the rest of my top coat. As others have mentioned, remove what you can for better access. Perparation and masking is the key.
 
Back
Top