• Hi Guest!
    If you appreciate British Car Forum and our 25 years of supporting British car enthusiasts with technical and anicdotal information, collected from our thousands of great members, please support us with a low-cost subscription. You can become a supporting member for less than the dues of most car clubs.

    There are some perks with a member upgrade!
    **Upgrade Now**
    (PS: Subscribers don't see this gawd-aweful banner
Tips
Tips

brake/rotor question

Hawkscoach

Jedi Hopeful
Country flag
Offline
gentlemen,

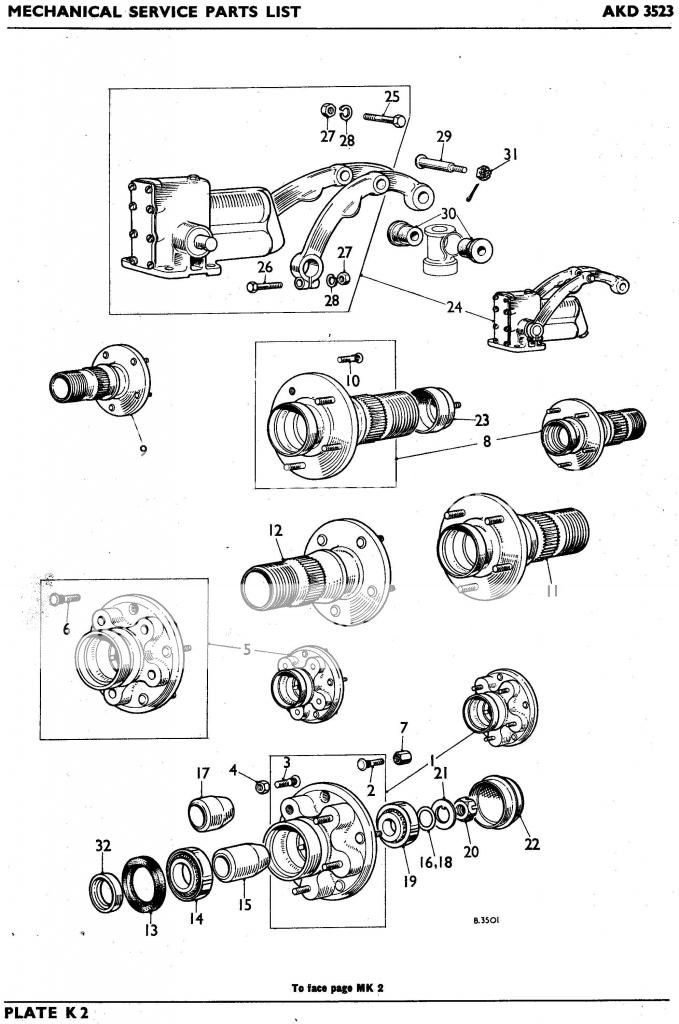
I was able to remove the dust cover (thanks to some previous advice from this site) using a small block of wood with a hole drilled through the center and a nut/bolt, some careful prying and out she came. guess i was lucky with this side. the cotter pin is a pain to remove, however, with some careful patience, it came out. I have NO IDEA how to put another back in? Anyway, my question is; to remove the nut inside, is this a reverse thread? or normal direction? It is tight and I didn't want to force it so I put it down last night and seek your direction..........thanks in advance.

Doug
 
Both sides are normal (right-hand) thread. There is a hole in the hub to allow insertion of a cotter. The torque spec for the nuts is broad (40-70lb-ft, I believe). I torque the nut as tight as I can with a slot lined up with the cotter hole. You couldn't overtighten these nuts unless you used an 8' wrench and stood on the end. If they're not tight enough the flatwasher can spin and make nasty noises (ask me how I know).
 
Doug

If it is not too late, look out for the shims when you get it all off, they will need to go back in and some minor adjustment to the shim thickness may be required if there is play after you tighten up. - Check this before you put the new split pin back in :wall:. The trick with the split pin is to make sure that the length is right to allow you to just spread it with a screw driver just below the nut.

:cheers:

Bob
 
Bob H

Not too late and a good call. this is my first time with the AH and the AH spindles. I knew there were shims in there somewhere so now I will be extra careful and pay better attention. Since this is a TOTAL restoration and I have the units off the car it is a bit easier. I would hate to have to do this in a hurry............ha!

Thanks again,

Doug
 
Do all the initial assembly / fitting dry then grease it up for the final.
 
thanks guys. I was able to disassemble one last night. No shims though??? The car had obviously been sitting for a long time prior to me so the outside of the rotor is a bit pitted, the inside looks good. I will see if they can turn it
 
Hey Hawks

Did you have a spacer in there?

The shims and spacer are there to take up any movement in the hub, on the axle, some British cars never bothered with them, relying on the castellated nut, washer with the lug on and the split pin to do the job, just backing of the nut one flange after tightening up then pop in the pin. Me - I would rather rely on the spacer and shims - if you have a dial guage you can put it together with a pack of shims - (you did not have any), and check the float, then reduce the shim pack by the amount of measured float. You do not want to use trial and error on this as it is a devil to get the shims on - well it was on my BJ7 anyway.

:cheers:

Bob
 
The purpose/necessity of the 'distance piece' (spacer) gets debated a lot (here we go again). Most American cars don't have them, either (I'm not aware of any that do, actually, making this one of those wonderful examples of British over-engineering in strange places). But, one thing I've never seen mentioned is that there is a second, inner spacer that fits over the machine radius at the base of the axle, which the grease/oil seal rides on. I believe this spacer is kept from rotating by pressure exerted on it by the shims, distance piece and the highly-torqued nut. Without the distance piece, there is nothing to keep the inner spacer from rotating due to friction from the seal which wouldn't, overall, be a good thing. Also, make sure this spacer doesn't have a significant groove worn in it; if so, it should be replaced else the seal can't seat properly and you'll sling grease on your rotors. Also too, it's tempting to pack the whole cavity of the inner bearing with grease, but it's not a good idea. Just pack the bearing properly; any more doesn't accomplish anything and could end up on the rotors.
 
Last edited:
The purpose/necessity of the 'distance piece' (spacer) gets debated a lot (here we go again). Most American cars don't have them, either (I'm not aware of any that do, actually, making this one of those wonderful examples of British over-engineering in strange places). But, one thing I've never seen mentioned is that there is a second, inner spacer that fits over the machine radius at the base of the axle, which the grease/oil seal rides on. I believe this spacer is kept from rotating by pressure exerted on it by the shims, distance piece and the highly-torqued nut. Without the distance piece, there is nothing to keep the inner spacer from rotating due to friction from the seal which wouldn't, overall, be a good thing. Also, make sure this spacer doesn't have a significant groove worn in it; if so, it should be replaced else the seal can't seat properly and you'll sling grease on your rotors. Also too, it's tempting to pack the whole cavity of the inner bearing with grease, but it's not a good idea. Just pack the bearing properly; any more doesn't accomplish anything and could end up on the rotors.
You're right, rarely if ever mentioned, but important nonetheless!

Here's one of those spacers, right on the top of this pile:

IMG_2216.jpg


And this is showing a spindle with it removed (notice the nice large radius on the stub-axle of this BJ8 piece):

IMG_2214.jpg


Bob,

Don't recall seeing such a spacer on my BJ7 and looked at the Moss catalog. I see a spacer listed for the late BJ8s, but not for the earlier cars. (#86 on this diagram: https://www.mossmotors.com/Shop/ViewProducts.aspx?PlateIndexID=28887#86) Is this what you're talking about?

I guess I'd have to go out and look, to see if it's integral with the earlier stub-axles, but the pictures above definitely show it to be loose on the BJ8...
 
Bob,

Don't recall seeing such a spacer on my BJ7 and looked at the Moss catalog. I see a spacer listed for the late BJ8s, but not for the earlier cars. (#86 on this diagram: https://www.mossmotors.com/Shop/ViewProducts.aspx?PlateIndexID=28887#86) Is this what you're talking about?

You're right, I don't see this part listed for earlier cars (just as well--they're $67.30 each!). Could have sworn our BN2 had them, but it's been a couple years since we assembled the front end on that car.
 
This is what I am talking about - item 15 was on the cars upto 17550 then it changed to 17 from 17551 to 26704.
Checking through the workshop manual for 100/6 to 3000 all cars had them in some shape or other and double checking against the specific manual for the BN4, BN6, BN7 and BT7, they all had them, if you do not have them then the PO has removed them to use the no shim option I guess.

Frontaxleexplodeddiagram014.jpg


:cheers:

Bob
 
This is great information guys. I was out of town this weekend for a game and came back to this surprise! Thank you. my car is a late 59 BN4 that came originally with drum fronts (I think). Somewhere in it's life, the discs were introduced and I would like to keep the discs (even though they may not be as originally ordered). The problem I anticipate is making sure any parts I replace are the correct application.

Regards,

Doug
 
ok, Im an idiot. After removing a ton of old grease, I found one shim ! only one though, on this side. I have not tackled the other side yet. It is amazing how a little cleaning can bring the parts back to looking good. I took the rotor to the shop today and as I suspected, it is too pitted to turn. The inside was good, however one small area on the outside looked like it sat in a puddle of water..............everything else looks good so I will be putting new rotors on my xmas list. Thanks again for the help and sorry about this parallel post. I didnt realize someone else had started a thread along a similar topic.

Doug
 
John Twist does a nice job of explaining the theory of the distance piece and shims and why the "no shim option" really isn't an option here:

https://www.youtube.com/watch?v=RJYIXZtnIiw

Its interesting that Healeys regularly have cracked stub axles and US-design axles don't (that I know of, correct me if I am wrong). Shot blasting of con-rods is done to put the surface in compression which reduced the ability of tiny cracks to propogate whereas the Healey style axle is permanently in tension from the tighness of the nut. I wonder if there is a relationship between the tension and cracking issue.

The front axles on my Ford are almost identical to the Healey but it uses US-style wheel bearings and cracking of stubs is unheard of. Notwithstanding that this may simply be because nobody bothers to crack test them. The down side of the US-style system is that the bearings constantly rotate on the shaft/axle as they are effectively just sitting there and the axles are noticeably worn on the underside after 55 years.

Andy.
 
I wonder if there is a relationship between the tension and cracking issue.

--YES- the distance piece and the spacer along with the specified "compression" torque for the nut forms a column. A column under compression is very strong. Failing to set the spindel up as specified in the shop manual leads to the cracking.

I'm referring to the spindle, not the items which are clamped. The stack of bearings and spacers is in compression because of the tension on the spindle/axle from tightening the nut and it is the axle/spindle that cracks.

Andy.
 
Back
Top