
-
 Hey Guest!
British Car Forum has been supporting enthusiasts for over 25 years by providing a great place to share our love for British cars. You can support our efforts by upgrading your membership for less than the dues of most car clubs. There are some perks with a member upgrade!**Upgrade Now**
(PS: Upgraded members don't see this banner, nor will you see the Google ads that appear on the site.)

Tips
- We have a special forum called "Member Articles" where you can submit actual articles for consideration for publication. Learn More
- Don't have an Avatar? If not, your avatar will default to the 1st character in your username. Go into "Account Details" to change your Avatar.
- Some basic forum navigation info: click
 Hey - did you know if you click on the title of a thread it will take you to the first unread post since you last visited that thread?
- Hey Guest - Is your British Car Club in our Clubs database? If not, send me a PM - Basil

- Looking for a local club? Click the "Clubs" tab above and browse hundreds of clubs world-wide.
- Add Android or iPhone APP: click
- Did you know - any picture or video you add in your posts in any marque-specific forum will also get added to the Media Gallery automatically.
- A few more tips about posting and replying: click
- Hey there Guest - be sure to keep your profile page up to date with interesting info about yourself: learn more
- More tips and tricks on Posting and Replying: click
 but were afraid to ask:
  STOP!! Never post your email address in open forums. Bots can "harvest" your email! If you must share your email use a Private Message or use the
  smilie in place of the real @
- Want to mention another member in a post & get their attention? WATCH THIS

- So, you created a "Group" here at BCF and would like to invite other members to join? Watch this!
- Hey Guest - A post a day keeps Basil from visiting you in the small hours and putting a bat up your nightdress!
- Hey Guest - do you know of an upcoming British car event?
 Pretty Please - add it to our Events forum(s) and add to the calendar! >> Here's How <<
- Hey Guest - you be stylin' Change the look and feel of the forum to fit your taste. Check it out
- If you run across an inappropriate post, for example a post that breaks our rules or looks like it might be spam, you can report the post to the moderators: Learn More
- If you would like to try some different "looks" or styles for the site, scroll to the very bottom, on the left and click the Style Selector.
You are using an out of date browser. It may not display this or other websites correctly.
You should upgrade or use an alternative browser.
You should upgrade or use an alternative browser.
Brake line routing
- Thread starter Rut
- Start date
Jim_Gruber
Yoda
Offline

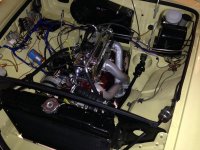
 Ask and you shall receive. Now this may not be exactly stock routing but I saved these for reference.
Jim_Gruber
Yoda
Offline
A few more from Bugsy III the Parts BE I Sold. Pretty much all was as original including the mouse remnants.


Keith_M
Jedi Knight
Offline
Thanks Jim; these are really helpful. The routing looks very similar to my '65 Sprite, so I'm thinking I can use it as a template. One question though. What is the thing with the knob on the top next to the brake light switch on the black car? Also, I note that on the black car, the clutch line runs on the left side of the drivetrain, while on the other car it runs along the firewall and down the right side. I think the latter is the correct routing?
Keith
Keith
Jim_Gruber
Yoda
Offline
And thus it will be for Bugsy II. Glad I know that before I routed clutch lines. A 5 speed for Bugsy II.
Stock Bugeye ran clutch across the fire wall. When they went to the duel master for brakes they moved the clutch by the battery.
Bill, the BE ran the two lines across the bulk head as Jim's pictures show while mid 60's spridgets ran the clutch line by the battery.
Kurt.
The_architect
Jedi Trainee
Offline
Alan, on your clutch pipe, is that a hose on the end? I'm putting a five-speed in my Bugeye and have been puzzling out where I will run the line, and feed the slave cylinder. Right now on my ribcase I simply have the typical hardline with the line coiled near the end attached to the slave. I have not been sure if I should add the hose when I route to to the other side. Any thoughts, anyone? I changed the pipe to a copper/nickel one a few years ago.
Last edited:
Jim_Gruber
Yoda
Offline
Rut on a 1275 the hardline goes to a bracket mounted on the frame rail and bakes a transition to a rubber hose. That would be my plan for Bugsy w 5 speed but again slave needs to go on a different side than w a Ribcase.
OP
Rut
Obi Wan
Offline
The clutch line will have to wait until I drop my engine and transmission in, but I'll make up a combination of hard line and hose for the 5 speed. I installed a remote bleeder on my MGB and it makes bleeding very simple and I may do the same on the Bugeye...it's located in the upper left next to the firewall.
Rut
Rut
Attachments
The_architect
Jedi Trainee
Offline
Very cool. I wonder, is it possible to avoid rebleeding my slave by simply moving it from one side to the other without taking it off the hardline? I know that I bled it before actually bolting it onto the transmission when I replaced the slave, master and the line, and that worked pretty well too.
BlueMax
Jedi Warrior
Offline
I fabricated a through hole bracket welded to frame. I hard pipe the tubing from master cylinder down to bracket having a female fitting at the bracket end. I then use a Teflon stainless steel braded male nipple hose through bracket with a jam lock nut on opposite side. At the slave cylinder end the hose has a banjo fitting attached to an E type Jaguar 7/8” slave cylinder. I attached the banjo fitting to bottom of slave with a hollow bolt and two copper washers mounted to an aluminum bracket to allow slave cylinder pushrod a straight line to center of clutch lever on transmission. For the bleed port on the slave cylinder, I use a male nipple Teflon stainless braded tubing attached to a fabricated bracket at one of the bell housings bolts for remote bleeding. If you look close straight back from heater valve you can see the bleed valve.


Last edited:
Charles, the first thing you need to do is decide what master cylinder and slave combination you are going to use. You won't be able to use the stock Brit slave cylinder without modification or Gerards mount. Rivergate is now making a slave up but used to use the Datsun slave off of a 620 if I remember correctly. The Datsun master was only 5/8 bore and when you try to match the Datsun slave to a British Master of 3/4 or 7/8 you can come up with pretty hard clutch pedal pressure.
The line feeding it works fine with the early coil...that's what I'm running on my Midget. I have the stock Datsun clutch on a Datsun engine and I used the 1098 slave with the 3/4 Master. The slave ends up inverted when you change sides so that the bleed nipple is on the bottom and therefore impossible to bleed. I bled it before I fitted it and never got all the air out so I am going to force fluid through from the bottom with a syringe to get the last of the air out before driving season.
Hope this help's
Kurt.
OP
Rut
Obi Wan
Offline
The remote bleeder is a really neat idea and I can't remember where I saw it first. On the Bugeye I'll do something a little differently...ill route the remote bleeder back to the master cylinder reservoir. That way I'll be able to pump that clutch pedal to my hearts content!
Rut
Rut
BlueMax
Jedi Warrior
Offline
Thank you Nomad, they make 2 Jaguar slave cylinders, one is short and one is long. I used the short one, but I had to mill the ears out to fit the bolt pattern for the Datsun transmission.
As far as bleeding, being that the feed line is on the bottom and the bleeder is on the top makes it easy for the bubbles to exit quickly. I had the system bleed with a half dozen pumps and that was it.
As far as bleeding, being that the feed line is on the bottom and the bleeder is on the top makes it easy for the bubbles to exit quickly. I had the system bleed with a half dozen pumps and that was it.