• Hi Guest!
    You can help ensure that British Car Forum (BCF) continues to provide a great place to engage in the British car hobby! If you find BCF a beneficial community, please consider supporting our efforts with a subscription.

    There are some perks with a member upgrade!
    **Upgrade Now**
    (PS: Subscribers don't see this gawd-aweful banner
Tips
Tips

Brake Drum Help - 60 Sprite

Mike -

As mentioned, there is only one rear flex hose, and it is located near the rear differential. It runs from the rear union mounted on the passenger side of the differential to the bulkhead. Just follow the hard line from either rear brake cylinder and it will take you to the union and flex hose. Since you are going to open up the brake system, I would encourage you to change the rear hose and both front hoses with the stainless steel braided hoses. I have drums on all four corners, and the stainless steel wrapped hoses give me a solid pedal feel.

I also agree with Trevor. Might as well put in all new consumables while you have it open. Just remember on the rear that if you are going to change the axle gasket and o-ring and the hub seal, either drain the rear end, or only jack up one side at a time so the rear differential fluid doesn't run out the axle tube opening.
 
Thanks guys! All top notch advise and info. Going to have to really consider time / effort vs getting to actually drive the car... I've put all of 1 mile on him so far... I know, I know... Do it right and then drive the heck out of it.

The brakes I feel pretty confident about changing out.... About the axle gasket, o-ring and hub seal.... how technically difficult on a scale of 1 - 10? Any special tools or presses needed?
 
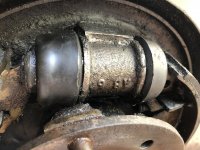
Cleaned up the brakes a bit more... Noticed that the front shoe was out of it's seat in the cylinder. You can see that in the earlier pic.. the slightly blurry one. Doesn't really change anything, just a curious thing. I'm attaching a couple more pics just for verification of a couple things.....
One pic shows the cleaned up cylinder. Do those numbers on the side help in getting the replacement in any way?
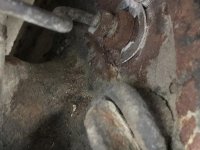
2nd pic shows the clip on the opposite side. Is that an e-clip? Doesn't look like a snap ring to me.... help me get the right tool, please.
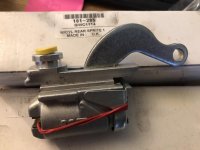
3rd pic shows a couple rear cylinders that came with the car... I'm assuming these are the wrong ones, as they don't look at all like what's on there.... Are these mk1 original brake cylinders by any chance?
Also... when I squeezed on the rubber boot on the end of the cylinder while cleaning it, I could hear air whistle out a hole, and some remaining fluid came out... so I think I can confirm the cylinder as the leak.
Thanks!
 
here are the pics
IMG_0623.jpgIMG_0622.jpgIMG_0626.jpg
 
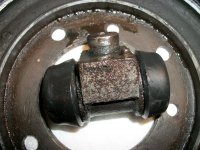
One Wheel Cylinder Removed! I know it's no big deal for you guys.... but a big step forward for this guy! Does it just pull apart to get in there and get the bore measurement?
101_0047.jpg
 
Those aren't the correct Wheel Cylinders for the axles and backing plates you have on your car. And yes these Wheel Cylinder use an E-Clip. Yes you can use a Circlip and a Wavy Washer but I never found a Circlip thick enough that I wanted to trust my life to it. The e Clips are bastards to install without a proper tool. Be sure and use lots of PB Blaster over multiple days on that Brake Line Thread before you try to loosen it.
 
Measure the bore diameter with a ruler. They are either 3/4 or 7/8.
 
Took apart the cylinder this morning... 7/8 inch bore. Definitely damaged from the unseating of the shoe. I think I may be missing the upper return spring, which would explain a lot. There should be a top spring, I'm assuming. I'll pull the other side next to see what it looks like... in the meantime.....
Can someone see if this diagram, https://mossmotors.com/mg-midget-austin-healey-sprite/on-sale-now/rear-brakes-late-948-1500 , seems to match my brakes. I think it does.. it's from Moss and is labeled 'late 948 - 1500'... same diagram used for midget and sprite, so I assume they were the same thru those years. Seems to my novice eye to be what I have. I'd like to order parts today but would appreciate a second opinion....
I'm going to do the shoes, drums, wheel cylinders and all three soft lines, and of course inspecting the front brakes as I do the lines.
Thanks,
M
 
Looking at that page (and it is the correct page for your brake setup) I see there is also an 11/16" bore wheel cylinder. So my above post is not accurate. Better recheck yours.

I'd still go ahead and order wheel bearing seals, gaskets, and o-rings. That job can be done without special tools (except maybe a large socket). It requires a bit of creativity to get the bearing and seal out of the housing, but worth the frustration knowing that your new shoes are not going to get soaked with gear oil.
 
Mike,
I concur with Trevor and doing everything now will hopefully prevent you from having to pull it all apart to do the bearings and seals. It’s not a hard or expensive job to do and you’ll know that it’s all in good shape once done.
Rut
 
Bearings, seals, gasket, and o-ring were the same, but there are some variations in other aspects of the axles.
 
You’ll need a 1 7/8” socket to get the rear hub nut off which is a LH thread in one side and RH nut on the other. Tractor Supply or other similiar store will have for less than $10. I’d order axle seal gasket, new nuts again 1 LH and 1 RH, as well as locking tabs and a tube of Hylomar Sealant. Also new locking screws 3 per side, they get buggered up removing them. You’ll need 4 large nuts that can fit over lug nut screws that you can use to tighten down and press the axle seal/O ring together. Same nuts you can use to pull that wheel stud back into place. Once Hylomar and seal has set up, you can insert the locking screws to hold it in place.
 
Mike -

Yep. That's the kit you heed. One kit per side. Just another note: I struggled for quite awhile with a leaking rear axle. I changed seals, gaskets, o-rings at least twice and still had rear end lube seeping out of the axle/hub joint. Someone, either on this forum or another forum pointed out that the gaskets provided by the usual vendors are too thick and the rear bearing will not be held firm in the hub. Not quite sure why, but a thinner gasket solved the problem.

I used the vendor supplied gasket as a template, and cut a gasket out of a grocery brown paper bag. Did this on both the Bugeye and Big Healey. No more leaks.
 
The last gaskets I ordered from moss (a few weeks ago) were the correct thinness.
 
Parts should be here tonight. Everyone has suggested I do the bearings and oil seal and I'd really like to, but I'm less confident. If you guys could look over my list of steps below, and let me know if I have a grasp on the job, I'd appreciate it! I just went out and the set screw in the hub turned out easily. Pulled on the hub and was surprise to see the half axle pull right out..... then I could see the bearings in the hub behind it, and the hub assembly nut. So I kind of get how it all sits in there. I just bumbled around until the shaft went back into place... didn't remove the whole thing...

So... please comment, add, remove, alter, etc. as needed.... all advice appreciated. Keep in mind.. no arbor press available... not even a work bench really... working on the floor of my garage building.

1) Take off the brakes and springs
2) Remove the hub retaining nut
3) Remove the hub assembly (or can the bearings come out whilst on the car?)
4) Tease out the bearing while being careful not to bugger up the metal inside the hub.
5) Take out Oil seal
6) Use the old bearing and light tapping to press the new bearing to place ... Not sure where the oil seal goes, but I'll figure out that as I take it apart, I assume.
7) Hub assembly with new bearings back into place, nut back on, brake hub back on, brakes...
8) Oh... and the new paper-thin gasket... that's between the bearing assembly and the brake hub?

Thanks!
Mike
 
These cars have a semi-floating axle.
1. Remove brake drum
2. Remove two posi-drive (similar to philips) screws that retain the axle.
3. Remove the axle (might need the split it from the hub by tapping a small screw driver at the interface).
4. unfold lock tab that holds the axle nut.
5. undo the nut (passenger side is counterclockwise, and driver side is clockwise), and remove the washer
6 hub must now be pulled off the axle tube. This may require creativity. Often you can turn the drum around backwards and start the four nuts then slide the drum of the studs like a slide hammer.
7. Install new brakes.
8. If you have new bearings you can drive out the old ones or press them out. If you get stumped here, ask and we can share some creative solutions.
9. Remove the seal. You might need to buy a seal puller they are usually pretty tight.
10. Clean the hub thoroughly
11. install new seal the "open" side of the seal will face the bearing. Be sure the seal is completely seated.
12 . lightly grease the bearing.
13 . press the bearing into place, or carefully drive it in (be sure to keep it square as it is fit into place)
14 . clean the axle tube and reinstall the hub. Might require some light taps, but nothing excessive.
15. Install the washer, clean both sets of threads with some brake cleaner.
16. put some blue loctite on the threads and install the nut torque to about 125 ft-lbs. If your breaker bar is 2 feet long then you need to lean approx sixty pounds on it.
17. refold the washer to lock the nut in place.
18. clean the face of the hub and seat the o-ring.
19. install some gasket dressing on the gasket and put it in place
20. install the axle, the little retaining screws and the drum and wheel and tighten it down.

Others will hopefully correct my steps, but I will tell you that I have done this job in the parking lot of an autoparts store once, it is not too daunting once you get in there and see how it all fits together.
 
Hey Trevor! Thanks for the detailed description... exactly what I needed. I think I can follow it all. One question to start with......
I need to install the new brakes after taking off the hub? Does it have to be that way? Seems like if you can change the brakes alone, it wouldn't be necessary to do it while the hub and all is off. Is it just easier than after it's all back together? I failed to order the shoes. Ugh... it will be mid next week before the brakes are here but I have all weekend to play with the bearings and get the soft lines changed.....
 
The hubs do not need to be off to do the brakes, it is just easier and the order in which I do them if I'm doing the whole shebang. But you could certainly get the hubs sorted and come back and do the brakes afterwards.
 
Back
Top