• Hi Guest!
    You can help ensure that British Car Forum (BCF) continues to provide a great place to engage in the British car hobby! If you find BCF a beneficial community, please consider supporting our efforts with a subscription.

    There are some perks with a member upgrade!
    **Upgrade Now**
    (PS: Subscribers don't see this gawd-aweful banner
Tips
Tips

Brake/Clutch pedal adjustment

CJD

Yoda
Country flag
Offline
Hey guys,

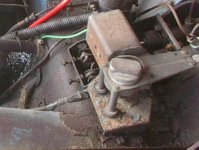
I am having trouble deciphering the manual on pedal adjustment. The manual goes into a detailed instruction, which mainly concerns setting the pedal stops. The trouble is, my TR3A has no pedal stops.

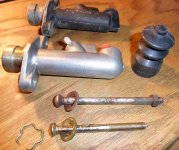
The pushrods are captured in the master cylinders by snap rings. The book says to set .030" play between the pushod and the piston, which will give 1/2" play at the pedals. The deal is, if you shorten the adjustment, the max play is limited by the snap ring to about .024", or about 3/8" at the pedals. If you continue to shorten the adjustment, all you get is a lower pedal resting position. In other words, the adjustment makes no change to the freeplay...it only changes the resting position of the pedals.

So, how is this supposed to work? I assume on the later systems, like this, you must set the pedal height with the adjustment...instead of "free play"...as described in the manual? So then the question is, what is the pedal height I am looking for?

Thanks,


John
 
Right. No need to adjust stops that aren't there. Basically all of chapter R is for earlier cars with Lockheed brakes; the chapter on Girling brakes says nothing about pedal adjustment (even though very early Girling cars did have stops).

So, set the pedal height where it works for you, let it go at that. I like them pretty high, so I can sit farther away from the steering wheel.
 
Thanks Randall. This question sat un-answered for a week on another forum, but you answered it in 5 minutes here. I've found a new home!

John
 
CJD said:
Thanks Randall. This question sat un-answered for a week on another forum

There's another forum?
 
:lol:

...not really.... :devilgrin:
 
John,
Welcome and enjoy
 
CJD welcome and I've tried them all there is no other!
 
On the TR 3A there are holes in the pedal base lip for 5/16 " stop bolts to be fitted right behind the pivot end of the pedal where the pushrod attaches . This is the pedal stop you are looking for. You can adjust the free play out of the pedal by lengthening the bolt which pushes the pushrod into the cylinder. You DO NOT want to rely on the snap ring to limit the resting position of the brake pedal. You want the bolt to do that. If not sudden release of the pedal can pull the pushrod into the snapring and unseat it, bringing the internals out of the master cylinder with it. Not something you want to have happen on your brakes. On these cars not everything is in the shop manual. If you want I can take a picture on my car. Kevin
 
Wow, someone up there must like me; I've only covered over 200,000 miles without those pedal stops (mostly in Los Angeles area traffic) and never had a problem. And just think of all those TR4 drivers with essentially the same circlip and no place to put a stop! Seems like the factory didn't know the risks either
 

Attachments

  • 24199.gif
    24199.gif
    45.7 KB · Views: 412
Good info.

Kevin, I saw those holes in the pedal box and figured they were probably for the missing limit stops. Like you, I was concerned about the snap ring groove taking the pressure from fast clutch releases. Not so much the brake, as the travel is much less. For the stops, did the factory cover the ends of the bolts with a rubber cap or anything? I assume, from the tech order Randall provided, that the cylinder can take it...but I also hate to assume to much!?!

The other thing that had me concerned was how the piston bottoms in the master cylinder. The brake will never bottom, unless something is broke and leaking...but the clutch bottoms most of the time. When I rebuilt the cylinders, the little reverse pressure valve did not look very sturdy. I cannot visualize what part of the piston strikes what part of the cylinder when it bottoms in travel, but it looked like it was the piston hitting the valve. Is there any chance of the valve getting beat up from being pounded by the main piston when it bottoms? I was considering setting the pedal so it would bottom on the floor right before the master cylinders bottomed in travel.

I know I am reading a lot into a simple adjustment...thanks to all for humoring me.
 
Here's a shot of a late TR3, showing the stops. This pedal box still has the captive nuts for the stops; if you have a later pedal box without the nuts, you'll need to add flat washers to cover the holes.
 

Attachments

  • 24200.jpg
    24200.jpg
    63.3 KB · Views: 370
Interesting topic. I always wondered what the correct adjustment was for those stops. i think I even had one stop missing when I started my resto.Anyone know how far the adjustment bolts should be turned in or what the proper clearance between the stop and and pedal end or brake and clutch should be?
 
It's very important that the MC pushrod be allowed to come all the way out and not be held partially depressed. It is only the last little bit of movement that opens the valve between the MC and reservoir. If that valve does not open, the brakes may appear to work normally at first, but as the fluid warms up it will expand and, being unable to return to the reservoir, cause the brakes to drag (which heats the fluid, causing more expansion, etc).

So, the same TSB that I partially copied above specifies 1/8" to 1/4" freeplay at the MC. I adjusted mine (on the 56) so the pushrod comes out against the washer & circlip, but there is only .010" or so of pedal movement before it takes up the play in the clevis & pin.

FWIW, I had this problem happen on a Stag once (due to binding inside the MC rather than pedal misadjustment). A friend of mine was driving at the time while I napped. When he finally realized there was a problem and woke me up, I could literally see the light from the glowing rotors shining out on the pavement! He was complaining of lack of power from the engine, and my first thought was that it was on fire
icon_eek.gif


But fortunately it wasn't, and after bleeding some fluid out at the MC, we were able to continue on our odyssey. The front brakes still worked OK, which was a Good Thing because I had already disconnected the rear brakes (to get us home after they had seized on).

But next time I buy a Triumph from 1500 miles away, I'm bringing it home on a trailer, no matter what the PO says about how reliable it is!
 
I took some pictures today but my set up looks like the one Randell posted . I used 3/8" NF bolts with thinner jamb nuts. Yes that's what we like about Triumph engineering. I never bothered with how far the piston travelled before bottomming or if it bottoms with pedal travel or is it the pedal stopping on something else? Kevin
 
I've been meaning to look at my replacement MCs since Frank posted a bit back. But I did notice that when I got my car, it had no stop bolts (yes, I had to look at my old pictures). With the MC's installed with the fork on the end, it seemed I needed longer stop bolts. Taking the MC apart, I see the push rod on the replacements are about 3/4" shorter than the 'original' ones. (I can't get the Girling apart, and the pipe threads are stripped anyway.) I popped out the new piston and compared it to Franks previous post, and it looks more like the Girling innards -but I can't be sure. I purchased these 'no-name MCs' off ebay about 6 months ago. Do you think I can assume my only issue is the wrong push rod and I can just use the 'original' ones? -I still have a lot of work to do before the body goes back on, but I'm picking away everywhere...
 

Attachments

  • 24215.jpg
    24215.jpg
    62.8 KB · Views: 330
I would not ass/u/me anything, but do everything I could to check it out. However, I'd say there is a good chance it will be OK with the longer pushrod. Are the bore sizes the same?
 
Back
Top