• Hi Guest!
    You can help ensure that British Car Forum (BCF) continues to provide a great place to engage in the British car hobby! If you find BCF a beneficial community, please consider supporting our efforts with a subscription.

    There are some perks with a member upgrade!
    **Upgrade Now**
    (PS: Subscribers don't see this gawd-aweful banner
Tips
Tips

Brake/Clutch pedal adjustment

Thanks, Randall. I try not to assume...

I can't get either of the 'originals' apart, but as close as I can see with my eye, they are the same size.
 
TexasKnucklehead said:
I can't get either of the 'originals' apart,
My "never fail" method :

Get some "jet spray" carb cleaner with the long tube. Stick the tube into the hole in one of the fittings and squirt some carb cleaner inside. Block both holes with suitable bolts & nuts (maybe a copper washer if you have one). Clamp one of the cylinder ears in a vise, making sure the open end is pointed away from anything fragile (preferably straight up). Put on some good eye protection, then start heating the cylinder with a propane torch. Nothing will happen at first, so just be patient and keep playing the flame all around the body of the cylinder. Eventually the piston will pop out; potentially with a lot of force if it was really badly stuck.

I usually don't, but it is possible you could get a flash of flame when it pops apart (carb cleaner is flammable). It will instantly burn itself out though, so just don't panic and it will be fine.

The heat increases the clearance between the bore and the piston, thereby reducing the damage to the bore compared with other methods. Although they were badly stuck, I was able to reuse both MCs from the 56 (although I had to use one of the pistons from the 59, as the original is still up in the rafters somewhere
grin.gif
)

There are other, less exciting methods. I believe Bob Schaller showed how to drill and tap a bolt for a zerk fitting, so you could use grease pressure to force the piston out. But where's the fun in that? :devilgrin:
 
TR3driver said:
But where's the fun in that? :devilgrin:

Your "never fail" method is "sure fire" and almost "fool proof".
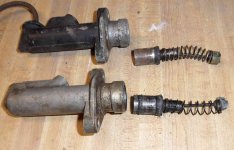
I used the same tool I made for brake piston removal (inner tube air valve soldered to an old brake hose fitting) to get 120lbs of air pressure first, with the other line blocked -two copper washers were required or it would just flame up at the leaks. I had nearly given up on the second MC but after it sat heated for a few minutes, it came out with a bang. (I had a plastic pitcher behind the vice to catch it, and it knocked it completely over.) That turned out to be a lot of effort to be able to say "yes, they are the same size".

But, along the way I noticed something else. Both 'original' MCs say "GIRLING" on them, but not in the same place. There are subtle casing differences. One also says 75. One says "D8 310680" and the other says "310680-01". The piston in one has two rubber seals, while the other has only one. No telling what was changed when.

I think I'll just clean-up the 'original' push rods and use them with the new replacement MCs.

...and sorry for dragging this thread off topic a little, but the wrong length push rods might screw up any attempt at a stop.
 

Attachments

  • 24222.jpg
    24222.jpg
    64.9 KB · Views: 236
Hey...there's another good question in your last photo:

The new replacement cylinders do not have the secondary rubber seal, or even a slot for the seal. When I rebuilt my original Girlings, they both had the slot for the secondary seals...but the seals were not there. I found that odd. Is there a reason someone would rebuild the originals and leave out the secondaries? Of course I used secondaries in my rebuild...
 
My guess is the 'secondary seal' is just an o-ring to try to keep the surface clean and maybe last longer. I don't think it should ever see brake fluid. But I'm only assuming, and we all know what that means...
 
The upper cylinder is a later replacement. Made by Girling, but not quite the same as the originals. The lower one looks like it could be original.

I couldn't find the reference when I went looking a few days ago. But as I recall, either Girling or Triumph said to remove the O-ring if it was present, and that it was not included in the service kits. No reason given.
 
Just my luck...it came in the Moss rebuild kit, so I put it in. I'm thinking along the lines of the Jedi...if Triumph said to leave it out, it was likely because it would go dry and cause the piston to stick. Guess I'll call Moss and see if they have a spin on it...then decide if I need to take everything apart and remove them!?!

Randall, is there a source for these bulletins? It sounds like I need to browse them to see if there are any other things the manual doesn't cover.

John
 
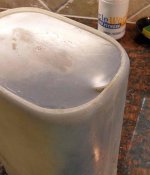
Just to show how hard the piston flew out of the MC, check out the bottom of the pitcher. It almost punched a hole through it!
 

Attachments

  • 24224.jpg
    24224.jpg
    66.6 KB · Views: 206
CJD said:
Randall, is there a source for these bulletins? It sounds like I need to browse them to see if there are any other things the manual doesn't cover.
I find them very interesting, although most of them aren't very helpful today. Unfortunately there is no single source with all of them, AFAIK. I've been collecting all I could find for several years, but I certainly don't have them all yet. Apparently even the factory never made a collection of them, they were just sent out to dealers as issues arose. Evidently they didn't even necessarily go to all dealers, sometimes it was just a specific region.

Try the Triumphs Only website, they used to have a collection of (retyped) bulletins there. I think there is another set on Teriann Wakeman's site. Couple more on Dan Buettner's site I think. And I've got an inch-high stack of photocopies that I've been meaning to scan for a long time (but haven't found that particular round tuit yet).

But I found the reference for removing the extra seal, and it wasn't one of the factory bulletins. Instead it was the instructions from Girling packed with a MC rebuild kit. I'll try to scan it later tonight.

PS, there were also a lot of technical articles in the TSOA newsletters that can mostly be found here https://www.templeoftriumph.org/tsoa/tsoa.html
 
Thanks again Randall. I got a ton of them off Wakemann's site. They have sketches that explain a lot of things that changed from the service manual. They will be a huge help as I reassemble this thing!
 
Back
Top