-
 Hey Guest!
British Car Forum has been supporting enthusiasts for over 25 years by providing a great place to share our love for British cars. You can support our efforts by upgrading your membership for less than the dues of most car clubs. There are some perks with a member upgrade!**Upgrade Now**
(PS: Upgraded members don't see this banner, nor will you see the Google ads that appear on the site.)

Tips
- We have a special forum called "Member Articles" where you can submit actual articles for consideration for publication. Learn More
- Don't have an Avatar? If not, your avatar will default to the 1st character in your username. Go into "Account Details" to change your Avatar.
- Some basic forum navigation info: click
 Hey - did you know if you click on the title of a thread it will take you to the first unread post since you last visited that thread?
- Hey Guest - Is your British Car Club in our Clubs database? If not, send me a PM - Basil

- Looking for a local club? Click the "Clubs" tab above and browse hundreds of clubs world-wide.
- Add Android or iPhone APP: click
- Did you know - any picture or video you add in your posts in any marque-specific forum will also get added to the Media Gallery automatically.
- A few more tips about posting and replying: click
- Hey there Guest - be sure to keep your profile page up to date with interesting info about yourself: learn more
- More tips and tricks on Posting and Replying: click
 but were afraid to ask:
  STOP!! Never post your email address in open forums. Bots can "harvest" your email! If you must share your email use a Private Message or use the
  smilie in place of the real @
- Want to mention another member in a post & get their attention? WATCH THIS

- So, you created a "Group" here at BCF and would like to invite other members to join? Watch this!
- Hey Guest - A post a day keeps Basil from visiting you in the small hours and putting a bat up your nightdress!
- Hey Guest - do you know of an upcoming British car event?
 Pretty Please - add it to our Events forum(s) and add to the calendar! >> Here's How <<
- Hey Guest - you be stylin' Change the look and feel of the forum to fit your taste. Check it out
- If you run across an inappropriate post, for example a post that breaks our rules or looks like it might be spam, you can report the post to the moderators: Learn More
- If you would like to try some different "looks" or styles for the site, scroll to the very bottom, on the left and click the Style Selector.
You are using an out of date browser. It may not display this or other websites correctly.
You should upgrade or use an alternative browser.
You should upgrade or use an alternative browser.
TR6 Brake Bleeding
- Thread starter Govtslug
- Start date
Tybalt
Jedi Warrior
Offline
It's hard to say with certainty but possible. More than once a seal that has seen better days is pushed over the edge when things get flushed and the sludge that had been helping to hold things together departs that serene scene as part of the system flush. Besides, if the fluid was dark and dirty, some of that dark and dirty is colloidally suspended rubber bitsmaybe my flushing with new fluid pushed the master over the edge? Ugh. I hate throwing parts at it but I think that’s my next step.
I asked about the pedal travel on pumping since my experience is that the travel will typically shorten when the MC is bypassing internally but the operative word is "typically." It's not as sure a thing on a twin circuit MC as it is on a single circuit MC.
D
Deleted member 12064
Guest
Guest
Offline
What you are describing sounds like air in the system. Easy to do using the 2 person method. The pressure from the MC method works best, but you still need someone at each wheel. I went with speed bleeders and a mityvac for a one person method, only concern is keeping the MC full doing the bleed.
OP
Govtslug
Member
Offline
Again, thanks for all the advice! I’m leaning toward a MC problem. One more question - from the first time I bled the brakes, the fluid just never flowed strong out of the rears. Completely different from the front where I had a good strong stream. I wonder if that might also indicate a problem with the rear chamber of the MC at least?
Any tips on the MC replacement? Do I need to prime the MC first or just install it, fill the reservoir and start bleeding?
govtslug
Any tips on the MC replacement? Do I need to prime the MC first or just install it, fill the reservoir and start bleeding?
govtslug
Tybalt
Jedi Warrior
Offline
I've been meaning to ask and keep forgetting, what was your bleeding sequence by corner with references to right and left facing forward from the rear of the car?
As for the MC replacement, I've put them on dry and I have bench bled prior to fitting and had it work both ways. Putting it on dry makes the bleeding a bit more of a hassle but it won't be dribbling any brake fluid while fitting stuff up. If you do bench bleed first, make sure that you have the fender and the bits below the mater cylinder covered with something to absorb any brake fluid drips, it is an excellent paint remover. If you do get some brake fluid dribbles, pull that cover and grab another to replace it. Even when fitting dry,
I always placed something below the MC on that just in case there was a leak at one of the brake pipes at the MC. I've only had that happen once and when pulled, I notices a nick in the pipe's tip so I either I nicked it during the removal process or it was perhaps some burr in the MC being replaced that caused the nick. In any event, a short piece of tubing and a few minutes later a replacement was made and the leak taken care of.
The paint remover bit is a moot point if you are using a DOT 5 grade silicon based brake fluid, but then it comes with its own set of potential pitfalls. Further adding to the confusion, while DOT 5 brake fluid is a polydimethylsiloxane based fluid with various company proprietary additives, DOT 5.1 is an glycol ester based fluid like DOT 3 or DOT 4 brake fluid and will eat up paint.
Tybalt
Jedi Warrior
Offline
Glad to see that answer, just took me forever to remember to ask.
As for the fluid flow differential front to rear, it has to do with the design of the system and the MC. On the previous page one of the things mentioned for causing a "long pedal" was improperly set front wheel bearings causing knock back of the pads and caliper pistons behind them. Even when properly adjusted there is still some knock back and to compensate for this and the relative amount of fluid that needs to be moved on each circuit for things to work, the MC uses two different bore sizes. Oriented toward the front of the car, the rear circuit uses a smaller diameter bore which doesn't move as much fluid. The reason is that with the drum brakes the return springs for the brake shoes pull things in to a set position and seat the much smaller rear cylinder pistons, one piston per side, into place so the system does not have to move as much fluid for things to work properly.
The front circuit which is oriented toward the rear of the car is a larger diameter. Since there are no return springs for pads and caliper pistons to work with along with the much larger piston size and two pistons per side, the front circuit needs to move much more fluid to get the front brakes to work properly.
On my TR6 I have done the Toyota four piston front caliper conversion along with the .875" diameter (stock is .700" except for some very late ones where ,750" cylinders were used) rear wheel cylinder conversion which results in a "long pedal" simply because of the increased amount of fluid that has to be moved to get things to work with the stock MC. Since it is primarily driven by the front calipers, I have fitted a very low pressure residual pressure valve which effectively acts as a mild spring to minimize the knock back and somewhat shorten up that "long pedal." I have been toying with the idea of changing over to a Jag XJ MC of similar design but larger bores on both circuits or just going to twin single MCs with a balance bar and punting the servo unit. I had been toying with/working on how to build that set up, but then Richard Good turned around and started offering one and I don't see how I can build my own for any less money that what he charges and it would be a lot less work to do that compared to sourcing all the bits and fabricating the mount stuff to make it all work. I'm still torn on what I want to do there and haven't done anything on that yet.
Tybalt
Jedi Warrior
Offline
Error correction time, see bolded text abovefrom post #38 ....
6) Have you taken a look at the brake pedal, the servo pushrod (TR PN 516891) and the clevis pin that attach to the brake pedal to check for wear (hole elongation on the pushrod and/or brake pedal, and wear on the diameter of the clevis pin)? Excessive wear on these items can cause a long pedal thanks to pedal lever effect on relative travel between the pedal pad and the servo push rod (~a 4:1 ratio). I think this is probably the unlikeliest of the bunch, but have seen it before. While the clevis pin is readily available, it looks like the pushrod is NLS as a serviceable part from the usual supplier suspects both in the US and the UK. I have seen pushrods repaired by welding washers to them and using a longer clevis pin but note that will probably require dismantling of the servo. There are various hydraulic houses around that could probably do that for you. My handy dandy big book of almost all things Girling does not list the servo so it evidently came from a different source that I cannot identify.
.....
It seems that I had overlooked something and that Girling was either/probably the OE supplier for the servo or at the very least supplied an aftermarket servo. My handy dandy big book of almost all things Girling is a collection of smaller Girling published information that I have in a big binder. There are your basic application catalogs for OE and aftermarket parts that Girling supplies/supplied and cross references showing many applications of various part numbers, part number to common base casting cross references and casting number to common specific parts made from that casting, caliper, brake pad and brake shoe identification information, etc. All good information to have when playing mix and match.
What I have not seen in that big book of almost all things Girling is a breakdown on component parts for servo repair. I don't know if it existed and I just don't have a copy or it never existed. That being said, a minor amount of digging and showed an outfit in the UK that sells a seal kit and diaphragm for the TR250 and TR6 servo that ships all over. Unfortunately, they do not list a pushrod for the servo. Also, Apple Hydraulics in Calverton NY, way out on Longguyland (anything past Ronkonkoma is way out there to me) sells a booster repair kit with diaphragm and seals, but again, no pushrod. If two suppliers for these parts were found without too much difficulty, there are probably other suppliers out there as well, hopefully one of them may even offer the servo pushrod.
SC Parts Servo Seals and Diaphram:
Brake hydraulics - spare parts for Triumph TR5, TR250 and TR6 (1968-1976) | Scparts.co.uk
Buy spare parts for "Brake hydraulics" of Triumph TR5, TR250 and TR6 (1968-1976). ✓ large selection ✓ professional support ✓ fast delivery
.ico?ts=1732715571) www.scparts.co.uk
www.scparts.co.uk
SC Parts Pedal Box:
Brake pedal and pedal box - spare parts for Triumph TR5, TR250 and TR6 (1968-1976) | Scparts.co.uk
Buy spare parts for "Brake pedal and pedal box" of Triumph TR5, TR250 and TR6 (1968-1976). ✓ large selection ✓ professional support ✓ fast delivery
www.scparts.co.uk
Apple Servo Repair Kit:
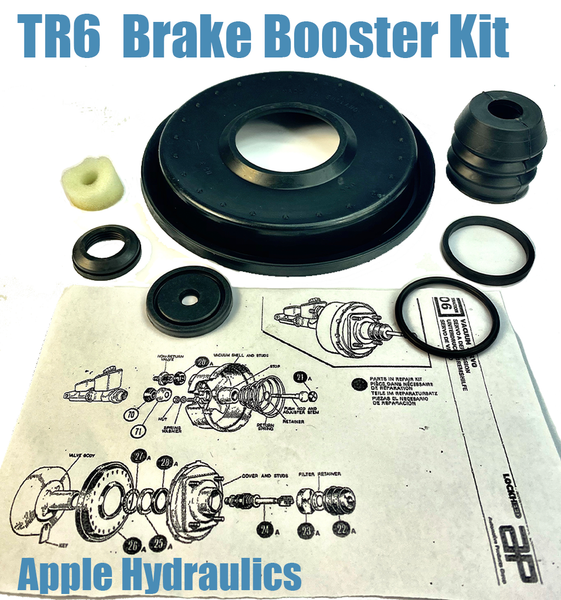
Triumph TR-6 and TR-250 Brake Booster Repair Kit, $88
Repair kit for TR6, TR250 Brake Booster - $88 Kit Includes: -Diaphragm-Bellows (dust boot)-2 O-rings-Foam Circle-Check Valve canister seal-Small hole rubber dam Kit includes the diaphragm which usually is damaged from brake fluid leaking into the booster from the master cylinder. FULL BOOSTER...
 www.applehydraulicsonline.com
Maybe I need to start calling it the handy dandy big book of many things Girling as a result of finding this potential hole in the collection.
OP
Govtslug
Member
Offline
Ok, one more question. As I contemplate a MC replacement this weekend, what are your suggestions for bleeding tools? I’ve always just used the two person method, but I’m guessing with a MC change it might take quite a while to bleed properly, and my wife has no patience pressing the brake pedal for me! Do those cheap bottles with one-way valves on the bleeder screws really work? How about the manual vacuum pumps on the bleeders? Or are the pressurized ones on the MC the best (not sure how i get the proper adaptor for the giant cap on TR6). when I read the reviews of the tools out there they are all across the board. It goes from ‘best tool ever’ to ‘total piece of junk leaked everywhere’ for the same tool! Any experience with these tools is welcome!
govtslug
govtslug
poolboy
Yoda
Offline
SpeedBleeders...the good thing beside making it a one person procedure is that once you install them you won;t have to hunt up anything but a wrench the next time you want to bleed the brakes...they are permanent
Tybalt
Jedi Warrior
Offline
The only experience I have with pressure bleeders goes back to the early to mid seventies and that was a commercial shop type pressure bleeder so for the most part not really relevant here. Nor have I ever fiddled with SpeedBleeders but I know lots of folks use them and don't recall hearing much, if anything, in the way of complaints.
There is the Gunson EEZIBLEED that Dr. Entropy mentioned previously. I have been tempted by that but like I said at the time, I've toyed with getting one but haven't pulled that trigger. Mityvac makes several products, some of which are dedicated to brake bleeding, others are more flexible as far as uses go. I have a few items from Mityvac for things like light vacuum application, fluid dispensing, fluid dispensing and evacutation products and like them for their ease of use. The fluid dispenser does mention how it can be used as pressure bleeder with some additional parts. In general, if they have it listed, the Home Despot website has some of the best prices on Mityvac products. But keep your eyes peeled as I have found some at better prices if an outfit is having some sort a Mityvac sale.
As for adapters, going back to that shop in the seventies, we had a collection of MC caps where we had added fittings and connected the bleeder flex hose to the fitting for pressure bleeding.

Offline
The EEZIBLEED "kit" has caps to fit most all of the Brit cars we have. The complaints about "fluid all over the place" likely come from improper use. No more than a couple PSI will work, usually less than five. I'm serious, it is the most efficient, convenient way to do a one-person brake system air purge. Used it for DECADES in our shop. SpeedBleeders work, they're great for the folks doing their own cars at home. But somehow there still needs to be MC "push" to do the job. A second body. Even with a spare tire with pressure reduced and the EEZIBLEED it is again, a one person job.
With the "Mighty-Vac" you will constantly need to top up the MC, wasting time (and the up-and-down to do it). The EEZIBLEED has its own reservoir.
With the "Mighty-Vac" you will constantly need to top up the MC, wasting time (and the up-and-down to do it). The EEZIBLEED has its own reservoir.
Offline
Ken, not being adversarial here. Just saying the two "systems" have different advantages. The speed bleeders still require MC pressure to work, where the Gunson thing is "open furthest to closest" without the need to push the pedal and refill the MC at intervals.
Offline
In a place where a lift is available, it's a breeze with the Gunson kit. At home, with a car on jackstands, getting up-and-down on hands and knees (at my age anyway  ) to repeatedly pump the pedal and check MC fluid level is a bit of a chore, IYSWIM. Just trying to simplify the job.
) to repeatedly pump the pedal and check MC fluid level is a bit of a chore, IYSWIM. Just trying to simplify the job.
D
Deleted member 12064
Guest
Guest
Offline
The Motive pressure bleeder is the most common one I have heard of, about $50. If I didn't have the Mityvac I'd get one. Again one person bleeding and it solves the 'keep the MC full' issue. It is the same system as a garden sprayer.
Tybalt
Jedi Warrior
Offline
It depends on the MityVac type. If you are talking vacuum bleeding using the little hand pump, you are absolutely correct......
With the "Mighty-Vac" you will constantly need to top up the MC, wasting time (and the up-and-down to do it). The EEZIBLEED has its own reservoir.
They do have models for both vacuum and pressure bleeding that have reservoir capacities of 2.5 Qt to 1.2 specifically set up for brake/clutch bleeding with manual pumps plus pneumatic operated pumps with both pressure and vacuum modes. With the bits they offer and their capacities, running the MC dry should not be an issue unless you just get completely out of control.
There are a couple of issues that I would have to reconcile with myself, first the manual pump pressure bleeder is one of the 1.2 G reservoir units and I figure a qt of brake fluid is bare minimum in case the unit is off level when suspended, I would probably want more just to feel comfortable. For most brake fluids, no big deal, but if you get into some of the more specialty fluid, it can get pricey. The other is cost of the units as they are ~four or five times higher than the cost of the standard Gunson Eezibleed even for the manual pump pressure bleeder kit. But then to be fair, Gunson has a pneumatic Eezibleed Pro which is about five times the cost of the standard Eezibleed which is about in line with some of the MityVac pneumatic units..
OP
Govtslug
Member
Offline
Update! I replaced the master cylinder, installed speedbleeders (thanks Ken), and bled the system. The brakes now work fine and I have a firm pedal near the top of the pedal! The speedbleeders worked pretty well, although it’s still hard to know if the bubbles are out when I’m doing it by myself. But I just pumped the brakes a bunch at each wheel, closed everything up and tested for sponginess.
Strange situation in that my original brake bleeding maintenance caused the master cylinder to crap out, but the system must have had junk in it that dislodged during the bleeding process and probably got caught in the master. Or it just pushed the master seals over the edge. Either way, problem solved!
Thanks everyone!