• Hi Guest!
    You can help ensure that British Car Forum (BCF) continues to provide a great place to engage in the British car hobby! If you find BCF a beneficial community, please consider supporting our efforts with a subscription.

    There are some perks with a member upgrade!
    **Upgrade Now**
    (PS: Subscribers don't see this gawd-aweful banner
Tips
Tips

TR2/3/3A Boot floor

Thank you for the pictures Graham.Examples of cars like yours and others on the forum are what keep me going. There are days when the light at the end of the tunnel is pretty dim. What a joy it must be to have a car like that. Great job! Frank
 
Actually...I'm still close enough to my restoration that those angles look normal to me. I bet Frank feels the same. I still have trouble walking into the garage and seeing everything right side up?!?
 
I have bolted both wings on and everything looks pretty good up to where the dogleg quarter panels starts. Those panels are in very bad shape. I will be away til next week so I will be doing more research, looking at pictures and doing a little thinking about it. What it really comes down to is for me to take the leap of faith that all is good and that it will look ok. I need to move on or it will never get finished. Hope all have a safe and Happy Thanksgiving. Frank
 
Happy New Year to all Especially Lionel and Graham who are a little ahead of every body. Still working on the back section but progress is pretty good. Not where I wanted to be by end of year but I will take what I can get.Weather turned off bad so a delay on the closing section at the back. Still have sand blasting and epoxy before I can close it in so been working another parts of the back half but this one in particular has been bugging me so made a point to finish it before end of the year.
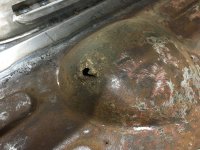
seat floor pumpkin bulge.jpgDamage to differential floor cover.

Got this repaired but can not get the photos to upload. Don't know what the problem is, maybe next time I can get it to work. Frank
 

Attachments

  • IMG_1408.jpg
    IMG_1408.jpg
    108.9 KB · Views: 108
  • IMG_1409.jpg
    IMG_1409.jpg
    68.1 KB · Views: 103
  • pumpkin repair finished top side.jpg
    pumpkin repair finished top side.jpg
    69.6 KB · Views: 109
Photos appeared but not as I thought . You get the idea. Hope new year post are better. Frank
 
Happy new year to all and yes you are right Frank our day is nearly done 8 pm already .

Regards Graham
 
Hi David, This has been bugging me for a good while thinking it would be a difficult repair. Repairs have gotten easier for me so I formed a domed piece that matched the damaged area. I laid a large washer over the damaged are and marked a circle. I used a rotary burr to cut to the line. Then I laid the repair piece over the hole marked it and the line up marks, cut close to the scribe mark with snips and sanded to the scribe marks. The repair fit great and was easy to tig weld. The domed shape and the repair being a circle there was no problem with warpage. The metal was not in that bad a shape. I believe the damaged area was punched thru from contact with the vent fitting on the rear end. I find it hard to believe that is possible but all indications are that this car was not maintained, and definitely abused during its life. They only fixed what needed to be fixed so it would move, did not matter if something else was damaged in the process. Also thank you for your comment about welding up unnecessary holes. the seat area had a lot of sheet metal screw holes, all are welded up. It was reassuring that I wasn't wasting my time. Have a great year, Frank
 
Hello Frank.

It would probable worth doing the same on the inside of the doors when you get to that point. I found a lot of holes that were in almost the right position but not exactly right when I did the door trim panels.

David
 
Back
Top