• The Roadster Factory Recovery Fund - Friends, as you may have heard, The Roadster Factory, a respected British Car Parts business in PA, suffered a total loss in a fire on Christmas Day. Read about it, discuss or ask questions >> HERE. The Triumph Register of America is sponsoring a fund raiser to help TRF get back on their feet. If you can help, vist >> their GoFundMe page.
  • Hey there Guest!
    If you enjoy BCF and find our forum a useful resource, if you appreciate not having ads pop up all over the place and you want to ensure we can stay online - Please consider supporting with an "optional" low-cost annual subscription.
    **Upgrade Now**
    (PS: Subscribers don't see this UGLY banner)
Tips
Tips

BJ8 Cylinder Head Re-Torque

AUSMHLY

Obi Wan
Country flag
Offline
Hello,

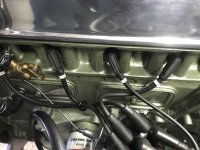
I had the engine rebuilt about 10 months ago. I've put about 200 miles on it as I'm in the process of removing/installing the transmission trying to rebuild it. There is a copper-colored sealant oozing between the head and the block (photo attached). I keep wiping it off, but it keeps oozing.

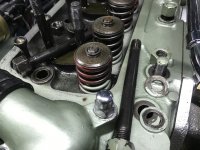
It's my understanding that the cylinder head nuts need to be re-torqued after X miles on a rebuilt engine. Today I tried to loosen the cylinder head nuts and had to put a steel pipe on the socket ratchet handle to get enough leverage. I loosened them in the order outlined in the workshop manual. To confirm they were loose I used my fingers. To my surprise, all the studs became loose too. Some of the studs came up having the nut frozen on top. I have stud, steel washer, nut (no locking washer which Moss diagram shows).

The Workshop Manual says, "Ensure that a bronze washer is fitted below the steel washer on each stud which passes through the inlet manifold on the left-hand side of the head, " but I don't see a diagram in the Workshop Manual that shows that. The Moss diagram shows (16) bronze washers for the 100-6 (2-port) engine. Moss diagram for the 3000 (6-port) shows stud, plain washer, locking washer, nut.

1) Should the 3000 have 16 bronze washers?
2) How do I reinstall the studs? Moss states, "All cylinder head studs should be put in the block only finger tight to avoid cracking the block."
I certainly don't want to crack the block. So, finger tight (with or without blue Loctite?), then how do I install the studs to get 33 lbs?
3) Once studs are in, (bronze washer?) steel washer, (locking washer?) nut torqued to 75 lbs. (I currently have steel washer/nut.)

Concerns: When I torque the nuts to 75, will it also re-torque the studs more then 33 lbs and possibly crack the block?
I thought this would be a simple exercise of loosen nuts, then torque to 75 lbs.
 

Attachments

  • 358952A3-B8B9-451D-B588-4535D5AC64E8.jpeg
    358952A3-B8B9-451D-B588-4535D5AC64E8.jpeg
    2 MB · Views: 130
  • EC9312FB-3525-46B3-8945-F112AE8CB224.jpeg
    EC9312FB-3525-46B3-8945-F112AE8CB224.jpeg
    2.4 MB · Views: 127
Last edited:
Country flag
Offline
Did you use Lock tight on the nuts? How did you tighten the studs into the block before you put the nuts on? I have heard of this happening if there is any oil on the stud or in the threaded hole prior to installation.
 

red57

Jedi Knight
Country flag
Offline
The copper colored stuff is spray copper gasket sealer. It is sprayed on both sides of the gasket and if it's applied a bit heavily it's very common for excess to ooze out for a while - no harm, no foul, it will stop eventually.

The bronze washer only applies to the 2 port head, long studs thru the intake - there are none on the 3000. No one uses lock washers on head studs so what you want is what you have - a flat washer and tall nut.

ARP and others these days say the same as Moss - only finger tighten studs in the block. Make sure the stud threads are clean so they screw all the way in.

Your last sentence is correct, it's normally very simple. You shouldn't really have loosened all the nuts at once when re-torquing - normally you do them one-at-a-time in the sequence shown in the manual, loosen each one about 1/4 turn and then re-tighten to the listed torque of 75, and move on to the next. Since you have loosened all of them, I suggest working your way back to full torque again as if you just had the head off - take all of them up to about 35 in sequence, then go around again taking them up to about 60 in sequence, and then finally up to 75 in sequence.

I like to put some Permatex on the threads of the studs in the block to stop any fluid seepage past the threads.
 
Last edited:
OP
AUSMHLY

AUSMHLY

Obi Wan
Country flag
Offline
Well the drama continues.

Tahoe, are asking if I did or the engine builder. I was just trying to re-torque. Read below.

I thought because it was important to follow the sequence so the head doesn't warp, I should loosen all of them, them torque them down in order. Then I find all the stud were loose. How do I tighten them and to what torque? I grab the manual start reading it. Install studs finger tight, Moss says then 33 lbs. How am I going to do that? I ask the question here, take photos. 2hrs later back to the garage, I find some drops of liquid under the car. (car is up on jacks). Where's that coming from. I taste it, antifreeze. From the time I read the manual and posted here, it leaked around the head. So I pull the nuts off all the studs so I can hand tighten them. Which I did with oil still on them. (Was that OK?) Put the nuts back on, hand tight. Tighten them up in sequence order with the socket wrench. Then 40lbs,50lbs, 60lbs, 70lbs, 75lbs.

Now what?
Assume I have oil in the antifreeze?
Assume I have antifreeze in the oil?
Should I replace the oil? I still have break-in oil in the car 200 miles. If I replace the oil, break-in oil, or regular oil?
Flush the coolant and refill?
Is the gasket and sealant ok or do I have to replace that? PLEASE say you shouldn't have to.

Now that I have stopped the leaking, is what I did good enough?

'I like to put some Permatex on the threads of the studs in the block to stop any fluid seepage past the threads."
Should I remove each stud, clean and dry it, use loctite or (if Permatex, there are so many, which one?) on the stud?
If so, remove the nut/stud, clean/loctite/permatex, torque to 75, move on to the next one?

Geeeez it was suppose to be a simple job. I certainly learned another lesson today.
 
Last edited:

Bugeyze

Member
Country flag
Offline
The only way to be sure all is good, is to drain oil and water, remove the head, clean all surfaces and start from scratch with a new head gasket.
 

Healey Nut

Luke Skywalker
Country flag
Offline
The only way to be sure all is good, is to drain oil and water, remove the head, clean all surfaces and start from scratch with a new head gasket.
Correct answer, studs finger tight only, no sealants. Nuts with correct washers as required, no sealants, torqued in correct pattern to spec.
Retorque means exactly that. Remove rocker shaft and retorque, don’t loosen anything off first.
 
OP
AUSMHLY

AUSMHLY

Obi Wan
Country flag
Offline
I'm going to replace the head gasket.
Wondering if I should replace the original cylinder head stud/washer/nuts.
Moss sells a heavy duty head stud kit by ARP.
Does anyone know ARP's kit number for the 3000?
 

Patrick67BJ8

Obi Wan
Silver
Country flag
Offline
Correct answer, studs finger tight only, no sealants. Nuts with correct washers as required, no sealants, torqued in correct pattern to spec.
Retorque means exactly that. Remove rocker shaft and retorque, don’t loosen anything off first.
I believe that if you have the original factory tool used for the cylinder nuts you do not have to remove the rocker shaft? Maybe someone will chime in?
 
OP
AUSMHLY

AUSMHLY

Obi Wan
Country flag
Offline
Correct answer, studs finger tight only, no sealants. Nuts with correct washers as required, no sealants, torqued in correct pattern to spec.
Retorque means exactly that. Remove rocker shaft and retorque, don’t loosen anything off first.
"don't loosen anything off first." Don't loosen the nut before torquing it?
As I seemed to have done the retorque procedure incorrectly, by loosening all the nuts then torquing, it's still my understanding that the nut needs to be loosened a little then torque it to 75 lbs. Do one at a time in sequence till all are done.
 

red57

Jedi Knight
Country flag
Offline
"don't loosen anything off first." Don't loosen the nut before torquing it?
As I seemed to have done the retorque procedure incorrectly, by loosening all the nuts then torquing, it's still my understanding that the nut needs to be loosened a little then torque it to 75 lbs. Do one at a time in sequence till all are done.
Yes, you need to break the nut free so the torque you are reading is the true torque of turning the nut rather that the torque to break it free.
 

Keoke

Great Pumpkin
Country flag
Offline
Yes, you need to break the nut free so the torque you are reading is the true torque of turning the nut rather that the torque to break it free.
YES,
RED57 I WILL AGREE WITH YOU ON THAT
 
OP
AUSMHLY

AUSMHLY

Obi Wan
Country flag
Offline
The only way to be sure all is good, is to drain oil and water, remove the head, clean all surfaces and start from scratch with a new head gasket.
It's a lot of work to get the cylinder head off. Remove exhaust down pipes, carbs, manifold, hoses, pipes, nuts, washers, R&R oil, antifreeze, etc.

I called the machinist who rebuilt the engine and told him what I did. He said it should be ok. I doubt very much oil or antifreeze leaked in the engine or oil into the antifreeze. You ended up torquing the bolts to 75lbs in the order they should be. Wait a couple days to let what ever antifreeze if any, settle to the bottom of the oil pan. Drain and replace the break-in oil with break-in oil being you only have 200 miles on the engine. Drain the antifreeze from the bottom of the radiator and replace. Remove the spark plugs. Adjust the valves. Turn the engine over a few time to expel any antifreeze that may have gotten into the cylinders. Replace the spark plugs. Drive the car. You may see some white smoke for a little while. You shouldn't do any damage inside the engine. If you find the gasket is leaking, then replace the gasket.

He speaks with such confidence when telling me what to do and says don't worry about it.
Anyone come across someone who did what I did, and did what the machinist said to do?
Maybe I'm making a bigger deal out of this then I should? Maybe I don't need to replace the gasket.
How's that saying go, If it ain't broke, don't fix it.

Anyone adamant about replace the gasket?
 
Last edited:

nevets

Jedi Knight
Country flag
Offline
If it was mine, I would follow the machinist's recommendations. I would not replace the head gasket at this time. There's a good chance it's all good and you will avoid a a lot of unnecessary work, and possibly causing other unintended problems. Falls under the 'if it ain't broke, don't fix it' axiom.
 

red57

Jedi Knight
Country flag
Offline
I absolutely agree with your machinist and would do as he said. I definitely agree that the amount of oil or antifreeze leakage would be minor. I wouldn't worry about changing the coolant (figure you have a drop or two of anti-rust additive) but I would change the oil, just in case.

By simply loosening all the head nuts, there would have been no forces applied to move the head or shift the gasket - no oil pressure/no coolant pressure no heat (not like starting it with some nuts loose). Worst case, the gasket doesn't seal and you have to pull the head....
 

vette

Darth Vader
Country flag
Offline
I find this tool to be curious. Many years ago I believed that I needed to retorque my head bolts but I wasn’t fond of removing the rocker shaft. I was talking to Bruce Phillips of Healey Surgeons and asked him if the bolts under the shaft could be torqued without removing the shaft. He said that he had never found a way to do it adequately without removing the shaft.
also I have never then retorqued my head bolts. I believed I had a little oil seepage along the distributor side. I still do. That was 40,000 miles ago. Last summer I turned over 100,000 miles. I just wipe up the oil once in a while. A lot easier than replacing a head gasket.
 

WHT

Jedi Hopeful
Silver
Country flag
Offline
I find this tool to be curious. Many years ago I believed that I needed to retorque my head bolts but I wasn’t fond of removing the rocker shaft. I was talking to Bruce Phillips of Healey Surgeons and asked him if the bolts under the shaft could be torqued without removing the shaft. He said that he had never found a way to do it adequately without removing the shaft.

Hi vette,

I am also curious about the 18G545 head nut spanner.
Six months ago I found one on eBay for a good price and put it our emergency trunk tool kit. No idea if it works as advertised and I never read anything about its effectiveness on any of the Austin-Healey forums. I would be interested if anyone here has actually used one; and did it work well? I would think Healey Surgeons would be familiar with the tool and tried it.

Regards, Bill

EDIT: OK, I just found this discussion on a Boating Forum of all places (their boats had BMC engines).


"Britool 18G545: You don't need this spanner to remove or refit the head. Some of the head bolts go through the rocker shaft so you have to remove it to remove the head. The difficult bolts are then exposed. The head can be refitted in the same way. The special spanner is useful if you want to re-tighten the head after an engine run as recommended. I compromised when I built my engine by torquing the difficult bolts to a slightly higher torque than specified and not re-tightening them. Most of the bolts can be re-tightened with an ordinary socket.


It has been some years since I had to use one, but IIRC there are 3 cylinder head nuts under the rocker cover and I think a further 2 which hold the rocker shaft down. Whilst proper tightening down can be achieved without the spanner it's a convoluted operation, made much easier with one. If you try to do it without the correct unit the head gasket does not seal very well.


Not sure what size the C/H nuts you want to tighten are but there is a suitable 'Snap ON' cranked spanner for sale on Ebay (item 280665932652 - sorry can't do clickys). Its 11/16 - 1/2in drive for sale at about £20. I had one and after filing it down slightly it fitted under the rocker shaft and made life a lot easier. Sold mine to a guy in Spain for Eu30 after an advert on CWDF.


You don't need the special tool. Machine Mart sell a set of crows foot spanners to go onto a 3/8" drive. Using a 3/8" wobbly extension you can clear the rocker shaft and use a torque wrench"
 
Last edited:

Bob_Spidell

Yoda
Gold
Country flag
Offline
A similar tool is used to torque piston aircraft engine base--aka 'head'--nuts (conveniently, these cylinders can be replaced individually):


My BJ8 engine builder, also a licensed aircraft mechanic, advised me to not bother re-torquing its head nuts; no issues/leaks after about 10K miles, with an old Payen copper/asbestos(?) gasket. He also re-used the head studs, which AFAIK are the original, which kind of surprised me.

I don't think a crows foot spanner will give a correct torque reading as the wrench-end and 'socket' are not co-linear. I think the 'boating forum' mechanic is full of bilge as re-torquing is recommended to correct a) the stud/bolt stretching and b) the gasket compressing; putting a few more ft-lbs on the stud won't accomplish this (has he calculated exactly how much compression and stretching occurs, and the torque required to compensate and, of course, more torque will create more of each?).

Really precise torque/stretch is done with 'torque-to-yield' studs/bolts, which is done by first torquing and then turning an additional number of degrees. Also, no one has mentioned if the torque specs are 'dry' or 'lubed,' which makes a considerable difference in the actual torque/stretch applied (I don't recall if the shop manual specifies).

I've not heard of any issues with the 6-cyl cars, but the 4-cyl engines are notorious for leaking between the #2 and #3 cylinders. This is due to an inadequate number of head studs; there are several potential 'remedies,' up to and including gaskets that cost $300 or more. Norman Nock recommended coating the gaskets with Wellseal, which I did on our BN2 engine; so far, no leaks.
 
Similar threads
Thread starter Title Forum Replies Date
AUSMHLY BJ8 Cylinder Head Installation Austin Healey 6
R BJ8 Cylinder Head Gasket Austin Healey 38
S Procedure for cylinder head removal and re-installation - BJ8 Austin Healey 11
D BJ8 brake master cylinder question Austin Healey 6
AUSMHLY BJ8 Rear Wheel Cylinder leaking Austin Healey 30
RickPA BJ8 rear wheel cylinder install Austin Healey 1
R BJ8 with Servo, Is the 7/8 Master Cylinder recommended ?? Austin Healey 7
L Initial Adjustment of Pushrod on BJ8 Brake Master Cylinder Austin Healey 5
letemglow Brake master cylinder BJ8 Austin Healey 0
Y BJ8 Clutch Master Cylinder Bleeding Procedure? Austin Healey 7
6 Wheel Cylinder Fluid leak on BJ8 Austin Healey 7
1 BJ8 History Trace Austin Healey 7
Patrick67BJ8 Wanted Looking for a used BJ8 switch panel. Austin Healey Classifieds 5
D BJ8 Top Installation Detail Austin Healey 3
B BJ8 Rear Backrest Hinges Austin Healey 4
S Wanted WTB: 3.5 ratio diff/pumkin for '67 BJ8 Healey 3000 Austin Healey Classifieds 0
AUSMHLY BJ8 Trans Cover Carpet Austin Healey 7
nitro BJ8 Engine Design Austin Healey 1
AUSMHLY BJ8 Carpet and Snaps Austin Healey 2
Overdrive45 BJ8 Interior Trim Austin Healey 8
nitro BJ8 Production Year Austin Healey 6
WHT BJ8 Rear Seat Surround Drain Tube Grommets Austin Healey 0
B BJ8 Seat Sliders Austin Healey 4
B For Sale 1967 Metallic Golden Beige MKIII BJ8 Numbers Matching - The Real Deal Austin Healey Classifieds 0
F Wanted BJ8 Engine Block Austin Healey Classifieds 1
BoyRacer For Sale BJ8 disk wheel hubs, spindles & calipers Austin Healey Classifieds 0
AUSMHLY BJ8 Rear Seat Squab Austin Healey 0
AUSMHLY BJ8 Differential Oil Change Austin Healey 6
S SOLD!! For Sale 1964 AH 3000 MkIII BJ8 Phase 1 Austin Healey Classifieds 2
Patrick67BJ8 BJ8 Factory Hardtop Rear Window Austin Healey 6
AUSMHLY BJ8 Clutch Pressure Plate, Old vs New Austin Healey 4
AUSMHLY BJ8 Clutch Fork Bush Replacement Austin Healey 5
LAW75 BJ8 Brake Lines Austin Healey 2
AUSMHLY BJ8 Clutch Pressure Plate Brand Preferences Austin Healey 3
BoyRacer For Sale BJ8 spindles & disc wheel hubs Austin Healey Classifieds 0
G Wanted BJ8 Tonneau Cover Austin Healey Classifieds 0
Cutrog1 For Sale Healey 3000 BJ8.... a restoration saga Austin Healey Classifieds 0
AUSMHLY BJ8 Overdrive Oil Passages Austin Healey 2
Scotsman Wiring Diagram for 1966 BJ8 Austin Healey 3
A For Sale 1966 3000 Healey Blue BJ8 Austin Healey Classifieds 3
S BJ8 Front Side Lamp/Turn Signals Austin Healey 1
B BJ7/BJ8 Door Check Straps Austin Healey 10
B BJ8 Hood Bow and Seal Austin Healey 5
Mickey Richaud Wanted Wanted: BJ8 Seat Track Sets (Both Sides) Austin Healey Classifieds 5
Scotsman BJ8 Intake Manifold Differences Austin Healey 4
AUSMHLY Laygear End Float BN1-BJ8 Austin Healey 2
C For Sale BJ8 original dash Austin Healey Classifieds 3
LarryK BJ8 Parts or Project Car For Sale in St. Louis Austin Healey 3
Patrick67BJ8 BJ8 Intake manifold Booster & Vacuum Hookup threads sizes. Austin Healey 2
B BJ8 Centre Console Chrome Strips Austin Healey 5

Similar threads

Top