-
 Hey Guest!
British Car Forum has been supporting enthusiasts for over 25 years by providing a great place to share our love for British cars. You can support our efforts by upgrading your membership for less than the dues of most car clubs. There are some perks with a member upgrade!**Upgrade Now**
(PS: Upgraded members don't see this banner, nor will you see the Google ads that appear on the site.)
-
 When posting a classified ad, you MUST select a prefix from the drop-down next to the subject line. If you don't you will get an error and your ad will not be posted!

Tips
- We have a special forum called "Member Articles" where you can submit actual articles for consideration for publication. Learn More
- Don't have an Avatar? If not, your avatar will default to the 1st character in your username. Go into "Account Details" to change your Avatar.
- Some basic forum navigation info: click
 Hey - did you know if you click on the title of a thread it will take you to the first unread post since you last visited that thread?
- Hey Guest - Is your British Car Club in our Clubs database? If not, send me a PM - Basil

- Looking for a local club? Click the "Clubs" tab above and browse hundreds of clubs world-wide.
- Add Android or iPhone APP: click
- Did you know - any picture or video you add in your posts in any marque-specific forum will also get added to the Media Gallery automatically.
- A few more tips about posting and replying: click
- Hey there Guest - be sure to keep your profile page up to date with interesting info about yourself: learn more
- More tips and tricks on Posting and Replying: click
 but were afraid to ask:
  STOP!! Never post your email address in open forums. Bots can "harvest" your email! If you must share your email use a Private Message or use the
  smilie in place of the real @
- Want to mention another member in a post & get their attention? WATCH THIS

- So, you created a "Group" here at BCF and would like to invite other members to join? Watch this!
- Hey Guest - A post a day keeps Basil from visiting you in the small hours and putting a bat up your nightdress!
- Hey Guest - do you know of an upcoming British car event?
 Pretty Please - add it to our Events forum(s) and add to the calendar! >> Here's How <<
- Hey Guest - you be stylin' Change the look and feel of the forum to fit your taste. Check it out
- If you run across an inappropriate post, for example a post that breaks our rules or looks like it might be spam, you can report the post to the moderators: Learn More
- If you would like to try some different "looks" or styles for the site, scroll to the very bottom, on the left and click the Style Selector.
You are using an out of date browser. It may not display this or other websites correctly.
You should upgrade or use an alternative browser.
You should upgrade or use an alternative browser.
BE Hood Tilt Kit
- Thread starter ralph_s
- Start date
cdsmith
Jedi Hopeful
Offline
Thanks for the picture... I think that's the same clamp one I was planing to order...
In response to limiting straps - I use two cables attached to where the rubber bumpers are on the fender, and the the other end to the same mounting place as original support rods on the hood. So far so good.
cd
In response to limiting straps - I use two cables attached to where the rubber bumpers are on the fender, and the the other end to the same mounting place as original support rods on the hood. So far so good.
cd
Jim_Gruber
Yoda
Offline
CD,
I found I really don't need the limit straps with the stop built in to the hinge. I did find that you can't attach just one stop both need to be on there or a twisting motion can bend the bolt holding on the end of the limit strap. Again that is just a 1/4 20 bolt turned backwards in my installation and there is a lot of sideways torque on that bolt. This really is a simple design and I like the way it works. As I'd doing some rework of the bonnet I took the latches off for painting/bondo.weld up the old trial and error from previous latches I broke. The #6 screws I'm replacing with new as again the were a little bit torqued.
My bonnet had sat for 10-15 years in a garage and it appears someone had laid things on top of the bonnet and it pulled the curve out of it. After two years of being clamped down the curve is gradually returning.
Newbie on the forum here. I've been slowing restoring my Bugeye for years, and would really like to change the hood to a front tilt. The pictures are great! Rust doesn't bother us too much in the desert.
Can someone direct me to the Gerald's Garage website so I can download the blueprint/diagrams ?
Thanks -
Richard
Can someone direct me to the Gerald's Garage website so I can download the blueprint/diagrams ?
Thanks -
Richard
cdsmith
Jedi Hopeful
Offline
Trevor Jessie
Yoda
Offline
I probably have them on another computer. Send me a message Monday if no one else comes up with them.

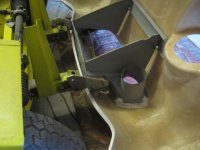
Just got mine on today, I used the hole spacing from Gerald's Garage but wanted mine less bulky. I have an early car and the hole spacing on the bonnet is 1 3/4"
not the 1 5/8" of most of the kits. I used aluminum plate and a 1" solid bar for the spacer, I didn't cut the bumper bosses off the frame horn or make any of the holes on the car bigger, I did slot the bracket and the spacer for lots of adjustment, I might make a stainless washer to cover the slots. I think I'm going to use a cable as a
 stop
stop
not the 1 5/8" of most of the kits. I used aluminum plate and a 1" solid bar for the spacer, I didn't cut the bumper bosses off the frame horn or make any of the holes on the car bigger, I did slot the bracket and the spacer for lots of adjustment, I might make a stainless washer to cover the slots. I think I'm going to use a cable as a
stop David_Doan
Jedi Warrior
Offline
Bob,
I just finished mine tonight. Homemade hinges similar to yours (more details in my blog). Tonight, I added the Gas Struts as stops. They are temporarily mounted, waiting on the hardware (10 mm ball studs) to finish. they are not stout enough to allow a "free-fall" close, but they do help. Most importantly, they hold the bonnet open. Here's a couple quick pics from my phone, I'll shoot better pics when I'm done.


I just finished mine tonight. Homemade hinges similar to yours (more details in my blog). Tonight, I added the Gas Struts as stops. They are temporarily mounted, waiting on the hardware (10 mm ball studs) to finish. they are not stout enough to allow a "free-fall" close, but they do help. Most importantly, they hold the bonnet open. Here's a couple quick pics from my phone, I'll shoot better pics when I'm done.
Last edited:
racingenglishcars
Darth Vader
Offline
Nice thread
I did a couple from Gerrards site. The bonnet is fibreglass but structure is steel from the original bonnet. The hinge material is 6mm aluminium plate and oak as a spacer (for now at least). I spaced it out from the frame with a washer and used countersunk bolts in the rear so I didn't have to cut the rear bumper mount.
I used Spitfire latches but was concerned about the strength of mounting so I welded a couple extra support holes and lengthened the bottom so there was no more free opening.