• Hi Guest!
    You can help ensure that British Car Forum (BCF) continues to provide a great place to engage in the British car hobby! If you find BCF a beneficial community, please consider supporting our efforts with a subscription.

    There are some perks with a member upgrade!
    **Upgrade Now**
    (PS: Subscribers don't see this gawd-aweful banner
Tips
Tips

BE Door Pockets from Moss Motors

TexasSprite

Jedi Hopeful
Offline
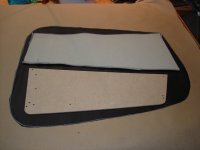
Here is what came in the Moss Motors interior kit. Anyone know how they are supposed to go together? I thought the top of the pocket was supposed to be metal that could be shaped to fit, but all that in the kit is what you see in the picture. My car came pocketless, so don't know if the metal stiffener is a part that you are supposed to transfer off the old pocket.
 

Attachments

  • 12103.jpg
    12103.jpg
    37.3 KB · Views: 458
Looks like you need to transfer the 4 metal pieces from the old ones. That said I've never had to buy anything from Moss so I don't know if they offer them? The holes in the lower part of the picture do match the metal brackets from the looks of it. The upper two holes are the ones that have a formed piece that is shaped slightly. Most are bowed from people pulling on them over the years.
Dug
 
Yup! The metal "pieces"/brackets referred to are important as they are what attatches that panel to the doors!
 
TexasSprite said:
Here is what came in the Moss Motors interior kit. Anyone know how they are supposed to go together? I thought the top of the pocket was supposed to be metal that could be shaped to fit, but all that in the kit is what you see in the picture. My car came pocketless, so don't know if the metal stiffener is a part that you are supposed to transfer off the old pocket.

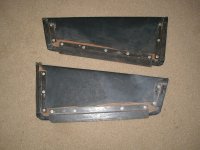
Just before Spridget 50 I shipped two of the pocket panels to Tony...there's a photo about half way down in the following thread:

https://www.britishcarforum.com/bcforum/ubbthreads.php/topics/469245/1

That photo might be useful in comparing what you received with what you need to complete the assembly.

From what I've seen, the metal pieces (or complete panels with good metal pieces) are quite hard to come by.

Ray
 
Yep, & I took the vinyl off & recovered them (well, Rik did) because they looked too good to remove the rivets.....now I have the new hardboard panels that came in my Moss kit if anybody needs them (There's no metal attached to them).
 
I didn't realize that the door pockets on the later model year cars were the same as the Bugeye. Knowing that, Ray's picture will be helpful in fabricating new metal brackets, but I can't really see from the picture how the top metal piece fits. Others have mentioned that it can be formed to hold the desired shape of the pocket. Is there just a metal strip attached to the outside of the fiberboard, or is it a U channel that is missing from the photo?

I took the liberty of reattaching Ray's picture. Thanks for posting it and for all the cool stuff on your web site!

Thanks for the input everyone.

Mike
 

Attachments

  • 12139.jpg
    12139.jpg
    96.2 KB · Views: 367
I have one taken apart. I'll take a picture of the top pice when I get home.
 
Those brackets are in a Z shape except the center portion is straight up and down instead of angled as in a Z. The center is only slightly wider than the door metal thickness. On Tonys set I glued (spray adhesive) a piece of heavy paper on the front (thin foam may also be used) to cover the rivets. I use Weldwood contact cement (but not the green can, water cleanup) and for good LONG adhesion, I coat both pieces to be glued and totally let the first coat dry and then coat both pieces again and let them get somewhere between tacky and dry before sticking them together. I use twice as much glue, but this seems to work (for me) the best since the EPA won't let me buy Neoprene adhesive in quarts anymore. Hope I explained this well enough. I know what I am doing but have a hard time explaining in writing.
Rik
 
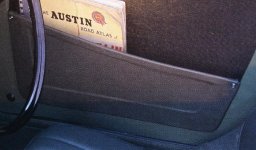
Here is a picture I found in one of my Sprite/Midget reference books. Is this what the front of the pocket is supposed to look like? I'm referring to the indented look of the panel.
 

Attachments

  • 12141.jpg
    12141.jpg
    64.2 KB · Views: 324
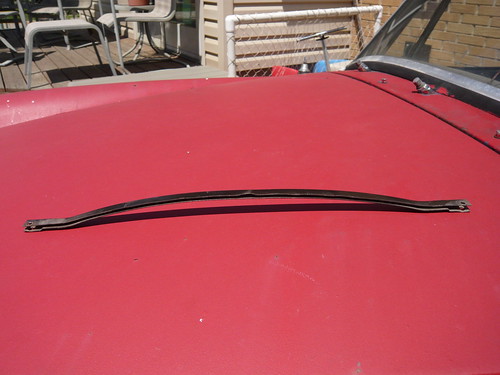
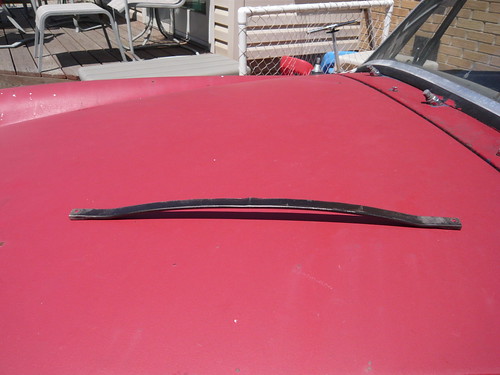
Here are some pics of the top piece. I might have to start making these, there seems to be quite a market for them.
2629204580_4d13fc4d7f.jpg

2628384651_857d2ae9e3.jpg
 
TexasSprite said:
Here is a picture I found in one of my Sprite/Midget reference books. Is this what the front of the pocket is supposed to look like? I'm referring to the indented look of the panel.
Mine didn't look like that & neither did the ones I got from Ray.
 
Thanks for the pictures of the top piece. With all the info contributed, I see what components I need to make and have a good idea how to put it all together.

I guess part of excitement of opening the boxes from the vendors we usually deal with is that you know there will be absolutely no instructions, tips or hints on how it is supposed to go together.

Thanks all!

Mike
 
OEM

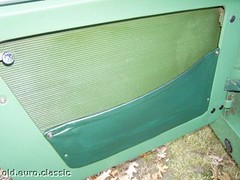
2629810670_e0a9a62529_m.jpg


There is a template for the raised portion on the Yahoo Groups Bugeye List (Files door.tif). My pockets have the four metal pieces described earlier.


Paul
 
Those indents, or should I say the raised edges are simple cardboard strips glued over the split rivets that hold the metal to the masonite board.
For replacement split rivets, I used those brass note book page things that you used as a kid in grade school to hold pages in the folder for your school project.
Staples has em for about a buck a hundred.
 
hmmmmmm....Rik & I may have to redo mine!
 
The top peice is actually a u shaped peice and provides the bow in the pannel. The raised edges all around are correct and the S or Z shaped peices are for the bottom and sides and are indeed riveted on the pannel.
 
Chris - if you have a template, I'd also like to borrow it.
 
Back
Top