• Hi Guest!
    If you appreciate British Car Forum and our 25 years of supporting British car enthusiasts with technical and anicdotal information, collected from our thousands of great members, please support us with a low-cost subscription. You can become a supporting member for less than the dues of most car clubs.

    There are some perks with a member upgrade!
    **Upgrade Now**
    (PS: Subscribers don't see this gawd-aweful banner
Tips
Tips

BE Battery Shelf and Firewall repair suggestions

John Moore

Luke Skywalker
Offline
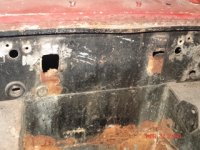
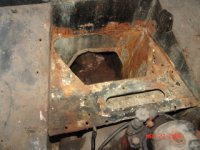
Suprise! My battery shelf is rusted. The back part is gone, but the forward section is just OK. I bought a heritage replacement from another member. The heritage part is for a later spridget and has a larger opening for the heater unit. If I were to replace the entire shelf, would an early "box style" heater box still fit? I'm thinking that it would just be easier to cut out and replace the entire unit rather than patch and repair the existing shelf. thoughts?

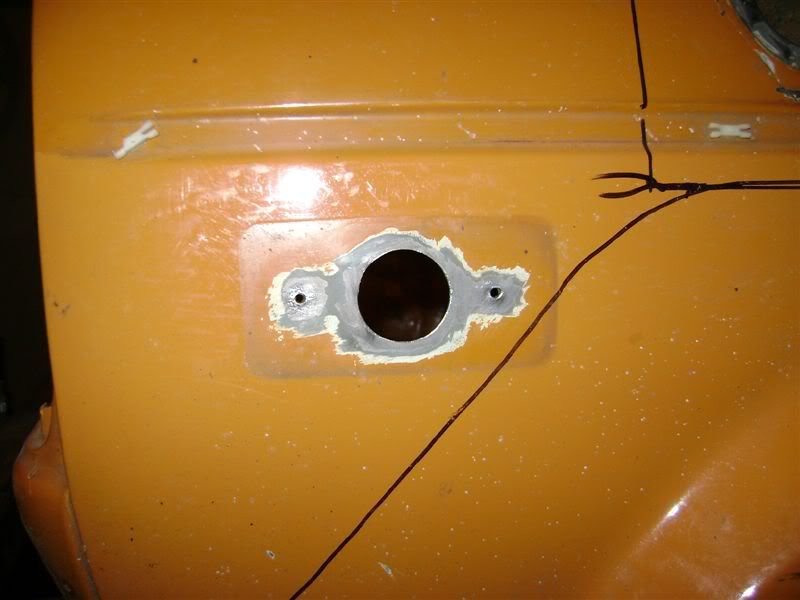
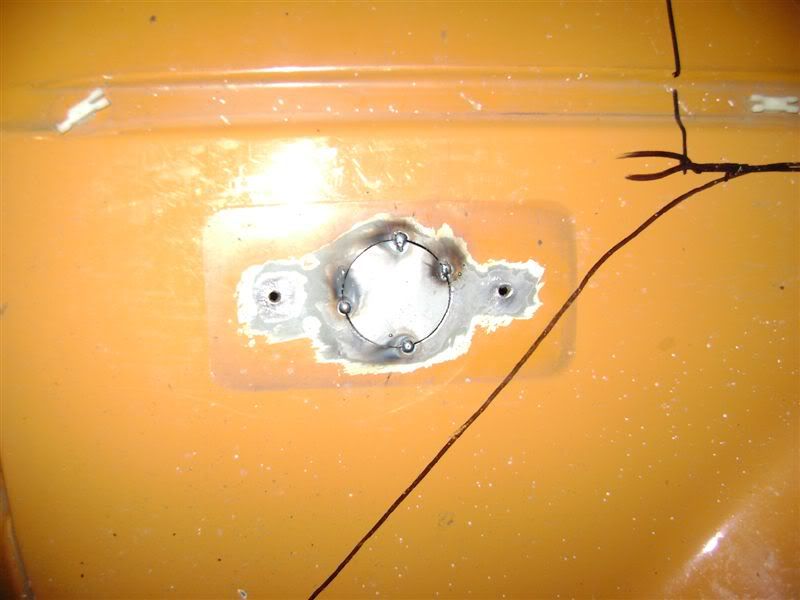
Also, the DPO cut out rusty spots on my fire wall and ran cables and wires through it. I'm wondering the best way to repair these two spots. It seems to be a common rust area in other spridgets. Did anything attach to the fire wall in that area originally? Thoughts on repairs? I was wondering if I could find a good fire wall from another spridget and graft in the metal.

any suggestions appreicated.

Photos attached!
 

Attachments

  • 10565.jpg
    10565.jpg
    66.1 KB · Views: 307
  • 10566.jpg
    10566.jpg
    66.5 KB · Views: 304
Hi John,

For those two upper holes, I certainly don't think you need to source another firewall. My repair would go something like this...

- Cut out any frilly bits, hopefully in a fairly regular shape (i.e. rectangle)

- Wire wheel down to good metal

- Hold sheet metal behind hole, trace with metal scribe or sharpie

- Cut out patch

- hold in hole with either magnet, or butt weld clamps

- weld, grind down, prime & paint

Here are a couple of pictures of that process, in this case shaving a signal marker.

Feb16001.jpg


Feb16004.jpg


Feb16006.jpg


Feb16007.jpg


Likewise, if the lower rust is just surface rust, I'd say wire-wheel, chemically convert, prime & paint with a good rust paint (POR15, Rust Encapsulator etc.) Unless it's a show car, that is...
 
John, you can make that shelf top. Make a patten. Cut out a wood form of 3/4" plywood minus the parts for the edges that get bet up. Use the wood form the pound the edges of the aperture down. A little head scratching and it would not be a very bad job.
 
By the way those upper holes are not rust. They are from the battery posts shorting out against the firewall when they were too close and it was not tied down tight.
 
Thanks Guys.

Duncan,

The areas on the firewall aren't flat. (I shaved my MGB sidelights too, the exact same way) They have ribbed for strength and that's what I'm concerned about duplicating.

Trevor, I suppose I could make another shelf, but since I already had the part, I thought it might be easier to replace the whole thing. I'll clean it up first and do some head scratching as you suggested before I do anything.
 
John
"heritage part is for a later spridget"

Getting ready to deal with this myself. My front shelf is in good shape but some holes in the back. I got the top shelf for a newer spridget (it was the only choice if you wanted only the top). On the new shelf the old box heater will not line up. I plan on cutting out the back and use the back of the new shelf as a patch. It has a small lip at the back end like the sides (not present on the B/E) which might leave, it my prove useful when fitting and whould not be easily seen. It also would prevent water from attacking the seam.

Paul
 
BTW, AHSpares lists a BE heater shelf for $100. Yikes!
 
John

Great to see you are progressing well.

Pat
 
Clean up well and rust proof. Put a peice of alum in there with pop rivits and sealent. Hay, it is under the battery after all. Oh yea, battery should be in a plastic tray. Check out sizes in the kitchen but wait till wife is out. heheh. Mine never figured what happened to that size. They can be cut down easly so they have about a one inch lip.
 
Thanks Pat! The weather is starting to break at bit and I want to get working.

Jack, I'll definitely put something under the battery.


I'm not sure yet what I'll do. I'll clean it up with a wire brush on my angle grinder and find out what's under there. I'm still not sure if I want to patch or replace the shelf. The firewall still has me scratching my head. I'm not sure how to duplicate the indentations with sheet metal.
 
Hammer form John.
 
John Moore said:
Thanks Guys. Duncan, The areas on the firewall aren't flat. (...)

Right, but the top of the stiffening flange looks OK, right? so all you'd need is a flat piece with two jogs in it?

__/---\__

A sheet metal brake, a vice or (at a pinch) the edge of your workbench should do it!
 
Maybe Duncan, but I can not tell how thin the metal is on the lower portion. He may have to form it. But since the lower bit is not visible, it need not be perfect.
 
I'll defintely have to form it. I don't have a brake, but I do have a vice. I still think the easiest thing to do is to find a rusty midget with a good firewall and cut it out, but that might be harder than forming it with a hammer!
 
Most all of them have holes there. Even with the battery firmly in place they rub (install rubber blocks there when you install a battery.)

It seems like there was a patch panel available at one time, but I may be mistaken.

It really looks like a 2-3 hr job. You can make it out of a bit thinner metal since you will protect the area in the future.
 
John
Here are pictures of mine
2353121446_2dc4c9413d_m.jpg

You can easily see the difference in the two.
2352293843_8d64c5a766.jpg

Plan as above. Cut out the bad and replace with the good.


Paul
 
P.S.
$39.00 at VB plus the Tony B discount. Priceless!

Paul
 
OK, I gave it more thought (head scratching). Get a piece of 3/4" plywood and cut a rectangle in it the size of the bump (where it meets the firewall). Then get a 1/4 inch bit of square stock and cut it the size of the rectangle on top of the bump. (round the edges). place some 20 gauge steel on the wood form and sandwich it with another bit of wood identical in size. Screw them together. Carefully place the metal stock in the center and start hammering. A lot of prep, but I think you could make a decent shape. The down side... those bumps are two different sizes.
 
apbos said:
P.S.
$39.00 at VB plus the Tony B discount. Priceless!

Paul
LESS the discount...we don't want folks to think we add to the price.....hehehe :devilgrin:
 
Back
Top