
• Hey Guest!
    British Car Forum has been supporting enthusiasts for over 25 years by providing a great place to share our love for British cars. You can support our efforts by upgrading your membership for less than the dues of most car clubs. There are some perks with a member upgrade!

    **Upgrade Now**
    (PS: Upgraded members don't see this banner, nor will you see the Google ads that appear on the site.)

TR2/3/3A Axle shaft end float

drooartz

Moderator
Staff member
Gold
Offline
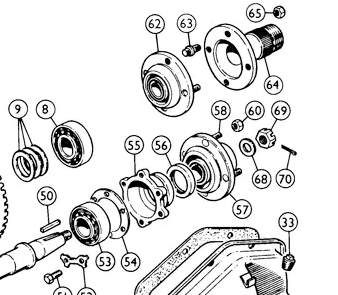
I'm sorting out a few things with my TR3A rear brakes, and was wondering about checking the axle shaft end float. I'm not finding it clear in the manuals that I have if I should tighten down the castellated nut (#69 in the pic below) to spec first and then measure? I assume so, but want to be sure before I crank things down in there.

Screenshot 2026-08-24 at 4.21.35 PM.png


I was in the brakes because I could hear something rubbing intermittently. Turned out pin and spring washer that holds down the top brake shoe in the center was missing from both rear brakes. The spring clip was was still stuck in the drum assembly, but the pins had long since wandered off. New ones on order.
 
As my memory serves, yes the nut (69) should be torqued. The axle assembly and brake baking plate are installed. The shim packs (item 55) are varied in thickness to achieve proper axel float. Ideally the shims should be the same on each side. It can be a right pain in the butt to get right.
 
Thanks! I’m hoping this one is not out of spec, but when I took the brakes apart to inspect that #69 nut was definitely not up to torque spec so we’ll see.
 
Actually...no, #69 has nothing to do with end float. The end float is set between the bearings (53) and set by the bearing retainer, (55). The hub is held outside of these on the axle. In other words, you are adjusting the bearing retainer so the axle has a limited pay between being held by the retainer outside, and the where the axle hits the pumpkin inside.
 
Actually...no, #69 has nothing to do with end float. The end float is set between the bearings (53) and set by the bearing retainer, (55). The hub is held outside of these on the axle. In other words, you are adjusting the bearing retainer so the axle has a limited pay between being held by the retainer outside, and the where the axle hits the pumpkin inside.
Thanks. I’ll be back at the car this weekend and we’ll see how things measure out.
 
In my opinion both of the above inputs are correct. First the axle should have been tight to begin with . And second the end float measures something different. I found if you even painted the outside of the brake drum it will alter the end float measurement.
Charley
 
If the brake drums made a difference, then you are not measuring axle float, but something else. Axle float is the amount of play the axle has to move between the center pumpkin and the outer axle bearing retainer. Anything outside of that makes no difference on the axle float.
 
Hopefully, this link will add to the discussion. What I learned from it last year was that both sides have to be tightened and in place before you even take the measurements. Then, you measure on one side and retighten, and when you finish that one side you can move to the other.


> General Tech - Rear Axle Spacer Shims—Solid Axle <
Thanks for that link. I'm not expecting to have to adjust the shims given how few miles this car has traveled since the restoration, but it's really good to know how to measure everything properly and make sure it's all buttoned up again the right way.
 
Back
Top