
 Hey Guest!

 Hey - did you know if you click on the title of a thread it will take you to the first unread post since you last visited that thread?
 but were afraid to ask:
  STOP!! Never post your email address in open forums. Bots can "harvest" your email! If you must share your email use a Private Message or use the
  smilie in place of the real @
 Pretty Please - add it to our Events forum(s) and add to the calendar! >>
OP
Tabcon
Jedi Warrior
Offline
Well, I suffered a slight setback on the rebuild. Nothing major, but I did have to send the (second) block out to get the deck height right. NOT to the same machine shop that ruined my first block of course. The deck was not off that much and I was determined to do it myself, but it just turned into too much of a PITA.
"Hound"- the 2 very important lessons I have learned from trying to do everything myself are:
1. Get the right tools.
2. Get the right tools.
I was spending more time trying to make or rig things to use then I was actually spending working on the engine. Depending on what you're doing, there are 3 essential tools that I think are mandatory to rebuild your engine correctly.
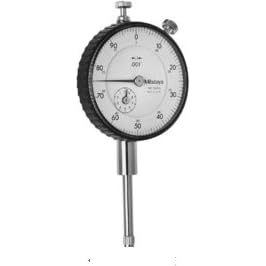
1. <span style="font-weight: bold">A GOOD dial indicator!</span> Not a $29.95 mass produced one made in China. You don't need to spend a fortune on one, but I did a little research and found the best one for this particular application to be the Mitutoyo 1" dial gauge. No, it's not Swiss made but it's a darn good one and extremely accurate. It's also very sturdy and easy to read. Some of the very expensive ones are just too fussy and delicate to use in a garage setting. I bought it off of Amazon for about $93.00, which is a great deal for this gauge that normally sells for around $130+.
https://www.amazon.com/Mitutoyo-2416S-001...9173179&sr=1-23
2. A good 3D magnetic base to use with the Mitutoyo. Again, after a little research and shopping around, I settled on a base made by Noga.

This is a fantastic base and very easy to use. The arm articulates in 3 dimensions and it has a fine adjustment knob as well. The magnetic base is also very powerful. You really don't want to drop your dial indicator on a concrete floor. I got this one from Wholesale Tool for about $108.00.
https://www.wttool.com/
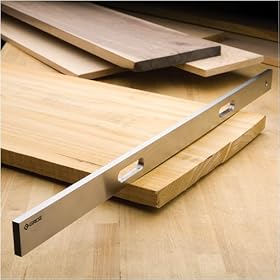
3. A good straight edge. These things are everywhere. Some are junk and some are ridiculously expensive. I found one, again at Amazon for under $60.00 that works extremely well.
I paid less than 300 bucks for all these tools and the headaches they have saved me are well worth it.
"Hound"- the 2 very important lessons I have learned from trying to do everything myself are:
1. Get the right tools.
2. Get the right tools.
I was spending more time trying to make or rig things to use then I was actually spending working on the engine. Depending on what you're doing, there are 3 essential tools that I think are mandatory to rebuild your engine correctly.
1. <span style="font-weight: bold">A GOOD dial indicator!</span> Not a $29.95 mass produced one made in China. You don't need to spend a fortune on one, but I did a little research and found the best one for this particular application to be the Mitutoyo 1" dial gauge. No, it's not Swiss made but it's a darn good one and extremely accurate. It's also very sturdy and easy to read. Some of the very expensive ones are just too fussy and delicate to use in a garage setting. I bought it off of Amazon for about $93.00, which is a great deal for this gauge that normally sells for around $130+.
https://www.amazon.com/Mitutoyo-2416S-001...9173179&sr=1-23
2. A good 3D magnetic base to use with the Mitutoyo. Again, after a little research and shopping around, I settled on a base made by Noga.
This is a fantastic base and very easy to use. The arm articulates in 3 dimensions and it has a fine adjustment knob as well. The magnetic base is also very powerful. You really don't want to drop your dial indicator on a concrete floor. I got this one from Wholesale Tool for about $108.00.
https://www.wttool.com/
3. A good straight edge. These things are everywhere. Some are junk and some are ridiculously expensive. I found one, again at Amazon for under $60.00 that works extremely well.
I paid less than 300 bucks for all these tools and the headaches they have saved me are well worth it.

