• Hi Guest!
    You can help ensure that British Car Forum (BCF) continues to provide a great place to engage in the British car hobby! If you find BCF a beneficial community, please consider supporting our efforts with a subscription.

    There are some perks with a member upgrade!
    **Upgrade Now**
    (PS: Subscribers don't see this gawd-aweful banner
Tips
Tips

after market steering wheel horn push set up

Before trying to make a second slip ring arrangement, take your multimeter and look to see if there is voltage on the "to horn" wire you show in both your sketches. On cars with Lucas wiring and no horn relay you should find battery voltage on that wire. If that proves to be true, and if that wire is connected to the slip ring that is already on the steering column, please refer back to my last post.
 
dklawson said:
Before trying to make a second slip ring arrangement, take your multimeter and look to see if there is voltage on the "to horn" wire you show in both your sketches. On cars with Lucas wiring and no horn relay you should find battery voltage on that wire. If that proves to be true, and if that wire is connected to the slip ring that is already on the steering column, please refer back to my last post.

Whole harness is getting replaced, relay on the horn circuit (regardless of how I end up hooking it up) so no voltage anywhere now but it will all be OEM except relays and switches.
No slip ring to speak off on the car (after market hub and wheel) but I have what I think is the stick ring on a little housing that I assume would be bolted to the dash. It won't fit up against the new hub anyway I'm pretty sure. I'll try the slack wire approach first probably.
 
Let me offer my personal experience regarding the looped wire solution.

3 years ago I needed to have the GT6 inspected and as usual its horn wouldn't honk. I determined that the steering column had lost its ground. I thought "no problem, I'll attach a wire, loop it around the column and ground the far end". I only had to drive 2 miles to the inspection station making two 90 degree turns. The wire broke before I got there. I spliced the wire back together while waiting and the car passed. Subsequently I found the real problem and fixed it. I only bring this up here as a caveat that the looped wire isn't likely to last long and more importantly in your situation... when it fails it's likely to do so where the horn sounds and won't stop.

I looked through some of my later manuals at cars having horn relays. On the cars with horn relays, the stationary ring was also "hot" with the horn pushbutton providing the ground connection. I don't have a Midget parts book in front of me to make educated suggestions. I did however take your first sketch and modify it slightly to show what I mentioned earlier. (Sorry, I don't know how to post pictures directly... here's a link to it).
https://home.mindspring.com/~dklawson/minipics/ModifiedVandyke01.jpg
 
I thought the springy brush physically moved out to touch the ring when you pushed on original horn button? Or is the OEM way a continual contact and circuit completed "internally", just like my after market one? Not that it matters really, just trying to decipher how it "used to be" from the one original part I still have (slip ring). Maybe the hole in back of housing is supposed to be where the brush sticks out to always rub the ring?
In your modified drawing, I'd still need to connect my backplate to the column though, right? thanks for the input BTW!
 
Horn Brush is always in contact with the slip ring. It is only when horn button is pushed and it shorts to ground that the horn sounds is my understanding of the way it works. Now I don't want to get into a positive/negative ground discussion but does that in any way enter into this discussion.
 
Jim_Gruber said:
Horn Brush is always in contact with the slip ring. It is only when horn button is pushed and it shorts to ground that the horn sounds is my understanding of the way it works. Now I don't want to get into a positive/negative ground discussion but does that in any way enter into this discussion.

Okay then I was wrong earlier, my button can be made to work similar to OEM if I really want it to.
I don't think +, - ground matters, just a polarity thing. I am going from positive to negative ground during this whole mess too.
 
In answer to your last question about the contacts, the steering column on the BMC cars I've worked on were grounded. With your horn pushbutton having a metal back, it should make the ground contact for the pushbutton when you secure it in place. I don't see how your particular horn button is secured to the wheel but there should be something about it that places the back side in good electrical contact with the wheel.
 
Okay, home with parts in hand instead of at work remembering. Looks like horn push does ground itself to hub through little round nubs on the perimeter, so my soldered on wire is now cut off. If I get a springy brush thingy I can connect it to the red wire, it can stick out the backside of the hub through the hole there (provided for that purpose I suppose) isolated from the hub of course, and rub on the ring of the old original column shroud.....in theory...things would have to line up but that's the plan as it was intended I would think, right?
Pictures here!!

Thanks Doug, I'm with you now! I need a brush thingy.

VB shows three different ones, which one is best for this set up? no idea, and wouldn't you know I just put in a Moss order last Thursday, ugh! Wonder if there's something similar out there in the rest of the world?
 
Here FWIW is the inside of my horn push and the contact
 

Attachments

  • 15450.jpg
    15450.jpg
    24.8 KB · Views: 318
So that's what they look like, eh? I'll need to get me one of those and hope things line up alright, glad I asked after all though it took me a while to catch on, much more elegant than trying to leave loose wires stashed beyond the dash.

Thanks Doug and Jim, now that the light bulb went on in my head all your posts make sense.

PS trip to garage and I see I can adjust the fore and aft location of the whole dash to get the slip ring and housing at proper position for brush contact, better have that set before I cut and adjust all my dash controls eh? choke, starter, heater valve, all must be happy.
 
You can get a large auxilliary horn switch button from auto parts stores and hide it under your dash where its easy to get at.
I need all of the horn push parts for a 66. Are they the same? I'm reinstalling the factory wheel. Appreciate anyone that has them contacting me off the list.
Thanks,KA
 
nomad said:
You can get a large auxilliary horn switch button from auto parts stores and hide it under your dash where its easy to get at.
I need all of the horn push parts for a 66. Are they the same? I'm reinstalling the factory wheel. Appreciate anyone that has them contacting me off the list.
Thanks,KA

I had an auxiliary horn push button on the dash, you can trip the horn with any switch you want, mounted anywhere that's easy, but the best place for horn button is on the wheel, the hard part is mounting a switch on a moving surface!

Didn't '66 have the horn on the column as stalk? I don't know, probably not yet, is that a MK3 thing? I'd still want a center push on steering wheel, it's where I instinctively reach for a horn.
 
'68 and '69 had horn on the stalk.
 
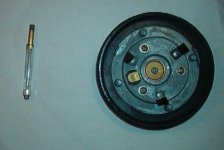
Stopped by University Motors during my lunch break and between job locations, they had a B horn push brush so I bought it. They were in the middle of their gearbox rebuild class, man was I jealous. I wanted to take that class in the worst way. Oh well. Back to work.
Hope I can mod the B brush to work, it looks just like the one pictured above in JP's post, I'm thinking of cutting off the bullet connector on my push button's red wire and soldering it right on the end of the brush, shrink tube on it too maybe be prudent, hate to short the horn. That or use the method Doug suggested of sticking a brass contact point to the rearside of the push, connect red wire, let that end of the brush ride on it. Would make changing the brush easier, should the need arise, which it probably won't with a relay in the mix. If I'm lucky the slip ring/shroud will line up with my oak dash and after market hub...hey, it COULD happen.
 
You're close to University Motors? I'd love to visit there sometime!

Remember that the "long" end of the spring/brush goes down against the slip ring in the column. Regardless of what eventual method you use to connect the red wire to the brush, it sounds like you're forming a plan that will work and be clean. Be sure to let us know how it works out.
 
dklawson said:
You're close to University Motors? I'd love to visit there sometime!

I stumbled on John Twist and University Motors back in 88 or so when I was in college and had a '75 Midget, and no money. He doled out advice. His shop is in Ada, Mi now (was in the 'hood in Grand Rapids in '88, about 3 blocks from my college house....) Yeah, great guy. I have been going there for parts a bit lately like today when I don't want to pay shipping on a $13 part. UM charged me $15 though, but hey, no wait and no shipping. Should have seen their lot this morning, TCs and Healeys and well, everything, too cool. Record high temp here today, 60!!! but putting in a 15 hour day or so, oh well.
From my home they're probably 30 miles away, from work about 5.
 
I've also got Eclectic Motorworks about 20 miles in the opposite direction (Holland, MI) The guys that did that Midget rebuild in that magazine last year. My cousin works there.

Anyway.
I mocked up the dash in the car last night so I could determine if the stock column surround/slip ring would line up with the after market hub. I think I can make it work. Once I take the drill to the wood I'm committed. Can't believe that part is $150 from Moss!
It seems like the brush is going to be way too long though. The surround's ring end just sits inside the hub, as it should I suppose. But at that point the brush's inside end wants to be way inside the horn push. I can cut the one end way way down, even then jury is out on if it'll fit. Still, I need to cover the bare column and crude hole in wood dash anyway so this will be the best route ultimately.
I'm getting antsy, not much progress lately and weather stinks, I need to work on the wife's van and my Dodge too (EGR and front brakes respectively).
I'm planning on pulling the EGR and cleaning the daylights out of it before I replace
 
years ago i got a wood wheel from a friend of mine. I sanded it varnished had it for years last spring i drilled the holes to mount it up got a nice fit bolted it on and then tried to put the horn on .... duo!!!!!

clean your contacts very well.

cheery
steve
 
I'm a bit surprised it takes this much effort with a common aftermarket wheel and hub. Maybe they have their own shorter brushes or a whole different approach, I don't know. I inherited it all. I'm not a huge fan of this 4 spoke wheel anyway but most others tend to cover the gauges..... In this picture I had just put the hornpush back on after fab'ing up an MG logo (original was a Sprite one) and the wheel is not in it's straight position. Normally the spokes are at right angles, straight up down and across, allowing access to see the tach and speedo. You can see the ugly hole in the wood where the column comes through.
wheelshot.jpg
 
I know, I know. To cover that nasty hole one of those chrome things that goes against the wall on the water pipe for a toilet.


Whoo, I just had to say that.
 
Back
Top