Hi Guest!

 Hey - did you know if you click on the title of a thread it will take you to the first unread post since you last visited that thread?
 but were afraid to ask:
  STOP!! Never post your email address in open forums. Bots can "harvest" your email! If you must share your email use a Private Message or use the
  smilie in place of the real @
 Pretty Please - add it to our Events forum(s) and add to the calendar! >>
2wrench
Luke Skywalker
Offline
Horrah! Got the Bentley repair manual in the mail
today, thanks to Alana. Appreciate that Alan.
So now we begin what I expect will be a real journey
and a stretch for me. Never tore an enine apart before
in my life.
I do have friends with limited knowledge, albeit more than
mine, who have agreed to come over and urge me forward,
just for the free food, drinks but mostly to be entertained
at my expense -- and I don't mean by money expense --
although I must say it would apply as well.
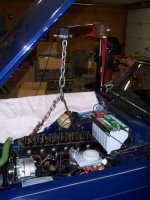
So the first steps in the plan are to: Remove the bonnet
and pull the head. Sounds easy enough, roit?
So I will drain the fluids and proceed to remove the head
backing offf the head bolts in reverse order in 20 pound
increments.
Now, once I am in, the idea is to look for bad/worn parts
right? So, here I plan to post pics to the Forum and discuss what it looks like with you all...ya'll... and
allow my pit crew friends at home to weigh in.
The over-all approach is to purchase parts and have them
installed by a machine shop.
I have a very good notion to "upgrade" parts. Concern is
whether I would be moving tuning stuff and the like out of
specs. Just setting car to specs is enough of a challenge
for me, without adjusting for changes that are too radical.
Thinking to go with a little bit hotter running crank, for
starters. Don't think I want headers. Planning to stay
with original carbs for simplicity and cost concerns.
Any advice, comments or concerns are welcome. First
opportunity to start work is this weekend, December 8/9.
Hope to pull the head and get a look for what is going
on. Hoping my friends on the Forum will keep an eye on
me.
today, thanks to Alana. Appreciate that Alan.
So now we begin what I expect will be a real journey
and a stretch for me. Never tore an enine apart before
in my life.
I do have friends with limited knowledge, albeit more than
mine, who have agreed to come over and urge me forward,
just for the free food, drinks but mostly to be entertained
at my expense -- and I don't mean by money expense --
although I must say it would apply as well.
So the first steps in the plan are to: Remove the bonnet
and pull the head. Sounds easy enough, roit?
So I will drain the fluids and proceed to remove the head
backing offf the head bolts in reverse order in 20 pound
increments.
Now, once I am in, the idea is to look for bad/worn parts
right? So, here I plan to post pics to the Forum and discuss what it looks like with you all...ya'll... and
allow my pit crew friends at home to weigh in.
The over-all approach is to purchase parts and have them
installed by a machine shop.
I have a very good notion to "upgrade" parts. Concern is
whether I would be moving tuning stuff and the like out of
specs. Just setting car to specs is enough of a challenge
for me, without adjusting for changes that are too radical.
Thinking to go with a little bit hotter running crank, for
starters. Don't think I want headers. Planning to stay
with original carbs for simplicity and cost concerns.
Any advice, comments or concerns are welcome. First
opportunity to start work is this weekend, December 8/9.
Hope to pull the head and get a look for what is going
on. Hoping my friends on the Forum will keep an eye on
me.