• Hey Guest!
    British Car Forum has been supporting enthusiasts for over 25 years by providing a great place to share our love for British cars. You can support our efforts by upgrading your membership for less than the dues of most car clubs. There are some perks with a member upgrade!

    **Upgrade Now**
    (PS: Upgraded members don't see this banner, nor will you see the Google ads that appear on the site.)
Tips
Tips

TR2/3/3A 1960 TR 3A vacuum advance line installation

Tinkerman

Darth Vader
Offline
I have the missing parts to install the vacuum line to the front carb. Is there any trick to doing that?
It looks straight forward but I have had problems on previous attempts.

Your thoughts would be greatly apprecuiated.
Tinkerman
 
If you have the threaded part for the carburator end, that is the critical part. The other end goes to the distributor and can be done with a push on piece of tubing if you do not have the end piece. The tube is about 1/8 inch diameter and is held by a rubber piece in a metal hook off the themostat housing. You can see the parts in the MOSS book. So the only hard part is screwing into the bottom of the front carb. That is not bad as long as the threads are good.

Jerry
 
Dick --
I don't know the nature of your problems, but I do have a "trick." Leave some extra length in the line to make a loop in it, like the picture. This relieves stress on it when the distributor is turned to adjust timing.
 

Attachments

  • Arrow.jpg
    Arrow.jpg
    60.6 KB · Views: 156
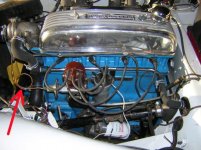
Important to make sure the join under the front carby is airtight, or the vacuum won't work and the carbies can't be tuned properly. Early cars had a brass adapter screwed into the carby body which must be fitted first and made tight. The tiny fibre sealing washer is usually long gone. Then a nut and olive on the vacuum tube attaches the tube to the brass adaptor. Later cars had a push on carby fitting which is a better way to go. Early dizzy canisters had a thread fitting for the vacuum tube - later were push-on.

Check the dizzy vacuum canister is operating - gas vapours can harden the diaphragm so it can't flex, rendering it useless. The vacuum advance only helps with better gas mileage at highway speed, so isn't vital. If it's removed the hole under the front carby must be plugged.

Viv
 
If y'all are really talking about a Vacuum Advance set up..should you be using the vacuum from the bottom of the carb ?
 
thanks for the comments.

"If y'all are really talking about a Vacuum Advance set up..should you be using the vacuum from the bottom of the carb ?" It is A Factory set up Poolboy and I really am trying to keep it "as it came off the dealership floor". Doing that can be a real pain at times, sigh.

Dick
 
If you are talking about the brass adapter, I removed the carb just to be able to see clearly and complete to my satisfaction.
Sometime a few minutes spent saves many minutes of aggrevation.
 
If y'all are really talking about a Vacuum Advance set up..should you be using the vacuum from the bottom of the carb ?
SU H6 throttle plates turn the opposite direction compared to later carbs. So the vacuum advance fitting is indeed on the bottom (and AFAIK none of them ever had a retard fitting).

BTW, a 1/4" drive, 1/2" flex socket makes the carb R&R a lot easier. With a little fiddling, it will fit in between the carb body & float bowl, to let you remove the front lower nut easily. Works for the other nuts, too.

 
Back
Top