
-
 Hey Guest!
British Car Forum has been supporting enthusiasts for over 25 years by providing a great place to share our love for British cars. You can support our efforts by upgrading your membership for less than the dues of most car clubs. There are some perks with a member upgrade!**Upgrade Now**
(PS: Upgraded members don't see this banner, nor will you see the Google ads that appear on the site.)
You are using an out of date browser. It may not display this or other websites correctly.
You should upgrade or use an alternative browser.
You should upgrade or use an alternative browser.
T-Series 1953 MG TD Reassembly - CONTINUOUSLY UPDATED
- Thread starter tony barnhill
- Start date
OP
tony barnhill
Great Pumpkin - R.I.P
Offline
A few photos to try & show some interesting differences:
1st photo, vping's original steering wheel cap off his '52 TD:
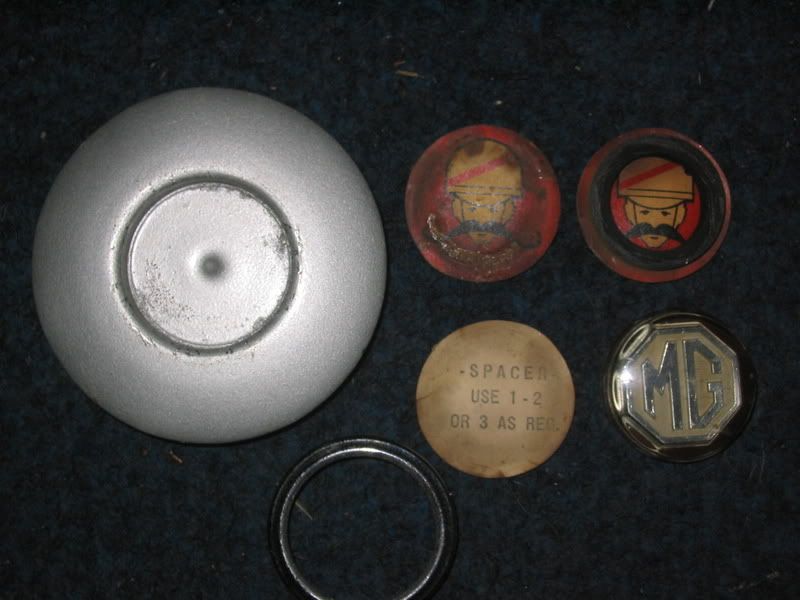
2nd photo, on the right is the original cap off my '53 TD & on the left is the Moss reproduction cap:

3rd photo, is the Moss reproduction cap on my Moss reproduction steering wheel - in person, it matches the steering wheel perfectly but for some reason in the photo its a bit shiny:

1st photo, vping's original steering wheel cap off his '52 TD:
2nd photo, on the right is the original cap off my '53 TD & on the left is the Moss reproduction cap:
3rd photo, is the Moss reproduction cap on my Moss reproduction steering wheel - in person, it matches the steering wheel perfectly but for some reason in the photo its a bit shiny:
OP
tony barnhill
Great Pumpkin - R.I.P
Offline
Remember, Jack - the TD WAS a Midget!
OP
tony barnhill
Great Pumpkin - R.I.P
Offline
/bcforum/images/%%GRAEMLIN_URL%%/banana.gif /bcforum/images/%%GRAEMLIN_URL%%/banana.gif /bcforum/images/%%GRAEMLIN_URL%%/grin.gif <span style='font-size: 12pt'> Stay with me, this post is gonna cover different topics - but you'll be pleasantly surprised at the end... </span>
<u>1st: Back to steering wheel center caps</u>....I took the logo off my original cap - the cap was originally painted what appears to be similar to the steering wheel & instrument panel & I suppose the PO removed the old paint to redo it...in the photo, you can see the original paint down under where the logo was...&, vping, unless there's some serious change between '52 & '53, one of us doesn't have an original cap; & the little decals under your logo weren't under mine.:

/bcforum/images/%%GRAEMLIN_URL%%/banana.gif /bcforum/images/%%GRAEMLIN_URL%%/banana.gif /bcforum/images/%%GRAEMLIN_URL%%/banana.gif /bcforum/images/%%GRAEMLIN_URL%%/banana.gif <span style="color: #FF0000"><span style='font-size: 14pt'>PRETTY, PRETTY, PRETTY: </span> </span>
My chrome pieces just arrived from Knox Custom Chrome...Jack, you were right on their work - & the photos don't do justice.....here's the radiator surround & windshield frame:


<span style="color: #000099"> <span style='font-size: 11pt'>... & I had 1 NOS left split rear bumper for Jerri's GT but didn't have the other so I also had them rechrome a bumper for me: </span> </span>

I did some work o the car today but these photos excited me so much that I accidentally dumped the photos of today's work out of the camera! Oh well, tomorrow should be some serious progress now that I have a radiator shell!
<u>1st: Back to steering wheel center caps</u>....I took the logo off my original cap - the cap was originally painted what appears to be similar to the steering wheel & instrument panel & I suppose the PO removed the old paint to redo it...in the photo, you can see the original paint down under where the logo was...&, vping, unless there's some serious change between '52 & '53, one of us doesn't have an original cap; & the little decals under your logo weren't under mine.:
/bcforum/images/%%GRAEMLIN_URL%%/banana.gif /bcforum/images/%%GRAEMLIN_URL%%/banana.gif /bcforum/images/%%GRAEMLIN_URL%%/banana.gif /bcforum/images/%%GRAEMLIN_URL%%/banana.gif <span style="color: #FF0000"><span style='font-size: 14pt'>PRETTY, PRETTY, PRETTY: </span> </span>
My chrome pieces just arrived from Knox Custom Chrome...Jack, you were right on their work - & the photos don't do justice.....here's the radiator surround & windshield frame:
<span style="color: #000099"> <span style='font-size: 11pt'>... & I had 1 NOS left split rear bumper for Jerri's GT but didn't have the other so I also had them rechrome a bumper for me: </span> </span>
I did some work o the car today but these photos excited me so much that I accidentally dumped the photos of today's work out of the camera! Oh well, tomorrow should be some serious progress now that I have a radiator shell!
OP
tony barnhill
Great Pumpkin - R.I.P
Offline
Well hopefully the car will leave the bodyshop in a few days to the upholstery shop for new top & side curtains!
OP
tony barnhill
Great Pumpkin - R.I.P
Offline
Some things I learned about working with freshly rechromed parts:
1) Every thread will have to be chased to clean the chrome residue out of them so nuts will go on.
2) If you replace a part of an assembly on an MG TD, replace everything. On mine, I had to replace the radiator shell which we sent off for rechrome; but we didn't replace the grille slats and painted the original slats to match the interior. Since these are hand built cars, nothing's in the same place on 2 cars - so today we had to remove all the studs from inside the radiator shell so the grille slats would fit...that meant each stud had to be epoxied in a new place...luckily, I had some extra studs since Moss doesn't carry a part number for them (however, tomorrow I'll give you the trick for making studs when I make photos of the inside of the radiator shell - you'll need it because you can't remove the slats without breaking at least 1 stud!).)
3) When you reassemble an MG TD windshield frame that's been rechromed & are using new screws - reassemble the frame without the glass, cut the screws to length & then install the glass....no, I didn't break my glass - but, it'll be a day or so before we've got the frame assembled/disassembled & reassembled! Oh, don't install the interior front panel (kick panel) until after the windshield is in place unless you're a contortionist!
We did, however, move her out in the sun for the first time to wash down the frame/engine compartment/suspension...when we finished them & before we started on the body, my bodyman sprayed a chemical coating on everything to keep overspray off - it always looked like a film of dust...today we washed it off...it ran off like liquid dishwashing soap. The middle photo shows the coating on the frame horms - it looks like dust:


The Sequoia Creme color really changes its hue in the sun...& we've not buffed it yet!
Tomorrow, I'll take photos of the radiator shell with the grille slats installed, install it & then start on the front fenders. If anything goes as palnned, tomorrow should show some progress....I know today I worked 8 hours & can't see any!
1) Every thread will have to be chased to clean the chrome residue out of them so nuts will go on.
2) If you replace a part of an assembly on an MG TD, replace everything. On mine, I had to replace the radiator shell which we sent off for rechrome; but we didn't replace the grille slats and painted the original slats to match the interior. Since these are hand built cars, nothing's in the same place on 2 cars - so today we had to remove all the studs from inside the radiator shell so the grille slats would fit...that meant each stud had to be epoxied in a new place...luckily, I had some extra studs since Moss doesn't carry a part number for them (however, tomorrow I'll give you the trick for making studs when I make photos of the inside of the radiator shell - you'll need it because you can't remove the slats without breaking at least 1 stud!).)
3) When you reassemble an MG TD windshield frame that's been rechromed & are using new screws - reassemble the frame without the glass, cut the screws to length & then install the glass....no, I didn't break my glass - but, it'll be a day or so before we've got the frame assembled/disassembled & reassembled! Oh, don't install the interior front panel (kick panel) until after the windshield is in place unless you're a contortionist!
We did, however, move her out in the sun for the first time to wash down the frame/engine compartment/suspension...when we finished them & before we started on the body, my bodyman sprayed a chemical coating on everything to keep overspray off - it always looked like a film of dust...today we washed it off...it ran off like liquid dishwashing soap. The middle photo shows the coating on the frame horms - it looks like dust:
The Sequoia Creme color really changes its hue in the sun...& we've not buffed it yet!
Tomorrow, I'll take photos of the radiator shell with the grille slats installed, install it & then start on the front fenders. If anything goes as palnned, tomorrow should show some progress....I know today I worked 8 hours & can't see any!

Offline
It's ALL progress, friend. I've done a few T-Series cars and all were 'different'. It is really a matter of time more than anything else. Patience and 'fiddling' are high on the list too. When it rolls out it will ALL be worth the effort and it'll ~SHOW~! /bcforum/images/%%GRAEMLIN_URL%%/thumbsup.gif
OP
tony barnhill
Great Pumpkin - R.I.P
Offline
/bcforum/images/%%GRAEMLIN_URL%%/banana.gif /bcforum/images/%%GRAEMLIN_URL%%/banana.gif /bcforum/images/%%GRAEMLIN_URL%%/banana.gif <span style='font-size: 17pt'> <span style="color: #FF6666">WOO HOO </span></span>
First, I've gotta show you what she looked like when I covered her up this afternoon:


Tomorrow fender welting goes on this side then the other fender & running board should go on along with the front valance panel and bumper...might even get to the hood assembly!!
Now, back to the issue with the radiator shell...here's a photo fo the backside with the slats going in....see the little studs where the slats are bolted in? Those are the ones that break off or are in the wrong place when you put the slats from one radiator shell into another radiator shell...

And Moss doesn't show a parts number for them....but, they do show this parts number:

...that parts number is for an MG TF....bolt set hood side strip...just cut the little wire off & epoxy them in place inside the radiator shell...
VOILA! Finished product"

First, I've gotta show you what she looked like when I covered her up this afternoon:
Tomorrow fender welting goes on this side then the other fender & running board should go on along with the front valance panel and bumper...might even get to the hood assembly!!
Now, back to the issue with the radiator shell...here's a photo fo the backside with the slats going in....see the little studs where the slats are bolted in? Those are the ones that break off or are in the wrong place when you put the slats from one radiator shell into another radiator shell...
And Moss doesn't show a parts number for them....but, they do show this parts number:
...that parts number is for an MG TF....bolt set hood side strip...just cut the little wire off & epoxy them in place inside the radiator shell...
VOILA! Finished product"
OP
tony barnhill
Great Pumpkin - R.I.P
Offline
Hey, I had that fender bolted on & then bolted off 3 times today!! & its a 3-man job to handle it....
& I'm real pleased with the color of the grille slats - we matched the leather upholstery almost perfectly!
& I'm real pleased with the color of the grille slats - we matched the leather upholstery almost perfectly!