• Hi Guest!
    You can help ensure that British Car Forum (BCF) continues to provide a great place to engage in the British car hobby! If you find BCF a beneficial community, please consider supporting our efforts with a subscription.

    There are some perks with a member upgrade!
    **Upgrade Now**
    (PS: Subscribers don't see this gawd-aweful banner
Tips
Tips

1940 Stearman restoration (moved from Triumph forum so all can enjoy)

I needed to mount the rudder on the fin. Here I am showing the ball bearing type that will eventually hold the rudder...but I did not want to press in the bearings yet, so I turned some temporary ones on the lathe out of brass...just to hold the parts together, but still allow easy disassembly.

3XTnIjF.jpg


TSt4Ok0.jpg


KGezOEz.jpg
 
And here you can see I used a rod to hold the rudder on, and it can easily be pulled off the plane by sliding the rod out.

pQq3s8P.jpg


cN8ni4I.jpg


And now we get to work on the rudder proper. All the tubes are spelled out in the blueprints, so they are fashioned on the bench and then carefully tacked into place.

Yuv63WB.jpg


dkfmRNY.jpg
 
And done. Here is the bent up original next to the newly fashioned rudder. It's kinda hard to see with all the junk in the back ground. I am setting new records for the size project I am working out of a garage?!?

bU2m8a1.jpg


And here the rudder is back on the bench for final welding. It amazes me every time I look at it how large the rudder is, but how thin it is in cross section! 80+ years say it works, though.

njeraa1.jpg


mRD85PC.jpg


mJdh7ps.jpg
 
WqiBomu.jpg


6Xpl7ko.jpg


SO...

Because this is a factory built airplane, it must go through rigid FAA inspections. At this point the frame and rudder are ready for paint, but I had to find and FAA authorized Airframe and Powerplant mechanic with an Inspection Authorization. How is that for a mouthful? Now, I am NOT a qualified mechanic, and therefore have to work under the supervision of a qualified A&P, naturally this first inspection was a bit stressful, to say the least. The gentlemen came out and found about a dozen tiny pinholes in my 500 or so welds. I had them touched up in 30 minutes...

...and then...

...had to wait...

...another 2 weeks for them to come back out for the sign off.

The good news is the IA said my work was good enough that he will not need to inspect anything else until just prior to covering the entire airframe with fabric. To put that in perspective, the fabric is the LAST thing that goes on the plane before it can fly. I'll take that as a compliment...
 
So, with the inspection under my belt, I was able to FINALLY put paint on the frame. The original color was a mixture of Zinc Chromate, black enamel, and a dab of aluminum flakes. I thought, and thought, and thought, about what this generic mixture of paints would look like. And this is what I finally came up with...

5LP1jZ6.jpg


KeJSK6S.jpg


loeKSrt.jpg


Those of you who have been here long enough to follow the TR2 restoration will key in to the fact that the frame is...British Racing Green...how's that?!? If you guys ever read the long dissertation about the history and search to find the "real" BRG shade will remember that the thought is that there was a ton of Olive Drab left over after the big war. So this was repurposed in the UK by adding black to take the "military" out of the shade and create a new usable color. Green...Black...that's good enough for me! I did add a flattening agent, as the original color was not a gloss.
 
Next, there are some aluminum covers that go on the leading and trailing edges of the fin and rudder. I had to create a jig to fashion the trailing edges, so back to the mill. I created a log of mild steel with a groove. I could then hammer an angle of steel into the channel to form the straight trailing edge. I tried using a hammer, but I learned the aviation 2024 aluminum does not like being heat worked!

dCdXT3X.jpg


yUNi5V6.jpg


lZ5Ihxm.jpg


vyuJn9o.jpg
 
I finally got to use clecos like Frank C! Speaking of which, we haven't heard from Frank since August...Frank, where did you go??

LPPWww0.jpg


And I finished up by re-making the ID tags for the rudder and fin. In aviation, all parts have ID's with serial numbers, so their history can be tracked.

PyXWrxh.jpg


So that's it for a couple months...!

Cheers!!
 
That's some project you have taken on there John, at least with the TR what the eye doesn't see the heart won't grieve but in this case, it must be exactly by the book with no exceptions.
Keep up the good work.

Graham
 
Amazing! So far above my pay grade I just sit it wonderment following this project. I have thoroughly enjoyed and appreciated the TR project notes also, VERY useful!! Thank you CJD.

Jay
 
John, would you be open to moving this project to the pub? I am loving it and I feel like it might be a great thread for the whole forum. Let me know.
 
Please oh please keep the wonderful eye candy coming!! :D I am guessing that the materials and welding supplies, etc. are better today than when this plane was new so the end result will be a plane that is better constructed, etc. than the day it left the plant? Looking forward to the updates!!
 
I am SO glad this got moved into the Pub area - I wouldn't have seen it otherwise and it is truly an epic project. Please keep reports coming!
 
Just occasionally, so I don't wear out my welcome posting plane pics on a car forum.
Post as much as you like - this is the Pub forum and it's for just this sort of "other than British car" banter! Thanks for posting this update by the way! Very cool stuff!
 
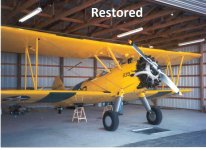
No welcome wear out here, I've been there many times, mine back in the 60s. PJ
My ex Navy Stearman.jpg
 

Attachments

  • My Stearman restored.jpg
    My Stearman restored.jpg
    130.4 KB · Views: 91
I am SO glad this got moved into the Pub area - I wouldn't have seen it otherwise and it is truly an epic project. Please keep reports coming!
Glad people appreciate this move - I am absolutely in awe of it all (mostly because I think LBCs are bonkers enough :D )

Grateful for John's willingness to share this journey and keep em coming!!! :cheers:
 
Back
Top