I'm posting this in the hope that someone else may find this experience helpful.
The water pump on the 100-6 leaked badly. And the spare water pump that I then installed dripped slowly. So I looked for a replacement pump and searched past discussions on the topic here and elsewhere. It seems that many owners have had bad experiences with the reproduction pumps available, most of all apparently made by one company beginning with the letter C.
So, I decided to try rebuilding the original pumps. I found replacement bearings and a replacement seal (likely the hard part to find) in a kit provided by Michael Salter. His blog post is for the BJ8 water pumps, but he also has the kits for the earlier cars. https://www.netbug.net/blogmichael/?p=994
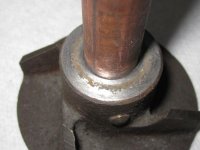
My first try did not meet with complete success as the pump still dripped a little. The reason for that probably was that the face of the impeller that runs against the carbon surface of the new seal was pitted and rough, allowing a little water to seep past. My initial efforts with a small file and fine sandpaper had not sufficiently smoothed the surface to allow for a good seal (see first pic below). Off came the pump again; it's amazing how much faster one can remove and reinstall parts after doing the same procedure a few times.
This time I pulled out the miniature lathe and resurfaced the part of the impeller that the seal rides against. For the first impeller, I removed the shaft and temporarily fitted a short piece of copper to bring the impeller closer to the lathe head to reduce wobble. For the second impeller, I clamped the lathe jaws onto the end of the water pump shaft. That also worked OK as it did not wobble noticeably. For the resurfacing, I began with small, fine files and then moved on to fine cloth backed sandpaper, wrapped around a small file to keep the sandpaper rigid.
Success at last. No leaks.


 Hi Guest!

 smilie in place of the real @
 Pretty Please - add it to our Events forum(s) and add to the calendar! >>

