-
 Hey Guest!
British Car Forum has been supporting enthusiasts for over 25 years by providing a great place to share our love for British cars. You can support our efforts by upgrading your membership for less than the dues of most car clubs. There are some perks with a member upgrade!**Upgrade Now**
(PS: Upgraded members don't see this banner, nor will you see the Google ads that appear on the site.)

Tips
- We have a special forum called "Member Articles" where you can submit actual articles for consideration for publication. Learn More
- Don't have an Avatar? If not, your avatar will default to the 1st character in your username. Go into "Account Details" to change your Avatar.
- Some basic forum navigation info: click
 Hey - did you know if you click on the title of a thread it will take you to the first unread post since you last visited that thread?
- Hey Guest - Is your British Car Club in our Clubs database? If not, send me a PM - Basil

- Looking for a local club? Click the "Clubs" tab above and browse hundreds of clubs world-wide.
- Add Android or iPhone APP: click
- Did you know - any picture or video you add in your posts in any marque-specific forum will also get added to the Media Gallery automatically.
- A few more tips about posting and replying: click
- Hey there Guest - be sure to keep your profile page up to date with interesting info about yourself: learn more
- More tips and tricks on Posting and Replying: click
 but were afraid to ask:
  STOP!! Never post your email address in open forums. Bots can "harvest" your email! If you must share your email use a Private Message or use the
  smilie in place of the real @
- Want to mention another member in a post & get their attention? WATCH THIS

- So, you created a "Group" here at BCF and would like to invite other members to join? Watch this!
- Hey Guest - A post a day keeps Basil from visiting you in the small hours and putting a bat up your nightdress!
- Hey Guest - do you know of an upcoming British car event?
 Pretty Please - add it to our Events forum(s) and add to the calendar! >> Here's How <<
- Hey Guest - you be stylin' Change the look and feel of the forum to fit your taste. Check it out
- If you run across an inappropriate post, for example a post that breaks our rules or looks like it might be spam, you can report the post to the moderators: Learn More
- If you would like to try some different "looks" or styles for the site, scroll to the very bottom, on the left and click the Style Selector.
You are using an out of date browser. It may not display this or other websites correctly.
You should upgrade or use an alternative browser.
You should upgrade or use an alternative browser.
Back on the Midget after a vacation and work break.
- Thread starter DavidApp
- Start date
The rear apron had been damaged and repaired at some time in the past and when I got the car the drivers side rear wing/tail light area had taken a bang. Someone had started a shoddy repair on the area including bondo n the tail light opening.
I could see the apron to wing had been bent out of position and the tail light opening was out of shape so I decided the best approach was a new apron for a number of reasons. It should give me a guide to the correct shape for the lower wing connection and also got rid of the badly beaten up area of the apron.
I have cut out the old apron and started to construct a new tail light opening to give the wing some shape. It is taking time because I am Not a body work guy by trade. OTJ training.
It is getting there but I will still need some filler to complete the job. Purest would manage to hammer out very bump and crease but I think this area has been through so much I think even an expert might have a task on their hands,
I am fitting the apron and making adjustments then welding a little then adjusting again. The boot lid opening is the next challenge which is tied in with the apron and tail light.
David
Each time I fit the apron it seems a little better. Going to have to do something with the boot lid channel on both sides. Almost looks like the apron is too far to the left but the bumper holes line up so I will fix the channels. Looks better in the photo. The old part of the channel has some damage.
David
David

David
David
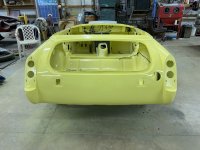
Got fed up looking at the maroon bonnet standing in the corner of the shop so I started to strip it back to bare metal. As I sanded with my DA sander I noticed it must have been painted several times in the past. Looks like tree rings. Trying to find the best method of removing the paint. Paint stripper is working but slowly so I may resort to my sand blaster especially for the underside. I know there is said to be a risk of distortion but did not see any when I did the TR3A body work.
The rusty patch had no paint on it when I got the car. It must have delaminated as I found rust out under the paint.
Da
 vid
vid
The rusty patch had no paint on it when I got the car. It must have delaminated as I found rust out under the paint.
Da
Offline
I like the yellow! When I had Ms Triss sandblasted they ended up distorting the bonnet and the boot lid. Admittedly it was the kid that worked for the owner who went in with full on industrial strength blasting. It was really annoying though for what was a pretty pristine car.
Back to the rear apron area. I have avoided it for as long as I could.
The rear apron was damaged beyond my abilities to fix it. As I ground off the filler I came across 2 layers of paint and filler so it had been fixed 2 times before.
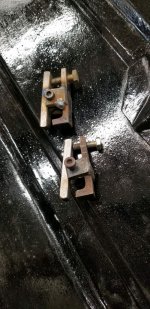
I had some repairs to do on the boot floor and apron support bracket. Sand blasted the area yesterday so I am ready to get it welded in. I made some special clamps to hold the apron edges to the wing in that unaccusable area under the rear lights.
I bought an apron panel from Moss UK.
The bottom edge of the apron is spot welded and it appeared it could be tough to do the plug weld thing on that area so I bought a HF 220 Volt spot welder. It is heavy. My first impression of my test welds is it does a good lob. I can't pull or chisel the test pieces apart.
I sprayed weld through primer on one test piece and that welded fine.
So far I will give it top marks.
Should the join between the apron and wing be smooth or show where the panels come together? Anyone got a photo of the area?
David

The rear apron was damaged beyond my abilities to fix it. As I ground off the filler I came across 2 layers of paint and filler so it had been fixed 2 times before.
I had some repairs to do on the boot floor and apron support bracket. Sand blasted the area yesterday so I am ready to get it welded in. I made some special clamps to hold the apron edges to the wing in that unaccusable area under the rear lights.
I bought an apron panel from Moss UK.
The bottom edge of the apron is spot welded and it appeared it could be tough to do the plug weld thing on that area so I bought a HF 220 Volt spot welder. It is heavy. My first impression of my test welds is it does a good lob. I can't pull or chisel the test pieces apart.
I sprayed weld through primer on one test piece and that welded fine.
So far I will give it top marks.
Should the join between the apron and wing be smooth or show where the panels come together? Anyone got a photo of the area?
David
Attachments
Last edited:

Have you closed up the reversing light openings and the side markers?
Getting the boo=t lid to body gaps to look right. How much of a gap do you have along the trailing edge of the boot lid? I need to get the rubber seals to help setting the gaps. I gather the ones that Moss sells are too stiff/thick.
Moving on to the dash.
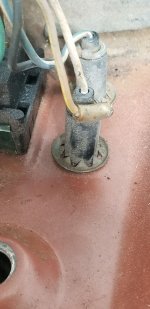
Any way of getting the lamp holder clips off with out destroying them and any idea if replacement clips are available?
David
Getting the boo=t lid to body gaps to look right. How much of a gap do you have along the trailing edge of the boot lid? I need to get the rubber seals to help setting the gaps. I gather the ones that Moss sells are too stiff/thick.
Moving on to the dash.
Any way of getting the lamp holder clips off with out destroying them and any idea if replacement clips are available?
David
Attachments
Offline
I did have them weld in the signal lights and the reverse lights. Full disclosure this started out as a rubber bumper> It had been lightly rear ended so it was an easy decision to convert it to chrome bumper. The rear valance is from a chrome bumpered car. If you look at the picture, you will see the reverse light on the left under the bumper. It is a generic motorcycle signal light (front) with a clear bulb instead of a yellow bulb. I can measure the trunk gap in the morning. I did use Moss trim and am fine with it, though it is generally acknowledged that MacGregor here in Canada sells a superior product. > MacGregor British Car Parts <

Offline
Here is the gap

and the corner - you don't see it, the boot edge lifts a little, so, yes the trim is bit thick. OTOH it is good enough.

and all of it

In terms of the EGR I think by '74 they were already grappling with emissions on the car. I keep pondering replacing the old (useless) buttons with either a USB port or a start button or both.
and the corner - you don't see it, the boot edge lifts a little, so, yes the trim is bit thick. OTOH it is good enough.
and all of it
In terms of the EGR I think by '74 they were already grappling with emissions on the car. I keep pondering replacing the old (useless) buttons with either a USB port or a start button or both.