• Hi Guest!
    You can help ensure that British Car Forum (BCF) continues to provide a great place to engage in the British car hobby! If you find BCF a beneficial community, please consider supporting our efforts with a subscription.

    There are some perks with a member upgrade!
    **Upgrade Now**
    (PS: Subscribers don't see this gawd-aweful banner
Tips
Tips

TR2/3/3A dimpled out panels

sp53

Yoda
Country flag
Offline
Hi Frank could explain briefly if you have time how you made those dimpled out panels on the back section by your seat. I have been heating the metal and pounding the metal onto a block of would that I have carved out, but it is not working very well.

steve
 

Attachments

  • DSCN3809.JPG
    DSCN3809.JPG
    3.4 MB · Views: 110
Hi Steve, You will have an easier time forming the steel cold. I do hot heat the metal when hammer forming.
TR4/4A Early TR4 seat pans Post # 11 shows pictures and a description of the process. I did the boot floor out of 18 gauge and I used a 3 pound hammer for most of the forming with various chisels that the end has been dulled to the desired radius you are forming. A very sturdy table or piece of steel is needed when you form the ridge. The metal has to come from somewhere and this warps (deforms) the panel and so you will have to turn it over and put a piece of wood the thickness of the offset to straighten the panel. The other method is to cut a hole the shape you want, put this under your blank piece of steel and drive the steel down into the recess. either way the steel has to be clamped between your form top and bottom. I made the entire boot floor the first time to learn how to do it. The first boot floor was a twisted up mess but the second one turned out very nice. A lot of time and a lot of hammering but it was worth it. I found it amazing the amount of force it takes to form a raised area for a panel. It is better to use softer blows and more of them to try and avoid damaging the metal and ending up with an ugly panel. If you need more help feel free to ask and I will see if I can come up with other sites that I have looked at on how to hammer form. Good luck Frank
 
That is perfect Frank. I really appreciate you taking the time and making the instructions clear. Plus your honesty about learning which is how real knowledge comes about through experience and a little guidance, thanks for the guidance.

Steve
 
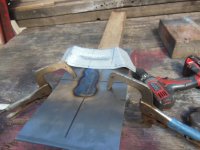
I gave Frank's method a try just to see if I could do it. It worked remarkably well. This was just a test piece.

David
Test piece.jpg
 
I am afraid I can not take credit for this method as I watched a lot of videos and read plenty of forum post before I started trying to do it. Great job David, now I hope this inspires others to try and create their own repair panels. It is easy to buy repair panels but much more satisfying to make your own. Once you make your own parts the ones you can buy seem like a bargain. Frank
 
If you can weld and have a hand held air chisel, here's another trick. Take one the chisels from the set and weld a nice blunt end on it. The air chisel moves metal quite easily. In the beginning it might move it too easily so work slowly again. Some people have even made a stand to hold the tool and then added an almost flat end to the chisel and use it for a planishing tool. Search for the You tube video. It's out there.
 
I have an old commercial slag chipper that was used on pipe and iron to knock the slag off for weld inspections. It might work well here I will try that also.
 
Back
Top