but were afraid to ask:
 GTP1960
Jedi Knight
Offline

 Hey Guest!

 Hey - did you know if you click on the title of a thread it will take you to the first unread post since you last visited that thread?
 STOP!! Never post your email address in open forums. Bots can "harvest" your email! If you must share your email use a Private Message or use the
  smilie in place of the real @
 Pretty Please - add it to our Events forum(s) and add to the calendar! >> Here's How <<
  Change the look and feel of the forum to fit your taste. Check it out
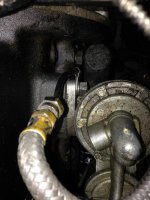
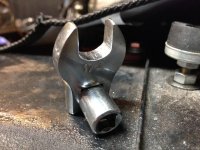
 As I recall, Justin Wagner devoted a page on his website to that bolt (and removal of same). Anyone with a link?


...I've even been known to take a punch and spread the pivot pins in the U-joint, to make it stiff enough to hold the socket horizontal (but still flexible enough to work around corners).


Alternately -- When I need to stiffen the u-joint I wrap a piece of duck tape around it.
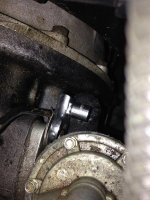
Wow...I didn't remember this bolt being that hard to reach. I've got my kids putting the pump back on the TR2 motor this week, so we'll get a chance to find out!
...I handed my son the fuel pump today to mount on the TR2... he had the pump mounted and torqued in the minute it took me to turn back around from sorting through the crow's feet!...
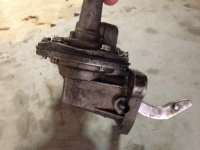
Now you guys have me wondering if repro pumps are different from the originals.
Both my fuel pumps are originals that I have rebuilt. I have to wonder if there is a later reproduction that gives everyone trouble with the rear bolt, as it is a non-issue on the original pumps...