
-
 Hey Guest!
British Car Forum has been supporting enthusiasts for over 25 years by providing a great place to share our love for British cars. You can support our efforts by upgrading your membership for less than the dues of most car clubs. There are some perks with a member upgrade!**Upgrade Now**
(PS: Upgraded members don't see this banner, nor will you see the Google ads that appear on the site.)

Tips
- We have a special forum called "Member Articles" where you can submit actual articles for consideration for publication. Learn More
- Don't have an Avatar? If not, your avatar will default to the 1st character in your username. Go into "Account Details" to change your Avatar.
- Some basic forum navigation info: click
 Hey - did you know if you click on the title of a thread it will take you to the first unread post since you last visited that thread?
- Hey Guest - Is your British Car Club in our Clubs database? If not, send me a PM - Basil

- Looking for a local club? Click the "Clubs" tab above and browse hundreds of clubs world-wide.
- Add Android or iPhone APP: click
- Did you know - any picture or video you add in your posts in any marque-specific forum will also get added to the Media Gallery automatically.
- A few more tips about posting and replying: click
- Hey there Guest - be sure to keep your profile page up to date with interesting info about yourself: learn more
- More tips and tricks on Posting and Replying: click
 but were afraid to ask:
  STOP!! Never post your email address in open forums. Bots can "harvest" your email! If you must share your email use a Private Message or use the
  smilie in place of the real @
- Want to mention another member in a post & get their attention? WATCH THIS

- So, you created a "Group" here at BCF and would like to invite other members to join? Watch this!
- Hey Guest - A post a day keeps Basil from visiting you in the small hours and putting a bat up your nightdress!
- Hey Guest - do you know of an upcoming British car event?
 Pretty Please - add it to our Events forum(s) and add to the calendar! >> Here's How <<
- Hey Guest - you be stylin' Change the look and feel of the forum to fit your taste. Check it out
- If you run across an inappropriate post, for example a post that breaks our rules or looks like it might be spam, you can report the post to the moderators: Learn More
- If you would like to try some different "looks" or styles for the site, scroll to the very bottom, on the left and click the Style Selector.
You are using an out of date browser. It may not display this or other websites correctly.
You should upgrade or use an alternative browser.
You should upgrade or use an alternative browser.
TR2/3/3A Dzus Fastener Question:
- Thread starter toysrrus
- Start date

Don Elliott
Obi Wan
Offline
With that clip, do they rattle or vibrate between 800 to 12 RPM engine speed - like when you're stopped in traffic and everyone around you admires your car but they think your TR is about to explode ?
Let me give you a heads up on a problem you may run into when repainting your bonnet. When you remove the old Dzus fasteners, the old aluminum grommet that was installed in the hole will still be there. Since it was flared into the hole originally, I would suggest leaving it there rather than trying to grind it out. Mine was left in during the painting process. What I hadn't considered was the added thickness of the primer and finish paint coats. When I went to install a new Dzus fastener, the body of the Dzus didn't extend far enough through the hole so that the dished washer would slide far enough up on the body to seat in the groove.
My solution was to very carefully sand the paint coats away down to the bare metal of the grommet on the underside of the bonnet. Even then the body wasn't quite far enough through the hole. Rather then risk too much of the paint being chipped away on the top side, I designed a different washer. I took a standard nylon washer that was close to the right size and modified it by: 1) drilling out the hole so that it was just slightly smaller than the diameter of the fastener so that it would slide on with pressure and stay snug in the groove, 2) sanded down the outside diameter of the washer so it would fit, 3) thinned the washer down on the belt sander so it would fit up into the slot on the Dzus.
I'm not sure I'm making any sense here, so I'll add some photos. I've got one of the hole after it was sanded but I can't find it at the moment. If it would help, I'll take some more tomorrow.
Bottom line: I would suggest that you mask off the top and bottom of the existing grommet before you paint. Then make a nylon washer to fit. That will also allow you to easily remove the Dzus in the future if need be.


Rick...
My solution was to very carefully sand the paint coats away down to the bare metal of the grommet on the underside of the bonnet. Even then the body wasn't quite far enough through the hole. Rather then risk too much of the paint being chipped away on the top side, I designed a different washer. I took a standard nylon washer that was close to the right size and modified it by: 1) drilling out the hole so that it was just slightly smaller than the diameter of the fastener so that it would slide on with pressure and stay snug in the groove, 2) sanded down the outside diameter of the washer so it would fit, 3) thinned the washer down on the belt sander so it would fit up into the slot on the Dzus.
I'm not sure I'm making any sense here, so I'll add some photos. I've got one of the hole after it was sanded but I can't find it at the moment. If it would help, I'll take some more tomorrow.
Bottom line: I would suggest that you mask off the top and bottom of the existing grommet before you paint. Then make a nylon washer to fit. That will also allow you to easily remove the Dzus in the future if need be.
Rick...
OP
toysrrus
Yoda
Offline
Hi Rick,
Here I thought I had a "Silly / Simple" question!!
Thanx for your input and the Pics. "Very, Very Helpful".
Happy New Year,
Russ
PS: Where in NC do you live? There`s a gent up there; Somewhere; That I always see at shows; Hendersonville & BMW - Eurofest; with a real sweet BRG TR3. Is this you?
Here I thought I had a "Silly / Simple" question!!
Thanx for your input and the Pics. "Very, Very Helpful".
Happy New Year,
Russ
PS: Where in NC do you live? There`s a gent up there; Somewhere; That I always see at shows; Hendersonville & BMW - Eurofest; with a real sweet BRG TR3. Is this you?
PeterK
Yoda
Offline
Don, I added a small rubber o-ring around the dzus to stop the death rattle. Mine also had rattley noise from the chrome bumper support rubbing on the grill.
With that clip, do they rattle or vibrate between 800 to 12 RPM engine speed - like when you're stopped in traffic and everyone around you admires your car but they think your TR is about to explode ?
Don Elliott
Obi Wan
Offline
Thanks Peter - I wish you continued good health in 2014 - and driving a TR is one way of achieving this.
Cheers
Don
Cheers
Don
OP
toysrrus
Yoda
Offline
Russ...
I'm out in western NC in the mountains near Boone. Mine is Powder Blue and isn't on the road yet. There's a fellow near Hickory with a BRG TR-3.
Rick...
Good Morn`n & Happy New Year,
Rick, We`re darn near neighbors. I live in the "Table Rock, SC" area. That`s approx. 45min. drive directly North (RT. 26) to "Hendersonville" & about 1hr. or less to "Asheville". How far along are you with your TR?
Regards, Russ
Got_All_4
Luke Skywalker
Offline
I've done the E-clip for decades and has worked very well. I've never had a rattling issue from it but the prop rod drove me nuts for years at idle. took a block of foam and glued it to the underside of the bonnet and it presses against the prop rod to quiet it down. Worked perfectly but had that unsightly foam rubber block there. Like you Russ I've removed my hood for some repairs and I'm thinking of pulling the engine too to redo the engine compartment . After 30+ years of driving the engine compartment is horrible. I really like the idea of the nylon washer under the dzus flange. For sure it will reduce paint chipping and ware. I'd like to see the final assembly process of the dzus.
Good Morn`n & Happy New Year,
Rick, We`re darn near neighbors. I live in the "Table Rock, SC" area. That`s approx. 45min. drive directly North (RT. 26) to "Hendersonville" & about 1hr. or less to "Asheville". How far along are you with your TR?
Regards, Russ
The motor has been run and the body has been painted and mounted on the chassis. I'm doing the wiring, the interior work, and all the other little stuff. Hopefully it will be on the road when the weather turns nice in the spring.
Rick...
TexasKnucklehead
Jedi Knight
Offline
I have two comments.
1) regarding the aluminum grommet sandwiched onto the hood for the dzus fastener to fit inside. I had to remove both of mine because they were loose and I could see rust under them. Installing new ones into a freshly painted hood is not hard if you have the right "tools". As a "tool", a local member loaned me a large counter sunk screw to start the compression. I forget the exact size, but it barely fit into the grommet. I went to a hardware store and found a grade 8 (fine thread) Allen countersunk head bolt (with matching nut and washer) because A) the fine thread makes turning/bending/squeezing the grommet much easier and B) a Allen wrench is easier to control than a flat blade screwdriver (I did not want a large screwdriver anywhere near the new paint). After the compression is started, another non-countersunk bolt with washers can be used to flatten the fitting onto the hood. Make sure the grommet is tight because you don't want it moving and damaging your paint -but also not so tight that the ID of the grommet is changed (or the dzus will not fit).
I did not use the washer, crimped in place, to retain the dzus fastener. Instead, I used a rubber o-ring. It doesn't rattle with the hood up or down. Some owners had trouble with a terrible rattle of the dzus, but only with the hood up. I never drive with the hood up, but often spectators want to see the engine running, and that's hard to do without opening the hood. Loud rattles are embarrassing.
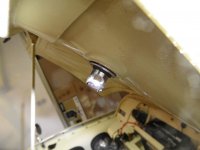
2)regarding the hood prop rod rattle. It took me quite some time to understand where my hood was rattling. At idle, it was horrendous -but only at idle, warm, and with the hood firmly closed... The rubber (held in place by a cotter pin) used to retain the rod was worn, and needed to be replaced. Also the secondary finger catch needed the spring tightened, as well as the "axle" screw tightened so it didn't rattle. Finally, I added a o-ring at the base of the prop rod. In the picture you might also note a small section of rubber backed outdoor carpet in the channel where the striker pin hits. I think I installed that while trying to isolate other rattles/squeaks, but it might not be needed.
At present, I have no rattles at idle with the hood open or closed.
1) regarding the aluminum grommet sandwiched onto the hood for the dzus fastener to fit inside. I had to remove both of mine because they were loose and I could see rust under them. Installing new ones into a freshly painted hood is not hard if you have the right "tools". As a "tool", a local member loaned me a large counter sunk screw to start the compression. I forget the exact size, but it barely fit into the grommet. I went to a hardware store and found a grade 8 (fine thread) Allen countersunk head bolt (with matching nut and washer) because A) the fine thread makes turning/bending/squeezing the grommet much easier and B) a Allen wrench is easier to control than a flat blade screwdriver (I did not want a large screwdriver anywhere near the new paint). After the compression is started, another non-countersunk bolt with washers can be used to flatten the fitting onto the hood. Make sure the grommet is tight because you don't want it moving and damaging your paint -but also not so tight that the ID of the grommet is changed (or the dzus will not fit).
I did not use the washer, crimped in place, to retain the dzus fastener. Instead, I used a rubber o-ring. It doesn't rattle with the hood up or down. Some owners had trouble with a terrible rattle of the dzus, but only with the hood up. I never drive with the hood up, but often spectators want to see the engine running, and that's hard to do without opening the hood. Loud rattles are embarrassing.
2)regarding the hood prop rod rattle. It took me quite some time to understand where my hood was rattling. At idle, it was horrendous -but only at idle, warm, and with the hood firmly closed... The rubber (held in place by a cotter pin) used to retain the rod was worn, and needed to be replaced. Also the secondary finger catch needed the spring tightened, as well as the "axle" screw tightened so it didn't rattle. Finally, I added a o-ring at the base of the prop rod. In the picture you might also note a small section of rubber backed outdoor carpet in the channel where the striker pin hits. I think I installed that while trying to isolate other rattles/squeaks, but it might not be needed.
At present, I have no rattles at idle with the hood open or closed.
Attachments
I really like the idea of the nylon washer under the dzus flange. For sure it will reduce paint chipping and ware. I'd like to see the final assembly process of the dzus.
I took some photos of the nylon washer to show the modifications and then the washer and Dzus installed. The hole in the standard size washer was enlarged just enough to fit snugly over the tip of the Dzus and then ride in the groove without backing off. I saw the other comment above about using the o-ring and I like that approach too.


I mentioned earlier that I had to remove the paint from the top of the aluminum grommet. I had to be real careful not to cause the paint to separate beyond the grommet. I used a surgical blade to score the paint along the edge and then remove the paint to the metal.


Rick...