• Hi Guest!
    You can help ensure that British Car Forum (BCF) continues to provide a great place to engage in the British car hobby! If you find BCF a beneficial community, please consider supporting our efforts with a subscription.

    There are some perks with a member upgrade!
    **Upgrade Now**
    (PS: Subscribers don't see this gawd-aweful banner
Tips
Tips

New Model A project

Bayless

Yoda
Silver
Country flag
Offline
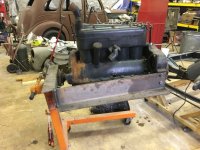
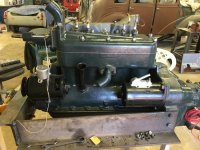
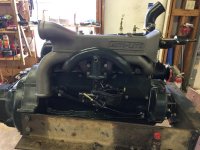
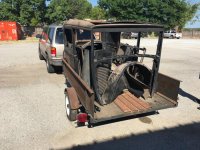
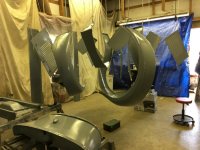
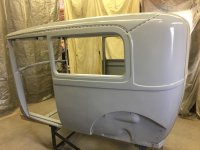
One of my shop partners has a '29 Model A Tudor that was a show car until it got caught in a garage fire. The car didn't actually burn but the extreme heat did it no good. I has finally decided to restore it again and I will be helping him. Here are a couple of photos. The first is everything except the chassis loaded in my trailer and headed for the sand blaster to remove all the burnt paint and rust. The second is a couple of weeks later after many hours of sanding, a few hours of straightening, some more time welding and finally with two coats of epoxy primer on everything except the body and doors. It currently occupies our makeshift paint booth which is also where my Sprite lives. So the Sprite has been on hold until we can get everything primed for rust protection.
 

Attachments

  • ToSandBlaster1.jpg
    ToSandBlaster1.jpg
    87.8 KB · Views: 265
  • PrimedParts1.jpg
    PrimedParts1.jpg
    64.8 KB · Views: 259
I had a 29 Tudor. Twin side mounts. Tan body, black fenders, yellow wheels. Mechanical brakes. All done (with "trunk") except upholstery.

"Massacree" is what we named it. Date code stamped in the firewall was Valentine's Day, 1929.
Fun old car.

Everybody needs to do a Model A at some point.

I even hand propped it once to say I did it.
 
I'm slow getting back but yours must have been the deluxe model. This one is the cheaper Tudor with the spare mounted on the rear instead of the side mount and no trunk. It was an October build. We finally have everything sand blasted, sanded and in epoxy primer. Well, everything but the wheels. Still trying to decide whether to powder coat them. One of these photos shows the body in primer. The other shows how we got to the bottom for sanding and primer. A should add, my paint supplier suggested Southern Polyurethanes epoxy primer as they cater more to restoration shops than production shops. I'm glad he did. This stuff is great to use. It is 1:1 mix and required no thinning with my 2.0 gun tip. Unlike most epoxy, it allows for top coating without additional sanding within 7 days. I was a little concerned about temperature in the high 80s for the first application. I texted their tech line about maximum temp and humidity. Within 10 minutes I got this answer back: "No maximums. 100 degrees and raining is fine." I love it.
 

Attachments

  • BodyPrimed.jpg
    BodyPrimed.jpg
    49.5 KB · Views: 238
  • BodyBottom.jpg
    BodyBottom.jpg
    73.3 KB · Views: 255
looks great!
 
Bayless, nice work. I should drive up sometime and look over your shoulder.
 
Thanks Walt but I don't recommend myself as instructor. I'm not really a slow body man but I'm certainly not a fast body man either. I guess I would be classified as a half-fast body man.:wink-new:
On another note though, I got primer on all the trim pieces and a couple of others we missed earlier. Everything is now in primer and no longer susceptible to rust so maybe I can take a little time to work on my Sprite or Prefect for a while.
 
Made a little more progress. All the major (really not that bad) body work done, including bondo as necessary, and everything is now in epoxy primer. Last pieces were the doors and the hood parts. So, yesterday was my first experience with polyester primer. I put 2 or 3 coats of Slick Sand on those parts as they were still in the paint booth area. Today we will start sanding and find out how good (or bad) our prior work was. Based on how much paint those few parts took, I don't think a gallon will be enough for the car.
 
I bumped into a beautiful Model A Cabriolet when taking Baby Blue out for some gas. The guy at the register came out to see both cars, and all the other folks filling gas came over to check the cars out. It was like a mini-car show.
 
I bumped into a beautiful Model A Cabriolet when taking Baby Blue out for some gas. The guy at the register came out to see both cars, and all the other folks filling gas came over to check the cars out. It was like a mini-car show.

nice though a somewhat unfortunate description :smile:
 
Well I had a disappointment today. The first experience with Slick Sand was great. It shot nice and sanded easily. Easy with a long board to get everything flat. I decided at the last minute yesterday to do the next batch. This morning it is still too soft to sand. I'm sure I put the right amount of hardener so my best guess so far is that I let it get too cool too soon. I left the heat on for tonight but if it's not hard by tomorrow it looks like I will have to find a way to take it all off. Fortunately I do have a solid epoxy base under it.
 
Well I had a disappointment today. The first experience with Slick Sand was great. It shot nice and sanded easily. Easy with a long board to get everything flat. I decided at the last minute yesterday to do the next batch. This morning it is still too soft to sand. I'm sure I put the right amount of hardener so my best guess so far is that I let it get too cool too soon. I left the heat on for tonight but if it's not hard by tomorrow it looks like I will have to find a way to take it all off. Fortunately I do have a solid epoxy base under it.

I know it is supposed to be science and others say it is easy, but I swear it is all magic and voodoo and the phase of the moon getting those mixtures right.
 
With the weather we have been having it is not entirely surprising that you got different results. With this cold and wet weather I'd definitely leave the heat on it all night after shooting.
 
You're probably right Walt. And thanks JP. After reading your last comment and choking down my second cup of coffee, it suddenly hit me. It was not the temperature. I have used a little more than a quart so far and there are 4 tubes of hardener for the gallon. Each tube mixes into a quart and I still have about a fourth of the first tube left. I remember very carefully calculating how much hardener for that last batch then just as carefully adding a little less than half what I should have.

Today we took most of it off with lacquer thinner and a lot of scrubbing. Fortunately I did have a solid base of epoxy primer under it that the thinner didn't hurt. I am now back to where I was last Friday. Oh well, another lesson learned. The hard way, of course. I think it was Mark Twain said "Some people learn just by reading. A few more by watching. The rest of us have to pee on the electric fence ourselves."

Glad you figured it out (I hate it when it's obvious :whistle: AND Twain also had Tom Sawyer get someone else to do the painting - just sayin' :grin:
 
Dang, it looks like that's what my shop partner (the car owner) did to me.
 
Happy you figured it out. Good luck with it moving forward.
 
Better luck today. It finally got warm enough outside that our shop heater could get everything up to 75 degrees and hold it there. I mixed up another batch with the right amount of hardener this time and re-shot the pieces. It actually got hard this time. Sometimes it just pays to think about what you are about to do even when it is a last minute decision.
 
Good to hear.
 
Latest project was getting the engine on the stand instead of the hoist.Dick found, cut up and drilled this monster piece of angle iron and I welded it together. Now I'm not really a welder so I was a little concerned about it. We left it still attached to the hoist with the chain slack overnight just in case. His reason for mounting it this way is so the gearbox can be mounted to it.
 

Attachments

  • EngineOnStand.jpg
    EngineOnStand.jpg
    225.5 KB · Views: 245
Since the last post, we have hand-lapped and adjusted the valves, replaced all the gaskets, painted and reassembled the engine the engine. Ford painted the engine before assembly so judges don't want to see any engine paint on any of the gaskets. All the body parts are now in primer and ready for final painting. The main body is and exception and a slight disappointment though. I shot 4 coats of Slick Sand, which should be about 12 - 15 mils, then a guide coat and started block sanding only to find that the body work was not as good as I thought. There were a few low spots on those slab sides that wouldn't quite sand out. It looks like some glazing putty and another coat of Polyester will be required. I'll get photos later. The next thing the is the chassis. It is in pretty good shape, just needing a paint touch up coat. Meanwhile we are still waiting and hoping to get single stage paint for it. Here is the engine ready to reinstall but waiting for the frame to be painted.
 

Attachments

  • EngineDoneLeft.jpg
    EngineDoneLeft.jpg
    76.5 KB · Views: 241
  • EngineDoneRight.jpg
    EngineDoneRight.jpg
    61.8 KB · Views: 237
Last edited:
Back
Top