• Hi Guest!
    You can help ensure that British Car Forum (BCF) continues to provide a great place to engage in the British car hobby! If you find BCF a beneficial community, please consider supporting our efforts with a subscription.

    There are some perks with a member upgrade!
    **Upgrade Now**
    (PS: Subscribers don't see this gawd-aweful banner
Tips
Tips

General MG New Project

Have a look around the 'net for the airbox/plenum/filter arrangement in early Elans, Bro. The rig ducted air from a Ford (round) air filter housing mounted in the nose, thru flexible tubing to the plenum. Plenum is deeper than you have room for, but it may be a good reference point.

Thanks, Bubba - will do!
 
WE HAVE IGNITION! And fire. And fuel. And I'm on my second Cuba Libre!


55 lbs. oil pressure at idle. Just got it started today. Will do a proper run-in to bed the cam next week.
 
That is great news! You have been living for this day for quite a while, eh? That "first start" sound is now recorded for posterity!

Congrats!

Tom M.
 
Why th' screwdriver?

Sounds solid.Good job!
 
Why th' screwdriver?

Sounds solid.Good job!

He's tuning the heater valve... :devilgrin:

Was wonderin' if anyone would pick up on that. Don't have a valve yet and we were wanting to go ahead and start it without. Fashioned a temporary plug and he held it in place.

The YouTube video makes it sound harsher than it does "in person"; We idled it down to around 700-800 and it really smoothed out nicely. Pretty pleased at the moment!
 
'Nother update:

Two months since my last post, and though it seems I haven't progressed much, in reality I've managed to get a few things done (and undone!). I say "undone" referring to the wiring. The Victor came with its own wiring diagrams, harnesses, and color codes - the latter not anywhere near the coding system of the MGB it uses as its base. The diagrams were not that easy to read/follow, and were multi-page, rather than a single map like most. So one had to flip back and forth over several pages in the manual to see what went where.

OK, that's confusing enough; but the previous owner had made some major (and minor) changes to the wiring to suit his preferences, and he did alter the diagrams to reflect those. But that only added to the confusion. And included in the changes were some different wiring colors that didn't line up with the Victor's. And to add further to the confusion, black wire was used in positive circuits! The other change he made was to include a bulk connector at the firewall so that all the wiring leading to the dash could be unplugged at one point, should the dash require removal. So all those wiring points had to be exact, and there was always the potential for faulty connections.

And as if that weren't enough, the previous owner also added a trick turn signal/hazard/brake light controller with momentary contact switches to activate the turn signals and hazard flasher. Pretty nifty gadget, but he used white wires for all the wires leading out of the control box! Plus, he had bought a set of aftermarket gauges, which have their own wiring system and sending units that aren't compatible with standard MGB wiring. Add to all this the fact that this is a fiberglass body and grounding is a huge issue that needs to be addressed. There were other anomalies, but I'm sure you get the picture.

Well, I had things pretty well sorted out (I thought), and actually had the gauges registering properly after we got the engine running. But then for some reason (maybe the bulk connector...) the gauges froze and could not be reactivated. Even though I had previously sorted and run all the wires, including those going to the headlights, tail lights, horns, etc., and tested all to be sure each was in its place, I decided to pull all of it and start over - this time with a proper wiring system. A friend had a complete, unused Advance Auto Wire setup that he didn't need, so I bought it from him. If you're not familiar with this, it is a very high quality item designed by a friend over in Maryville whom some of you may know of - Dan Masters. And some of you may remember his son, who was once a member of this forum, Mike Masters, who died several years back.

0806180734_1.jpg


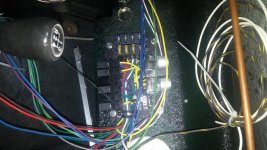
Anyway, the Advance Auto Wire is a very nice package which includes relays, modern fuses, a complete "PowerBlock" panel, and all wiring following proper MGB color coding. More here, if you want to know more: https://www.advanceautowire.com/ It's mostly installed as of today, though not hooked up; hope to get at least the dash components hooked up in the next day or so, and then can move on to getting to the rest. And will have several holes in the firewall to fill, including the two-inch one for the bulk connector which will be trashed.

Speaking of the dash, I did get the crash rail completed and installed. This is a curved plywood structure that has a rubber core that you glue in place. I managed to get the rubber part glued on, but covering that thing with the green leather proved to be too daunting a task for me. I tried a couple of times, and rather than ruin a good piece of expensive leather, I decided to take it to a professional; glad I did, because it turned out fantastic!

0806180733_1.jpg


More later...
 

Attachments

  • 0806180734.jpg
    0806180734.jpg
    72.7 KB · Views: 48
You remind me of my doctor. A man with a lot more patients than me.

How the heck you could figure all that out is beyond me. I'd have ripped it all out and started over about an hour after I got a car with wiring like you inherited. I remember my first old Mercedes, where any wiring changes were done with black wire (or green wire, or ...) regardless of the original. You must be so psyched about getting the car closer to roadworthy. Yeehaa!

Next time you have wiring problems, here's a diagram which may be helpful.

circuit_diagram.jpg

Say, I notice your shift knob shows Reverse as Left, then Back. Is that typical for these cars?

Tom M.
 
Say, I notice your shift knob shows Reverse as Left, then Back. Is that typical for these cars?

Tom M.

Yep - remember, it's an MGB drivetrain (overdrive, too!)
 
Thanks, Tom. And this will try one's patience, to be sure. However, in the process I've discovered the way to get expenditure approval from SWMBO: I complained so much about the wiring difficulty that she said, "Go ahead and get the wiring; I'm tired of hearing you gripe about it!"
 
Oh yeah - forgot. Also think the air cleaner problem is solved. We made a housing out of sheet stock and wrapped it with perforated steel. Will fill it with aluminum mesh from a filter for a kitchen exhaust fan. Not the most elegant solution, or the best filter media, but given the clearance restriction due to the side panel, I think it's the best I'm going to come up with.

0806181309a.jpg


0806181309.jpg
 
That really is a mystery. Is there any evidence that some of the Victors had an outward "bump" in the bonnet, to accommodate the filter? (Like the MGTD has for the dynamo.)

Maybe spray some oil onto that filter screening to help catch dust; then clean the screening in kerosene when needed.

TM
 
No "bumps", and no instructions in the manual as to how to address it. Was definitely a puzzlement, to quote Yul Brynner. And, yep, got the oil for the media at the ready.
 
Mickey: Your wiring woes are very familiar; don't know what I'll do with the "new" project as I hate to put too much money into it and knowing I have some big expenditures coming up down the line such as paint, seats, interior, top and side curtains, etc. At least the wiring is exposed at this point. Like your air filter solution; is the gap at the forward edge really as great as it looks in the picture? What are the dimensions and is it perforated on all sides except the base sitting on the carbs? Did the crash rail myself and it was a pita. Keep up the good work! J.D.
 
The picture is misleading, as the side panel is unsupported. Once it's attached to the other half of the panel, it is pulled in closer to the carbs than the picture shows. That's why this was such a problem. And the perforation is on the back of the housing and fully across the face, if that makes sense.
 
Mickey: Not sure I follow you; it appears the top (as mounted) and the leading edge are perforated; is the flat side facing the side panel, bottom and rear edge also perforated? J.D.
 
Mickey.....I'll bet you can find a flat automotive air filter of the appropriate size at your local parts store. So many new cars use a flat, pleated filter they come in many, many sizes.
 
Mickey: Not sure I follow you; it appears the top (as mounted) and the leading edge are perforated; is the flat side facing the side panel, bottom and rear edge also perforated? J.D.

The housing is u-shaped. Back, top and bottom are solid; leading (front, slanted) and trailing (rear) edges are open. So the open area faces the side panel. The perforated metal is wrapped around the housing, which is why it appears to be open; if you look closely, you can see the burgundy metal behind the perforation on top.
 
Back
Top