
 Hey Guest!

 Hey - did you know if you click on the title of a thread it will take you to the first unread post since you last visited that thread?
 but were afraid to ask:
  STOP!! Never post your email address in open forums. Bots can "harvest" your email! If you must share your email use a Private Message or use the
  smilie in place of the real @
 Pretty Please - add it to our Events forum(s) and add to the calendar! >>
Got_All_4
Luke Skywalker
Offline
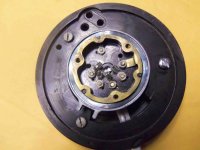
Had to take apart my control head for the 3. First reason is that it was very annoying driving it when I would set it to turn and any motion towards the direction your turning would cancel it. Disassembling it there was a lot of what looked like gray RTV silicon on the terminals. That may have had something to do with it if a piece broke off and got into the guts. Thought that was odd though. The wires were so tight in the tube and I tried everything to get them to move with the head but the wires pulled off the terminals. So if anyone can tell me the wiring order I would appreciate it.
Second does anyone know how to stop the gear lube from leaking out the split ferrule on the steering box?
Second does anyone know how to stop the gear lube from leaking out the split ferrule on the steering box?

.jpg")
