• Hey there Guest!
    If you enjoy BCF and find our forum a useful resource, if you appreciate not having ads pop up all over the place and you want to ensure we can stay online - Please consider supporting with an "optional" low-cost annual subscription.
    **Upgrade Now**
    (PS: Subscribers don't see this UGLY banner)
Tips
Tips

The ghost of Pedro...

John_Mc

Jedi Knight
Country flag
Offline
So I'm disassembling my right side front suspension now and I just discovered that at some point in the past, one of the owners WELDED the rear lower fulcrum bracket to the frame! The nuts on the back also look like they have been messily welded as well. So this means I cannot remove that bracket, which means I can't remove the bolt that secures the wishbone to the bracket and I believe it also means that I can't adjust alignment (although the first problem overshadows that). Any suggestions on how to proceed next? Dale, can you refer me to a good voodoo priestess? /bcforum/images/%%GRAEMLIN_URL%%/wall.gif /bcforum/images/%%GRAEMLIN_URL%%/wall.gif /bcforum/images/%%GRAEMLIN_URL%%/wall.gif
 

Keoke

Great Pumpkin
Country flag
Offline
Thin diamond cut off wheel


--------------Nut splitter

Keoke
 
G

Guest

Guest
Guest
Offline
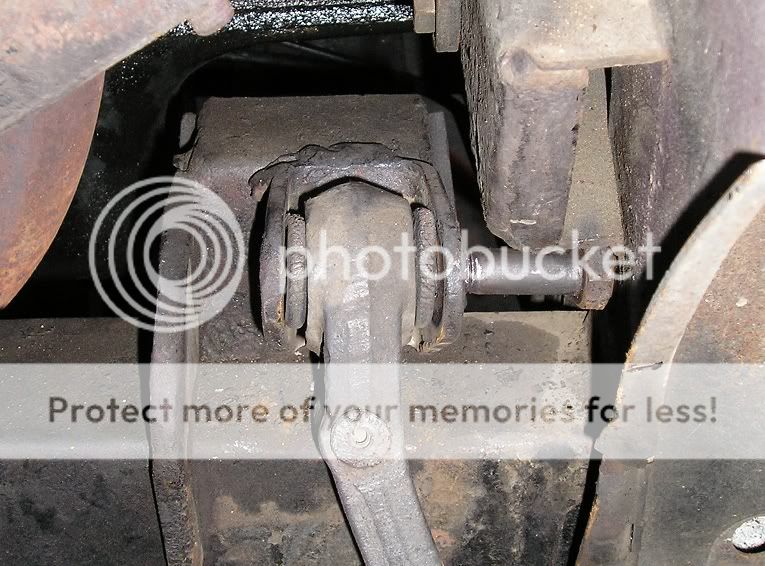
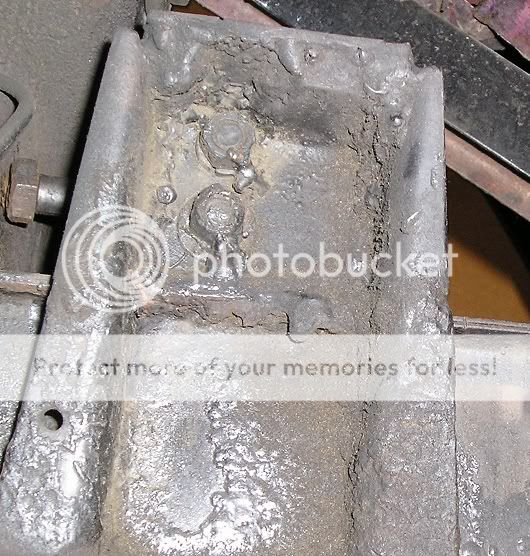
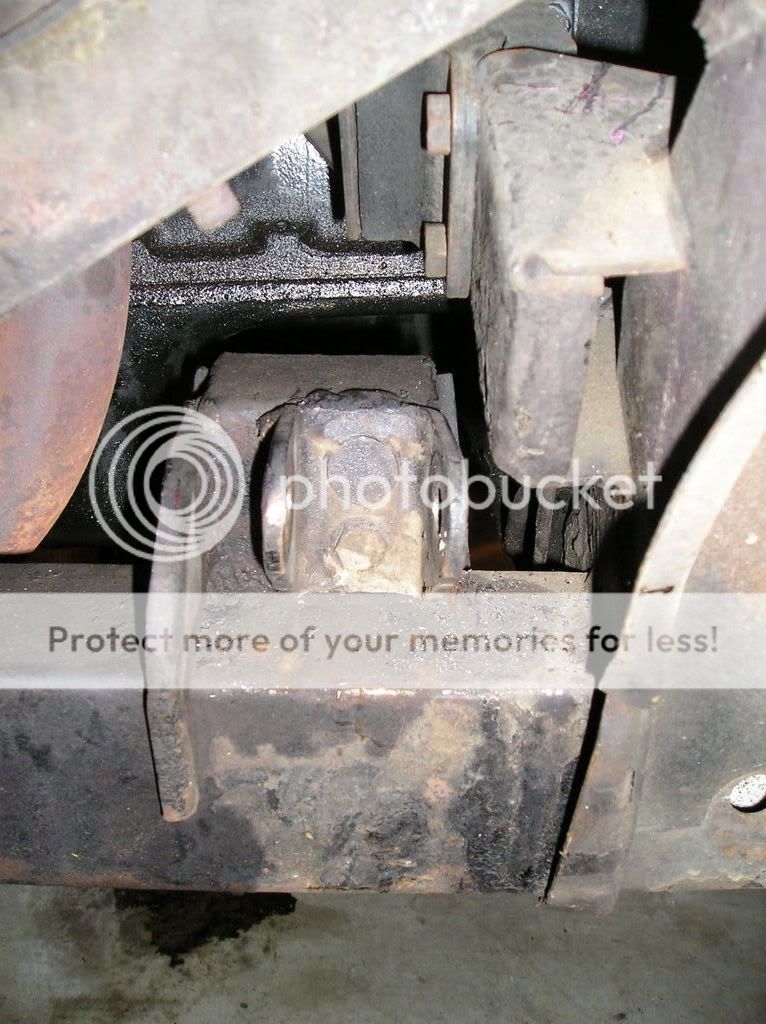
John, perchance did the DSPO inadvertently weld the bracket because he may have used some sort of frame stiffener plate?
I used TRF's frame-stiffening kit to bolster my front suspension. Maybe the guy got carried away. That said, you have a problem. First off, you need to source some new brackets. I would think that TRF would market these. Before you go a-cuttin, make sure you can get these brackets. If you cannot remove the bolt, you cannot rebuild your suspension nor change your bushings. I don't have to tell you this. Be careful when trying to cut these brackets from the frame. I am sure that your body is still on the car and you wish it to stay there. If would be a lot easier if it weren't. (Actually, it won't be easy either way) Your best bet is to somehow cut the welds. You well know that you don't have a lot of room to work with the body in place. Someone good with a cutting torch or a plasma cutter may could get the bulk of the bracket off, knock the bolts out and the rest could be done with a sharp chisel or drift and a BFH. Beware, the frame on these cars is not like a '67 Chevelle. They are thin, wrapped heavy gauge sheet metal boxes and can easily be distorted or cut.

A second option is to try and get a good cutoff wheel in there and nibble away at the bracket and hence the welds. Either way, the bracket will be destroyed. Could you possibly post a few pics of the mess so we can see where the DSPO welded the blasted thing?

Or, use 5000 diamond bits and 280 handpieces (as you know, you will cook 279 of the turbines).

Ratco?
 
T

Tinster

Guest
Guest
Offline
John, it sure looks DPO Pedro visited your state
as a TR6 master used bogus car salesman.
Yes, please post some photos.

I have been trying to install new body to frame
mounting assemblies because Crypty still rattles
and shakes pretty badly.

I quickly discovered PDO Pedro had the nuts on
the underside of the mounting assemblies welded
to the frame.

John, When you work out a decent method to removes
these welds, please post a few photos and description.

thanks
Dale
 

martx-5

Yoda
Country flag
Offline
Is the reason you can't remove the bolt because there isn't room to slide it out when you take the nut off?? Is it that the body gets in the way?? If that's the case, just cut the head off the bolt holding the A-Arm to the bracket. When you re-assemble, just feed a new bolt in from the other side. Once you get the A-Arm out of the way, you will be in a better situation to evaluate the welded bracket. If everything looks solid, then reassemble. The alignment may be OK, or maybe it can be tweaked using shims on the other bracket if that one isn't welded in.
 
OP
John_Mc

John_Mc

Jedi Knight
Country flag
Offline
Mart-x et al,
I can cut the bolt to get it out, but then I can't put a new one in because of the reinforcing gusset on the other side. I will take pictures to show. I have the car in a storage unit, so I'd have to get someone out there to weld it, OR, I'd have to put everything back together and drive it to a shop. Hopefully I can find someone who can make "house calls". In the short run, might it be easier to remove the reinforcing gusset, change the suspension components and weld the gusset back on?

Ugh.
 

AweMan

Jedi Knight
Offline
My suggestion is to Cut the bulk of the brackets off, {providing you have a source for NEW brackets} avoid cutting into the frame at ALL costs! Once removed use a die grinder to remove what is left.

Welding vertically on any vehicle frame is a NO NO! {So says the Govt. engeneeres I worked with}
The reason is {they say} it causes a stress riser, prone to cracking.

If you HAVE to weld on your frame weld the horizontal Portions of what ever you are attaching, leaving the verticals open. {leaves a place for the stress to go {they say}.

Any vertical welds on a Govt. vehicle frame has to be fishplated, that is to say, overlay a piece of metal equal to the thickness of the frame material over the vertical weld extending at least six inches on either side of the weld zone covering the entire weld and weld it on {horizontals only}.

What I have said here is S.O.P. for welding Govt. vehicle frames.

I know many people have cut/chopped/welded thier frames without ever encountering any problems.

Take this info for what it is worth to you and do as you will
 
OP
John_Mc

John_Mc

Jedi Knight
Country flag
Offline
here are the pics

Front side
weldedbracket2.jpg


Back side
bracketbackside.jpg


To be honest, I can't exactly tell what has been done here. It doesn't look so much like welding as it does a splattering of molten metal, but it's stuck nonetheless. What next?
 

Keoke

Great Pumpkin
Country flag
Offline
Well looking at your picture here is what I would do: I would put that bolt back where it belongs. Then I would get a replacement bolt and using a hole saw cut a hole in the outboard side of that plate. Then using the replacement bolt as a drift I would drive the exiting bolt out until it hit that barrier on the inboard side, Then I would cut the original bolt off close to the wishbone support. Then I would drive the remainder of the cut off bolt out using the in place new one and drive the new one all the way home. Put a nut on it tighten it up and drive to the shop.--Keoke--?
 
G

Guest

Guest
Guest
Offline
https://www.zeni.net/trf/TR6-250GC/89.php

This site on TRF shows the replacement parts available for your front end.

From the pics it looks like you can cut the welds holding the nuts in place with relative ease. He only welded the bracket from the outside top, which will make access for you easier to cut. Do you have a decent air compressor? You will need a fair amount of CFM to run a cutoff wheel. These little puppies eat up the air. I bought mine from Home Depot for close to $300 (26 gallon, lots of air, American built).
You will have to cut the bolt with a sawzall hack saw.

Clean that area up first to see what you have to work with, using scrapers and wire brushes.
 

AweMan

Jedi Knight
Offline
John:
If you have access to an Oxy/Acetylene torch or sawsall cut the bolt off. Remove the remainder of the bolt with a drift or punch.Then remove the wishbone. The back side of that bracket is a MESS!!
It look as if someone tried to reinforce the backside with a plate of some sort, then TRIED welding it on. The nuts back there are a NON issue, once you can remove th bolts from them I`m sure you can use a cold chissel to knock them off.

Once the "Wishbone" is off you can inspect what you have to work with. If you choose to remove the bracket, if it is only welded on one side {the side we can see in the pic} Use the cold chisel from the oppisite side. Once you get the chisel started under the bracket, that weld will break easily. Other wise you will have to use the die grinder to cut one of the welds and the cold chisel to break the other.

Now the work begins, use a die grinder and clean up both sides where the bracket mounts on as best you can.

NOTE: A pencil grinder and various grinding burrs are handy for grinding in tight quarters. Use parifin wax as a lubricant for either Burrs or cutoff wheels {if you intend on welding in or on the area you will need to clean any and all lubricant off berofe attempting a weld.}

When you re instal the New bracket and wishbone DO NOT use the same orientation for the bolt as the P.O. did!

Insert the bolt from the opposite direction placing the nut where the bolt head originaly was.

The above mentioned "Kit" Looks to be a good solution with one MINOR problem. When welding these "KIT BRACKETS" on, {part # 139580} ORIENTATION is going to be critical In order to get a proper alignment. However a COMPETENT Welder can accomplish this task.

P.S. When useing a die grinder {cutoff wheel} to cut a weld go slow! Try not to cut into the frame if possible. The same applies to removing excess welds from the back. Take your time and you will have accomplished your intended task with complete satisfaction.
 
OP
John_Mc

John_Mc

Jedi Knight
Country flag
Offline
Here's some follow up to this situation if anyone is still interested. I was able to easily cut that bolt with a sawzall and remove the wishbone arm.
springcompressor004.jpg

Once that was out of the way, I went at that weld and the backside nut with a bunch of cut-off disks on a Dremel tool- slow, but ultimately successful. Then the bracket came off easily. The mount on the frame was a bit rough but I was able to smooth most of the welding material off. A previous owner had reinforced that area with a thicker metal plate on the backside (looks to be about 1/4" thick). I cleaned up everything as best I could with wire wheels, Krud Kutter, and Krud Kutter's "A Must for Rust", then I painted over it with some Rustoleum.
Suspension002.jpg

Very amateurish, but I'm hoping it will keep rust at bay until I own a home with a garage and tools and can do a more complete job.
 
OP
John_Mc

John_Mc

Jedi Knight
Country flag
Offline
Quick question:
This a 1971. Would those reinforcing gussets have been added later or were they standard on the TR6 by then?
TRF parts
 

AweMan

Jedi Knight
Offline
John:
My field of expertise is welding and fabrication.
I cant answer your question about the gussets bieng factory or addons. Maby someone else can.
Sorry
 
G

Guest

Guest
Guest
Offline
John_Mc said:
Quick question:
This a 1971. Would those reinforcing gussets have been added later or were they standard on the TR6 by then?
TRF parts


Hi John. Those gussets are part of the frame of any TR6. The reinforcement gussets sold by TRF are mirror-image pieces that sandwich right over the stock part and are welded on. I don't believe that you have those pieces on your car. I added them to mine. They thicken up the plates and add some beef to the front end. Now would be a good time to add them if you are so inclined. Or not.
 

Similar threads

Top