• The Roadster Factory Recovery Fund - Friends, as you may have heard, The Roadster Factory, a respected British Car Parts business in PA, suffered a total loss in a fire on Christmas Day. Read about it, discuss or ask questions >> HERE. The Triumph Register of America is sponsoring a fund raiser to help TRF get back on their feet. If you can help, vist >> their GoFundMe page.
  • Hey there Guest!
    If you enjoy BCF and find our forum a useful resource, if you appreciate not having ads pop up all over the place and you want to ensure we can stay online - Please consider supporting with an "optional" low-cost annual subscription.
    **Upgrade Now**
    (PS: Subscribers don't see this UGLY banner)
Tips
Tips

SaxMan's Winter 2016 Overhaul Thread

SaxMan

Darth Vader
Country flag
Offline
So, after procrastinating nearly all month, it was finally time to get down to business. This year, the mechanical focus is mainly on the front end -- brake job, replace some of the bushings, rack boots. I only get a chance to work for about an hour at a time, and I'm definitely taking my time, especially with the brakes, since there is no "90% right" when it comes to brakes...and I've never tried brake work before.

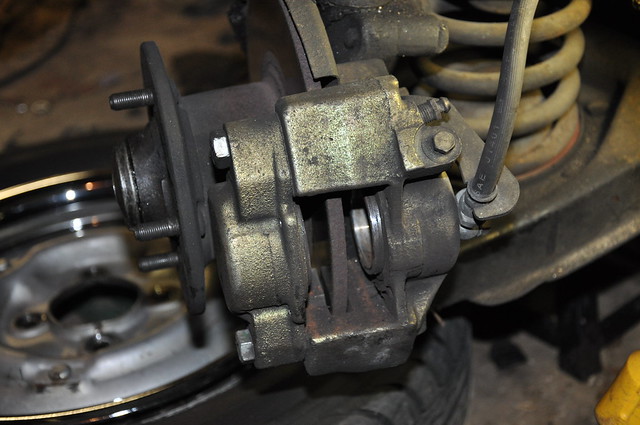
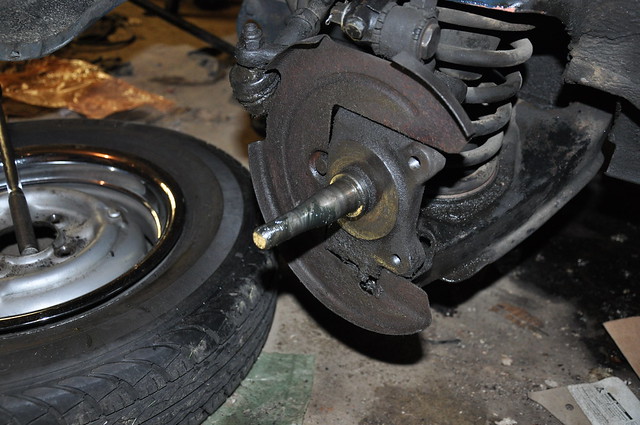
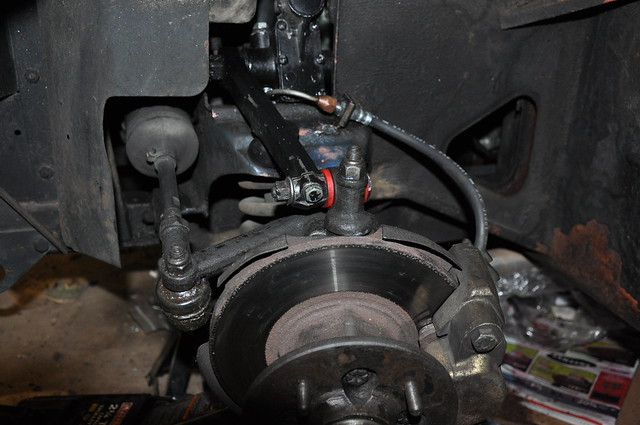
Brake pads out! One these were out, the rotor spun freely, but I hear a bit of bearing clatter, so I imagine I need to repack the wheel bearings.
DSC_0002 by David Cohen, on Flickr

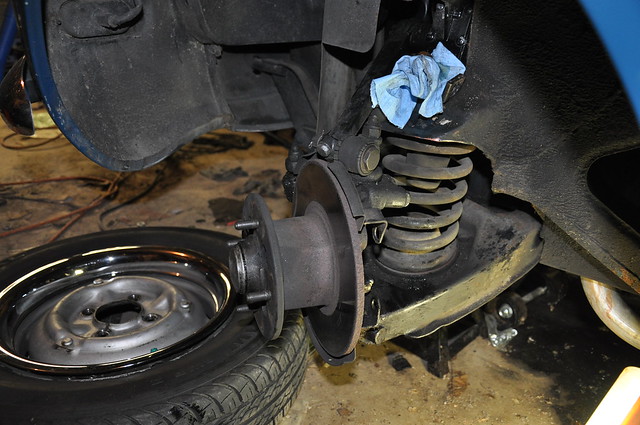
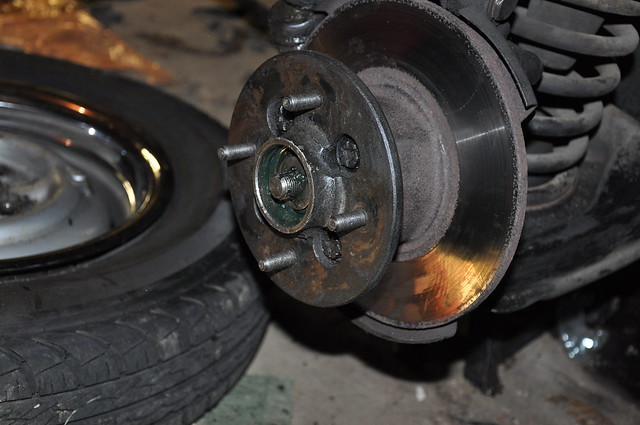
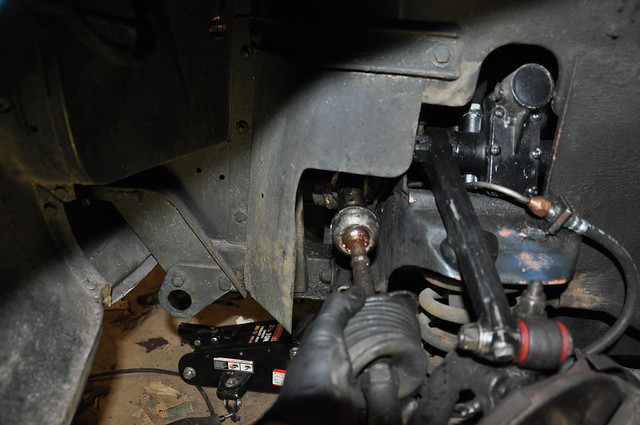
Caliper off - I am replacing the brake hoses, too, and will likely pull the rotors, although I don't think they need turning.
DSC_0004 by David Cohen, on Flickr

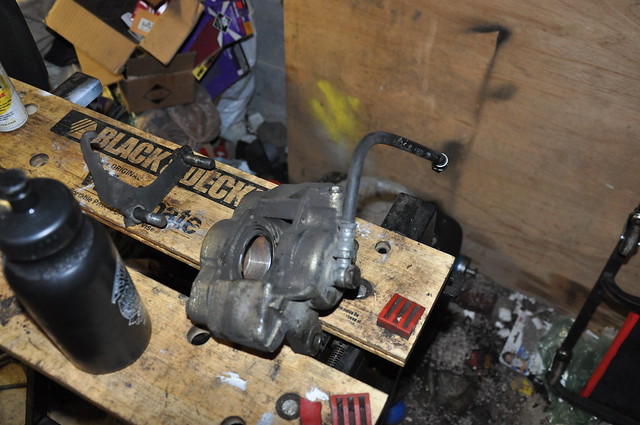
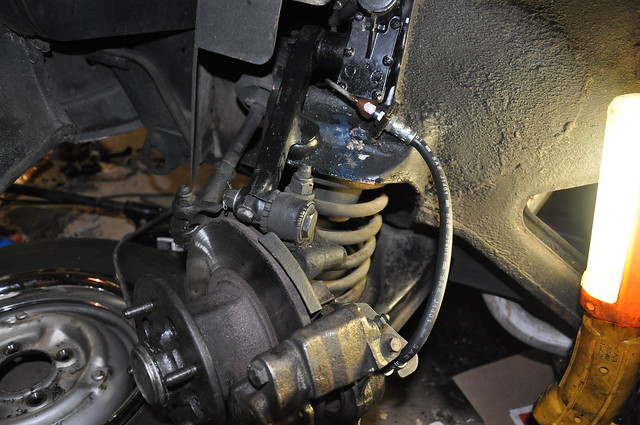
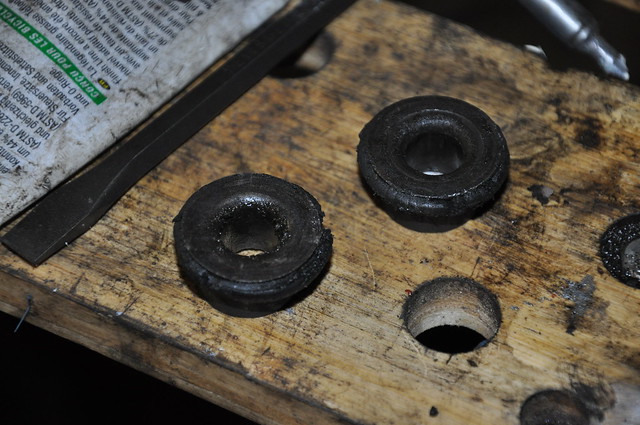
Caliper on the workbench -- I'm cleaning up the parts as I go along. Not going too terribly crazy, but clearing any loose dirt and grime from them
DSC_0005 by David Cohen, on Flickr

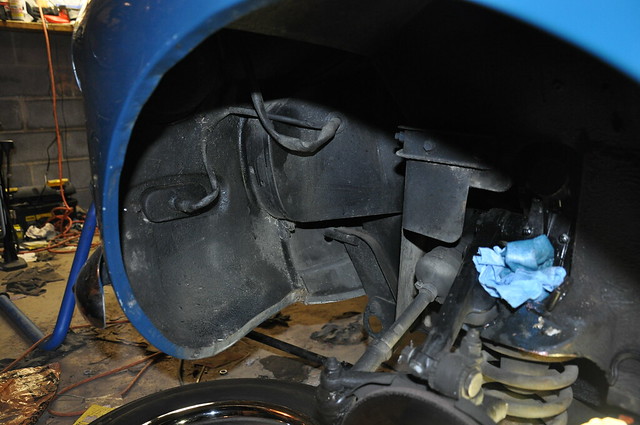
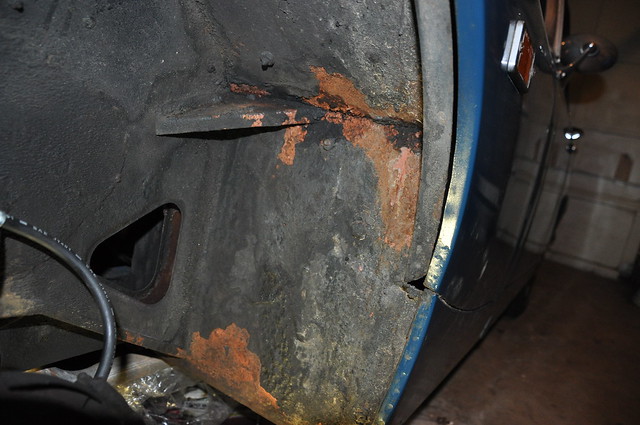
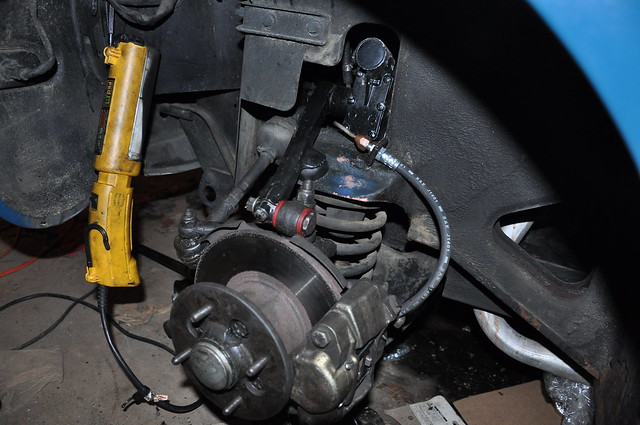
With the tire off, I cleaned up underneath the wheel well. I was pleasantly surprised to find that it was fairly clean underneath. Looks like someone may have done a rattle can paint job at some point, but the painting underneath seems to be more uniform than that. Overall, once I removed some of the grime, I found the condition to be better than I thought:
DSC_0006 by David Cohen, on Flickr

More pics to come as work progresses!
 

nomad

Yoda
Offline
If you pull the front hubs its likely that the inside bearing will come apart and require replacement. Not sure there are any really good quality bearings available. The county brand that are common I found to be loose feeling when they were new. I can't here the noise you are hearing but if there is no play in the hubs and no grinding sounds I'm not sure I would tear into them. If you are changing hoses I recommend the stainless braided for really great feeling brakes. Also wanted to mention that you might want to change your rubber shock to trunnion rubber bushings...they are looking a little tired. The shock clamp bolt has to come all the way out to get the cross bolt out.

Kurt
 

markberry

Jedi Trainee
Offline
Hi All,
I used the Timken tapered bearing replacement procedure outlined in the link below. I bought the shims from McMaster Carr and had a machine shop cut .060" off the back side of my axle nuts to make the whole thing fit together properly with about 50 foot pounds of torque on the nuts. it works fantastic! a great deal of work was done by the people that performed the study to put this procedure together.
regards
Mark

https://www.mgexp.com/article/mg-midget-wheel-bearings.html
 
OP
S

SaxMan

Darth Vader
Country flag
Offline
I did get the front hub off tonight and everything held together. Greased everything up and put it back together -- definite improvement.

I am planning on replacing the shock to trunnion bushings. Yup, they are tired.

As I continue to dig into the car, I'm definitely coming across parts that don't appear to be 47 years old. It looks like the car definitely had some degree of restorative work done to it, but the work seems inconsistent -- some parts that are adjacent to parts that were replaced do appear original. My guess is the car had a good deal of restoration work done about 20 years ago, and then some new work done in the last 10 years. Perhaps a project that got started, then stalled, and then someone else finished things up. I do know that the owner Larry bought the car from put a lot of work into it...until his parents found out and made him sell the car. Which, of course, started the whole chain of events that landed the car eventually in my garage.
 
OP
S

SaxMan

Darth Vader
Country flag
Offline
More pics.

Hub and rotor off. Other than the glob of grease, the spindle looks fairly pristine, certainly in contrast to the backing plate.
DSC_0010 by David Cohen, on Flickr

Hub and rotor back on with fresh grease in the bearings and in the cup. Nice and smooth sounding now!
DSC_0011 by David Cohen, on Flickr

Caliper back on, new brake hose installed. The wheel spins much more freely now.
DSC_0017 by David Cohen, on Flickr

While cleaning out the frame triangle, I discovered the drain hole was blocked. When I unblocked it, I got this nice pile of dirt and some rust on the ground -- more on the crap in the wheel well on the next picture:
DSC_0019 by David Cohen, on Flickr

This is ugly -- this is the inside of the left front wheel well at the rear. I can't tell if this is factory coating, or someone sprayed some undercoat into the well. The stuff practically flakes off in my hand. I'm sure it would all come off with a wire brush. I know this is something that needs to be addressed. I'm just not sure if I need to reshoot it with undercoat or just regular paint. You can see a bit of Bondo just below the horizontal seam.
DSC_0021 by David Cohen, on Flickr
 
OP
S

SaxMan

Darth Vader
Country flag
Offline
Hit the first snag of the overhaul: The bolt holding the shock to the trunnion isn't budging. If I turn it counter-clockwise, the arm of the lever shock gets drawn against the trunnion and won't turn anymore. If I turn it clockwise, the arm moves away from the trunnion, but then the head of the bolt reaches the end of its travel. When I replaced the shocks, I seem to remember this bolt virtually sliding through.

I've loosened the bolt on the arm of the lever shock. I've tried jacking up the A-arm to try different positions for the lever shock to see if there is less tension on the bolt. I've found jacking the suspension so the lever is just clearing the bump stop seems to yield the best result. I've tried hitting the bolt with a punch, and no joy. I decided just to hit the area with PB Blaster, walk away and try again tonight. My fear is that the bushings are so worn that the bolt has bent and won't come out without some amount of destruction needed. Any tips?
 

markberry

Jedi Trainee
Offline
Hit the first snag of the overhaul: The bolt holding the shock to the trunnion isn't budging. If I turn it counter-clockwise, the arm of the lever shock gets drawn against the trunnion and won't turn anymore. If I turn it clockwise, the arm moves away from the trunnion, but then the head of the bolt reaches the end of its travel. When I replaced the shocks, I seem to remember this bolt virtually sliding through.

I've loosened the bolt on the arm of the lever shock. I've tried jacking up the A-arm to try different positions for the lever shock to see if there is less tension on the bolt. I've found jacking the suspension so the lever is just clearing the bump stop seems to yield the best result. I've tried hitting the bolt with a punch, and no joy. I decided just to hit the area with PB Blaster, walk away and try again tonight. My fear is that the bushings are so worn that the bolt has bent and won't come out without some amount of destruction needed. Any tips?

Hi There,
you have to completely remove the "pinch bolt" in the end of the shock arm in order to remove that large trunion bolt. When you get the trunion bolt out you'll see the area in the bolt that is milled out to provide an extra bit of interference by the pinch bolt (preventing the bolt from working itself out in case you should lose the castellated nut). Hope that helps.
mark
 
OP
S

SaxMan

Darth Vader
Country flag
Offline
Hi There,
you have to completely remove the "pinch bolt" in the end of the shock arm in order to remove that large trunion bolt. When you get the trunion bolt out you'll see the area in the bolt that is milled out to provide an extra bit of interference by the pinch bolt (preventing the bolt from working itself out in case you should lose the castellated nut). Hope that helps.
mark

That will probably do the trick. That was enough to jog the memory that I did have to pull the pinch bolt out entirely when I took out the old shocks. Thanks for taking the time to respond! :encouragement:
 

nomad

Yoda
Offline
I tape a piece of heater hose into my shop vac and clean out that trash trap at the back of the front fenders. I'd suggest that while you are doing your maintenance and I would plug as many holes as you can that let spray form the wheel get in there. Your surface rust issue in the wheel well will probably fare better by eliminating any old undercoat that allows moisture to get under it.

Kurt.
 
OP
S

SaxMan

Darth Vader
Country flag
Offline
Got the bolt loose, but it took a punch to get it out. Then the old bushings were practically fused to the bolt, so I had to take of the trunion (I think that is what it's called) and use a punch to get the bolt loose. Slipped in the new bushings, put it back together, only to realize, I put the trunion on backwards so that the wheel had something like 15 degrees of negative camber. Fortunately, everything came back apart far more quickly and I put the car back together properly. Wondering if I should replace the kingpin bushings, too.
 

nomad

Yoda
Offline
. Wondering if I should replace the kingpin bushings, too.

Anything you do beyond the top trunnion bushings gets major and I wouldn't tackle it unless there is quite a bit of play. Good and regular lubrication is a must though....like every 1K or so for the bottom trunnion bolt.

Kurt.
 
OP
S

SaxMan

Darth Vader
Country flag
Offline
Anything you do beyond the top trunnion bushings gets major and I wouldn't tackle it unless there is quite a bit of play. Good and regular lubrication is a must though....like every 1K or so for the bottom trunnion bolt.

Kurt.

The front end feels pretty tight. I definitely think the trunnion bushings will make a big difference given how worn the previous bushings were. I seem to recall that the kingpins require a lot of work, probably not worth it for this round of overhauls. I usually lube twice a year, which is about 1000 - 1500 miles with the amount of driving I do with the Sprite.

Next step - replacing the rack boots. Both boots are torn, exposing the rack.
 
OP
S

SaxMan

Darth Vader
Country flag
Offline
Some more pics...

The old trunnion bushings looking a little bit toasty:
DSC_0023 by David Cohen, on Flickr

What's wrong with this picture?
DSC_0027 by David Cohen, on Flickr

Fixed it!
DSC_0028 by David Cohen, on Flickr

The clamps for the rack boots were rusted solid, so I had to cut them. The boots were in far worse shape than I thought, so I'm glad I'm replacing them. Here the rack oil looks a little bit worn, too:
DSC_0030 by David Cohen, on Flickr

I'm definitely not winning any prizes for speed -- I've got 8 hours in just to get to this point. Of course, I'm also cleaning things up as I go along, too.
 

Jim_Gruber

Yoda
Country flag
Offline
You do know those dust shields unbolt and can then be cleaned up and painted. Another while I'm in there thing. Or leave it for next year.
 

nomad

Yoda
Offline
Before you unbolt the tie rod end record exactly what the distance is from the lock nut on each side to the end of the thread's. Save you some headache later. You will have to do some realignment anyway but at least you will be close.

Kurt.
 
OP
S

SaxMan

Darth Vader
Country flag
Offline
Before you unbolt the tie rod end record exactly what the distance is from the lock nut on each side to the end of the thread's. Save you some headache later. You will have to do some realignment anyway but at least you will be close.

Kurt.

Yes. I found it was .625 inch from the end of the thread to the locknut. Will probably re-measure with a caliper to get it more exact.
 

Jim_Gruber

Yoda
Country flag
Offline
15 1/2
Threads showing is a pretty good reference point to get you close.
 
OP
S

SaxMan

Darth Vader
Country flag
Offline
I had to order the correct tool to remove the ball pin from the steering arm, so while waiting for that tool, I started on the right side. This time I worked in reverse order -- undid the clamps for the rack boots, and then replaced the trunnion bushings. While replacing the trunnion bushings, the arm of the shock on the right hand side was flapping around like a wet noodle. This is one of Peter C's shocks and it was installed two years ago. I'm thinking it is out of damper oil. I'm hoping that's the case. The oil reservoir is the bolt next to the inside mounting bolt in the engine compartment, correct?
 

Jim_Gruber

Yoda
Country flag
Offline
Talk to Peter, he'll make it right.
 
Similar threads
Thread starter Title Forum Replies Date
S SaxMan's Winter 2014/15 Project Thread Spridgets 105
T Vacuuming [prompted by Saxman's thread and Nomad's heater hose suggestion] Spridgets 2
AN5Sprite Happy B'day SaxMan Spridgets 4
S The Incredible Shrinking SaxMan Spridgets 9
S SaxMan's Cylinder Head Overhaul / Head Gasket Replacement Thread Spridgets 135
tr6nitjulius For Sale "SOLD" Winter projects: Upgrades 4Sale or Reasonable Best Offer Triumph Classifieds 0
Hamish Racing TR2/3/3A Winter engine running in - icy Triumph 7
Sherlock Winter Porsche sighting Spotted 1
RJS General TR Winter Blend Fuel Triumph 1
D Winter Projects Austin Healey 20
Rob Glasgow Getting Ready for Winter Austin Healey 24
M New Shocks for Otto and other winter projects Spridgets 22
bugedd Winter Suspension Project Spridgets 7
JPSmit Off to bed for the winter Spridgets 10
60TR3A Is It Safe to Heat My Garage All Winter While I Am In Florida? Austin Healey 34
drooartz A little winter drive Spridgets 3
Jim_Gruber Bugsy is ready for Winter Spridgets 6
R Winter Driving Austin Healey 24
bugedd Thinking about winter time projects Spridgets 5
Rhodyspit75 What I've been doing all winter Spridgets 13
R winter hard starting BJ7 Austin Healey 16
TomMull TR2/3/3A Gasoline fumes and winter storage Triumph 11
2 TR2/3/3A Winter driving question Triumph 10
Mickey Richaud Winter Project Anyone? Spridgets 4
Dave Richards MId Winter Jaunt Austin Healey 7
Sherlock Jensen FF [in winter weather!] Spotted 5
JPSmit Off to Boarding School for the winter Spridgets 6
DNK Wedge Must Be Winter Triumph 22
S Winter Projects Spridgets 8
HealeyDave Car transport company suggestions needed - winter/midwest/USA Austin Healey 2
kodanja TR6 Time for some winter work Triumph 15
R why winter and summer thermotat temp? Spridgets 3
P TR6 Running TR6 in the winter Triumph 11
alanjohnturner TR4/4A door handles - nice Winter job Triumph 1
Jer Winter repair plan[s] for my 74... Spridgets 9
mt10flyer TR2/3/3A Winter Project-Wiring Harness Triumph 4
drooartz MGB Drew's going to build an engine this winter MG 13
drooartz MGB After a busy winter/spring/summer, success! MG 9
Jim_Gruber Spring is getting closer - What Spridget Winter projects do you still need to finish Spridgets 13
drooartz Winter projects: carb and dizzy rebuild MG 26
johnrip how much gas for winter storage Triumph 17
Gliderman8 Winter Project complete.... Triumph 9
Nelson Battery winter storage Spridgets 10
TR6BobNF TR6 TR6 Teardown - Winter 2011 Triumph 4
jlaird John Twist - Winter Storage Spridgets 3
Go_Dogs_Go Winter storage? Spridgets 13
drooartz Sad day -- packed away for the winter MG 8
JPSmit It's Canada, It's winter Spotted 7
Grantura_MKI Winter projects TVR 25
livinginthepast After a long winter's nap - BE runs around town... Spridgets 7

Similar threads

Top