• Hey there Guest!
    If you enjoy BCF and find our forum a useful resource, if you appreciate not having ads pop up all over the place and you want to ensure we can stay online - Please consider supporting with an "optional" low-cost annual subscription.
    **Upgrade Now**
    (PS: Subscribers don't see this UGLY banner)
Tips
Tips

Installing electric fuel pump

bigjones

Jedi Warrior
Bronze
Country flag
Offline
Yo!

For various reasons, I'm yanking the mechanical pump (this is a 1500) and installing an Airtex E8016S electric.

Hey!! It's made here in the USA - I'm stupified!!

DSCI0001.jpg


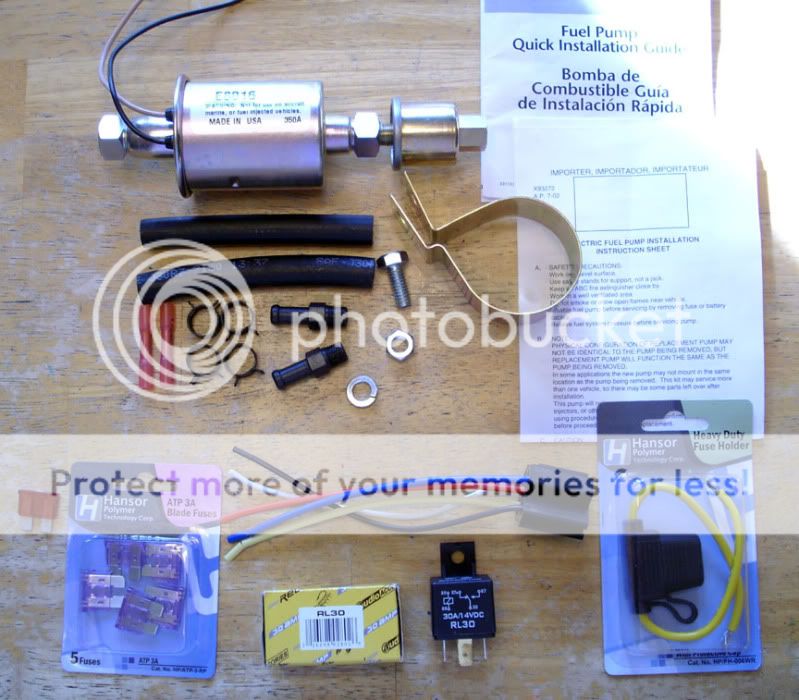
Top of pic shows what is included.

Bottom shows fuse and relay I plan to add.

I really want to do this correctly.

OK, I suppose they both go in the Positive lead to the pump but in what order and as close to the pump as possible?

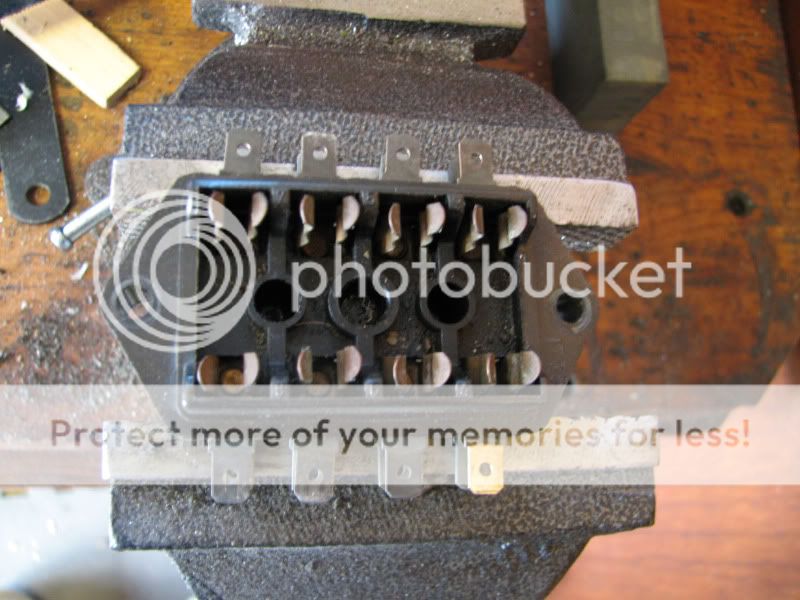
I've found a convenient spade on the original fuse box that gives juice when the ignition is on so I can run a lead from there I'm thinking. Do I then split this lead into two, at the fuel pump, for the relay, or run two leads from the fuse box?

This wire(s) will run under the carpet, etc. Do I need to wrap the wire in some sort of protective tape?

The rating for this pump is 1 amp so I bought some 3 amp fuses - the leaflet says use a 10 amp fuse - what gives?

If I remember right, the fuel line from the tank takes an inverted "U" shape and then under the car. I"m going to install the pump as low down as poss on the first leg, right?

Tubing in the kit is 5/16" - is this going to give me bother? Isn't our stuff 1/4" ID?

Those clips I don't like - I'll use proper "radiator" /Jubilee clips.

I have already installed an electric (Mr. Gasket) under the hood. I'm going to use that to pump out all the gas from the tank beforehand. I was toying with the idea of then filling the tank with hot soapy water and running that through, followed by a gallon ethyl alcohol (from Lowes), or is that unnecessary?

Advice much appreciated!

Cheers!
 

dklawson

Yoda
Offline
Adrian,

My advice would be to remove the original pre-filter from the Airtex pump and install the barbed fittings directly in the pump. Put a clear glass (serviceable) fuel filter between the tank and pump's suction port. The advantage of the glass filters is you can see what is in them and their elements are typically coarser than the paper inside the disposable type. This lets the glass filter catch scale and rust without unnecessarily blocking the suction side of the pump.

When you put the barbed fitting in the pump, go ahead and buy 1/4" tube barbs so you don't have to worry about the transition to 5/16". (Lowes, Home Depot, Advance...)

The recommended pump fuse rating will address things like in-rush current and other potential current spikes. If they call for 10 Amps, that is what I would use so you don't have any surprises while driving.

What to do with the wire under the carpet is really up to you. It will not hurt to put another layer of insulation on it. However, I would focus the extra insulation on those areas where the wire passes through openings or could potentially rub against an edge.

Soapy water will not do much to clean the tank. If you really want to clean it (AND leave the tank in the car) buy a gallon of ZEP Industrial Degreaser/Cleaner from Home Depot. After you drain the tank you can plug it, pour in the ZEP add water, and let it soak over night. ZEP is a very strong caustic and it will dissolve the fuel gum in the tank. A lot of rinsing and drying would have to follow. Were it me, I'd just put in the glass filter and skip cleaning the tank.

As for the relay, if you are not going to use a separate trigger wire so the trigger and power are separated... why bother? Ideally you would put the relay in the engine or passenger compartment. The power wire for the relay would be connected to the inline fuse and the other side of the fuse to the battery. The relay trigger wire would go from the relay to your switched fuse box connection. This will allow you to break that trigger wire and add oil pressure, inertia, or roll-over switches (for safety) if you want them.

Others will have to advise you on how to mount and plumb the pump on the Midget. On the Spit I have the electric pump below the tank and in the boot. Pumps work much better as pushers than pullers so whatever you do, keep the pump low if possible so it is gravity fed.
 
OP
bigjones

bigjones

Jedi Warrior
Bronze
Country flag
Offline
Doug,

Many thanks for the most excellent suggestions! I'll follow your advice and post some more pictures as I progress.

I'm still a bit confused over the relay wiring but let me read up about it and I'll post again if I'm stuck. Ha!

Cheers!
 

nomad

Yoda
Offline
Ethyl alcohol will combine with any water in the bottom of the tank and carry it out if you want to go to the trouble. Gasahol from a reputable gas station will do the same thing as will a couple of cans of HEET in regular fuel.

Kurt.
 
OP
bigjones

bigjones

Jedi Warrior
Bronze
Country flag
Offline
Nomad,

Yeah, that was what I was thinking.
Don't think I'll bother now, thanks to Doug's advice.

PS. I lived in Vermillion for a couple of years - miss the paddle fishing and pheasant hunting!!

Cheers!
 

Sarastro

Obi Wan
Silver
Country flag
Offline
I noticed that the pressure spec for your pump is 2.5-4.5 psi. That might be a little high for SU or Stromberg carburetors; it could force fuel past the float valve. You might want to consider a pressure regulator, to keep it around 2 psi or so. There is a low-pressure one by Holley that I use, and it's pretty good.
 

tdskip

Yoda
Country flag
Offline
There are pressure regulators available as well - I had to put one on the Bugeye to prevent the bowls from flooding due to excess pressure from the same pump.
 

nomad

Yoda
Offline
Big Jones; I'm 16 mile's from Vermillion. Major pheasant hunter but weather has been hard on them in recent years!

Good luck on the midget

Kurt.
 

nomad

Yoda
Offline
Big Jones; I'm 16 mile's from Vermillion. Major pheasant hunter but weather has been hard on them in recent years!

Good luck on the midget

Kurt.
 

dklawson

Yoda
Offline
+1 on the Holley regulator. Don't be tempted to use the round disk (pancake) style sold under many names. The Holley regulator is pretty affordable from Amazon and Summit. I believe it even comes preset to 2.7 PSI... but it's always good to check the actual pressure once installed.
 

jlaird

Great Pumpkin
Country flag
Offline
Miss Agatha has this fuel pump, works fine and a fuel pressure regulater was not required even on her H1s.

Yep I also threw away those awful clamps and the short hose etc.
 

Hairyone

Jedi Trainee
Offline
The relay is used to save your ignition switch from taking more current than it has to, or is designed for. These Lusas switches are not the best when new, so help it last:

Relay pin numbers: pin 85 to ground. Pin 86 to switched ignition.
pin 30 to battery + via the 10A fuse.
Pin 87 + out to the pump.
Pin 87A (may not be there) is not used, if it is there, & it looks as if you've 5 wires in the holder, yoink the wire out. As this will be live with ignition off.
 
OP
bigjones

bigjones

Jedi Warrior
Bronze
Country flag
Offline
Hairyone said:
...pin 30 to battery + via the 10A fuse...

Thanks for spelling it out for me. I'll take another look under the hood this afternoon but you don't mean fabbing up a connection to the battery post do you? How about the + terminal on the coil?

As far as a regulator, I'll be mighty annoyed if this pump puts out too much pressure - a regulator is just something else to go wrong - I'll see what happens and report back.

Regarding problems with the fuel, I'm planning on pumping all the fuel out the tank so I'll check for any separation.

Thanks again!

(Nomad, is that bar still there in Yankton where, when you finish your beer, you hurl the bottle at the backyard wall?)
 

Bayless

Yoda
Silver
Country flag
Offline
No the coil terminal won't buy you anything as it comes through the ign switch. Best place is find a brown wire at your fuse box and connect to it. Alternative is atr the solenoid where the wire from the battery connects.
 

Sarastro

Obi Wan
Silver
Country flag
Offline
jlaird said:
Miss Agatha has this fuel pump, works fine and a fuel pressure regulater was not required even on her H1s.

Remember, the pumps are spec'ed for a RANGE of pressures, in this case 2.5 to 4.5 psi. One might come it closer to 2.5 and you'd probably have no problems with it; another might be closer to the high end.

My Facet was spec'ed about the same as this one, and it came in at 3.0 psi, which was the same as the mechanical pump. So, I figured it was fine. About a year later it started blowing fuel past the float valves, and I had to install the regulator.

I have a Facet to put on my Porsche, when I get a chance, and I'll use a slightly higher pump pressure and regulate it down to about 2 psi.
 
OP
bigjones

bigjones

Jedi Warrior
Bronze
Country flag
Offline
Bayless,
Thanks for the hint. There was a spare brown connection at the fuse box that I can use!

Took the opportunity to remove it and give all the terminals a good clean. Here I started on the bottom right one with my Dremel:

Fusebox.jpg


Steve,
Thanks for that explanation. I thought the pump would operate somewhere in that range depending on what day of the week it was. Ha! If it's on the high side and pushes past the float bowl I'll install another fuel filter in the engine bay to slow it down some and see what happens.

Whereabouts in the electrical system should an inertia switch be placed:
in between the relay and fuse?
in between fuse and battery?
in between relay and ignition source?

I plan on touring the junk yard for one - where do these things normally hide - any clues on how to locate one on a vehicle? I can use a multimeter to test the continuity, right?

Cheers!
 

jlaird

Great Pumpkin
Country flag
Offline
Any race car supplier will have interia switches, they not expensive.
 

Sarastro

Obi Wan
Silver
Country flag
Offline
I'd put it in series with the relay contacts (i.e., 30 or 87, not the coil) as long as it can handle the pump current. That way it switches the pump directly. Doesn't matter a huge amount, though.
 
OP
bigjones

bigjones

Jedi Warrior
Bronze
Country flag
Offline
Jack,

Thanks for the post. Glad you are enjoying the spring weather, by the way!
I was hoping to get one from the junk yard but I must have forgotten what a maze modern engine compartments are like. The nearest thing I came across was this thing from a sporty, wedge Nissan with split sun roof:

Lamp1.jpg


But it turns out it is an under-the-hood inspection lamp. How cool!

Lamp2.jpg


It'll look nice all polished up.

Steve,

Thanks for the post. I'll take your advice if I ever find one. There were half a dozen Land Rovers at the junk yard- all but one misssing their engines and a 1986 Jag but I didn't know what to look for and didn't find anything that had a re-set button.

Cheers!
 
Similar threads
Thread starter Title Forum Replies Date
Trevor Jessie Installing electric fan switch. Spridgets 5
Y Installing electric fan Austin Healey 6
J Installing Adapter Hubs for Wire Wheels on a Bugeye Austin Healey 5
S Installing a Radiator Fan Austin Healey 9
G Installing New Rocker Shaft Assembly Austin Healey 3
W Need advice on installing new side curtain glass Spridgets 1
Bayless Help please installing bonnet release cable Spridgets 8
M TR6 Installing Retrosound? Triumph 4
S TR2/3/3A Installing the distributor pedestal. Triumph 3
K TR2/3/3A Question about installing the steering wheel control head? Triumph 1
A TR6 Installing differential and transmission Triumph 10
Z Installing Toe Board Panels Austin Healey 1
K TR2/3/3A Installing Brake Caliper pistons into the bore? Triumph 21
CJ Burton MGB-GT Installing Seat Covers for 1962 - 1967 MGB GT MG 0
A Early 1967 AH Sprite - installing steering column and new directional switch? Spridgets 0
B Installing cam bearings 1275, can I do it? Spridgets 1
bighealeysource Installing stainless steel brake hose on BN2 Austin Healey 5
steveg TR6 Installing stock trailing arm bushings on the car - is it possible? Triumph 2
steveg TR6 Installing adjustable trailing arm brackets Triumph 7
T Installing Garmin GPS in a BJ7 Austin Healey 19
F Installing AC in my 1960 Healey Austin Healey 14
S TR2/3/3A technique for installing a door Triumph 5
R TR2/3/3A Installing wiring harness in steering column Triumph 59
R TR2/3/3A Installing gas tank Triumph 6
C Installing rubber grommets in firewall? Austin Healey 6
S TR2/3/3A installing a fuse in the red tail lights Triumph 4
S TR2/3/3A installing the wiring harness Triumph 8
R Installing Sprite Luggage Rack Spridgets 9
Lukens TR2/3/3A Installing a throttle. Triumph 2
J Powertune booster for a bj8 , trouble installing Austin Healey 2
B TR2/3/3A Installing dzus fastners in bonnet Triumph 8
D Prepping Floors Before Installing Interior Restoration & Tools 6
drooartz Installing front hubs, tips? Spridgets 15
E TR4/4A Wiring the horn when installing a Moto -Lita steering wheel Triumph 4
K TR2/3/3A Installing Moss wheel spacers? Triumph 5
D BT7 tri-carb installing my crank Austin Healey 4
aero3113 Installing Front rotors to hubs Austin Healey 2
C Advice for installing a 3000 Grille??? Austin Healey 7
B MGB Installing new upper fulcrum bushings MG 5
B MGB Installing upper fulcrum bushings MG 0
S TR4/4A procedure for installing gauges etc Triumph 0
I Tips for installing intake manifold plugs in a stock Bugeye? Spridgets 6
55modified Help installing toggle dip switch on dash for lights. Austin Healey 23
TRMark TR4/4A Installing a new windscreen Triumph 9
55modified Rear anti-roll bar. Is it worth installing on a BN1? Austin Healey 22
T Installing a Lucas 16 ACR alternator on Bugeye Spridgets 10
KVH General Tech Installing the Pistons and Rings Triumph 7
T Need advice for installing a Winner's Circle Panhard rod on a BE Spridgets 4
6 General Tech Installing New Oil Pressure Gauge MG 5
6 Installing Oil Pressure Gauge Spridgets 2

Similar threads

Top