• The Roadster Factory Recovery Fund - Friends, as you may have heard, The Roadster Factory, a respected British Car Parts business in PA, suffered a total loss in a fire on Christmas Day. Read about it, discuss or ask questions >> HERE. The Triumph Register of America is sponsoring a fund raiser to help TRF get back on their feet. If you can help, vist >> their GoFundMe page.
  • Hey there Guest!
    If you enjoy BCF and find our forum a useful resource, if you appreciate not having ads pop up all over the place and you want to ensure we can stay online - Please consider supporting with an "optional" low-cost annual subscription.
    **Upgrade Now**
    (PS: Subscribers don't see this UGLY banner)
Tips
Tips

TR2/3/3A Block coolant passages plugged - pull the head?

TR3driver

Great Pumpkin - R.I.P
Offline
If you have to remove the #4 liner get ready for about a half cup of small rock and sand-like material to drop on the #4 rod journal of the crankshaft.
Not just #4, but all of them! What i do is wrap a clean shop rag around each journal, and hold it with a twist of wire while you clean out the water jacket.
After the liners ate in place, turn the crank so the journal is at the bottom before you remove the rag n wire. That leaves the oil drilling facing down so nothing can fall into it, while you clean up the area with another rag n solvent.
 
OP
D

Daves1957TR-3

Senior Member
Offline
Thanks all! Well, today was measurements and checking. The pushrods are still the 5/16", so I will replace those. The exhausts are still the larger stems. They look OK, so I decided t let my machinist make the call on replacement. I have given him quite a few jobs and he does stellar work. I will take the head up tomorrow and will be able to order the remainder of the parts once he does a look-see. I have started on the block and will do scraping/chiseling with vacuum clean-out, leaving the sleeves alone. Should be done by week's end, hope to put back together late next week.

Cheers, Dave
 

CJD

Yoda
Country flag
Offline
Scraping and vacuuming sounds much more prudent to me vs. power spraying. I approve and can stop cringing!
 
OP
D

Daves1957TR-3

Senior Member
Offline
Yeah, the power washer is down and awaiting a new carb anyway! ;) For rinsing I will use a dingus I have used before - a length of 1/4" copper tubing with the end flattened to a nozzle. Hook it to a hose and you get a strong stream that gets the loose stuff without it being ginormous pressure like a power washer. Although it was fun using the power washer on my Buick straight 8!

Cheers, Dave
 
OP
D

Daves1957TR-3

Senior Member
Offline
sp53: Dave you are probably going to do it anyway, but I thought I would mention to have your rocker shaft redone.

So when ordering parts I included a new rocker shaft, as well as the lock pins. Having worked on my Buick rocker, I assume it's about the same? Are the stanchions pressed onto the shaft? With the Buick you just heat them a bit to loosen. Is it the same on the TR?

Thanks, Dave
 

TR3driver

Great Pumpkin - R.I.P
Offline
If the shaft is worn, then so are the bushings in the rockers and the rocker tips. IMO its better to send the whole thing off to Rocker Arm Specialists (or whatever they are called these days). They rebuilt.mine for about what the bushings and shaft would have cost me. Shaft and rockers appeared brand new, only the pedestals and end caps were clearly the originals. And the result has held up well for a long time now.

But yeah, the pedestals usually come off pretty easy, once you get the locating screw out. A little heat will help loosen them, but mine came off cold.
 
OP
D

Daves1957TR-3

Senior Member
Offline
OK, today was Block Descunge Day. Got it all out. Turns out the muck was semisolid so was able to scrape and blast it out with air and house pressure hose.

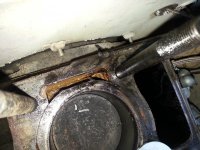
Before:
20170731_174338.jpg
You can see the muck behind #4 comes up to about 3/4" below the top of the block. All passages to cyl #3 blocked.

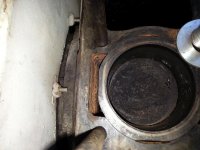
After:
20170808_180522.jpg
You can see down to the bottom now. The water now flows completely around all the sleeves and out the block drain. Full open passages to the block front. Big change from before! Extracted about a pound of muck, both into the shop vac and all over the engine compartment! My assistant Ben said we just should've taken it thru a water park! Got it all cleaned up and will change the oil before firing. Now waiting for my machinist on the head.

Cheers, Dave

Cheers, Dave
 

DavidApp

Yoda
Gold
Country flag
Offline
Hello Dave

Good job on getting all the crud out of the block.

I presume that is a disc of some type I see sitting on the piston.

David
 
OP
D

Daves1957TR-3

Senior Member
Offline
David - disc is washer used to keep the sleeves in place.

George - suggestions on cleaning method?

Cheers, Dave
 

DavidApp

Yoda
Gold
Country flag
Offline
Hello Dave

I was referring to the top of the piston in your before and after photos. There appears to be a raised portion almost piston diameter but off set to the center of the bore.

David
 
OP
D

Daves1957TR-3

Senior Member
Offline
Oh I see. It's just discoloration of some sort, or a shadow from the flash. I will take another look this weekend.

Cheers, Dave
 
OP
D

Daves1957TR-3

Senior Member
Offline
OK, I am in the process of reassembly. The head is on and torqued and I am finishing up on the rocker arm reassembly. I got a new shaft from Moss and it's OK, except for one thing. The holes for the Mills pin on one end seem to be drilled off center as neither one of my end caps fit properly. The other end is good. I know from other cars that this "offset" is sometimes used to ensure the proper part goes on but both end caps are the same in this case. Is this just sloppy workmanship or is something else afoot?

Also, I noticed that my old rocker shaft had just the end caps held on with the Mills pins to maintain oil pressure. The new rocker has threaded inserts in the end to seal it up good.

Pics coming!

Cheers, Dave
 

TR3driver

Great Pumpkin - R.I.P
Offline
The caps are the same front & rear, so sounds like your shaft is made wrong.

Having the caps should certainly improve oil flow through the rockers (especially the front ones); but don't expect much pressure. The rocker shaft runs at essentially zero pressure; the holes on top of the rockers are open to the bore through the shaft through the gap between the bushings and there isn't a lot of flow.
 
OP
D

Daves1957TR-3

Senior Member
Offline
Thanks Randall! Well I got it assembled and on. Had to use Cotter pins rather than the Mills pins but the threaded plugs in the shaft end are the primary oil "stoppers" anyhow. Rocker arm on, new larger pushrods and valves have been adjusted.

Next question: am getting ready to reinstall the manifold assy. Do I just use the gaskets dry as is or is any sealant recommended? Or does it need to move on heat expansion and need some copper antiseize?

Cheers, Dave
 

TR3driver

Great Pumpkin - R.I.P
Offline
I put them on dry.
 
OP
D

Daves1957TR-3

Senior Member
Offline
Dry it is. I got the manifolds back on and hooked up to the new exhaust. Also cinched down all exhaust system clamps. Put the carbs back on, did prelim adjust, and did turnover test, all good. Then did a quick compression test, 155 lbs all 4 cylinders. Also changed the oil. Then it started right up. Still have to do final carb adjusts/sync but it sounds pretty good.

2 questions:

1. The Book says adjust valves cold to 0.012" exhaust, 0.010" intake. I actually did all to 0.012". Should I go back and reset the intakes to 0.010"? Or are these clearances even correct?

2. What do you all generally set idle speed to? About 700 rpm?

Cheers, Dave
 

TR3driver

Great Pumpkin - R.I.P
Offline
I forget the crossover point, but your car is late enough that you should have the aluminum rocker pedestals. With the aluminum pedestals, the clearance was revised to .010"/.010" Check the TR3 supplement in the back of the workshop manual, I think the change is documented there.

That said, I wouldn't pull the cover again for just .002" too large. You'll get more valve noise, but it won't hurt anything.

The dash tach is almost never perfectly accurate at low rpm; plus it depends a lot on other factors (like oversize liners). So I go for whatever rpm will let it idle smoothly and reliably. With my current engine (which is relatively stock except for 86mm liners), that's about 850 indicated. But I've owned other engines that didn't like to idle below 1500 (Ok, it wasn't exactly stock :smile: )
 

sp53

Yoda
Country flag
Offline
Like what Randall said, heck Dave if you can get a good strong idle at 700 things are good. At 12 it might make some more noise, but again I would drive it a few hundred miles to let stuff settle in, then re-adjust, good job!!
steve
 
Similar threads
Thread starter Title Forum Replies Date
D TR2/3/3A Coolant tap on TR3 block Triumph 3
M standing coolant in block? Triumph 5
BugEyeBear GT6 GT6 Coolant Block Drain Plug Location? Triumph 4
H Block coolant drain plug Spridgets 2
Jim_Gruber Coolant Leak / Temp Sensor in the block Spridgets 10
77MidgetMkIV block coolant plug? where?? Spridgets 6
sim A-series Engine Block Search Spridgets 2
1955TR2 TR2/3/3A TR2/3 Oil Leak Where Oil Sending Pipe Connects to the Block Triumph 8
B TR6 TR6 block decking Triumph 2
B TR6 71 block & crank Triumph 1
T Block Heaters Austin Healey 3
tinman58 TR2/3/3A Por-15 in engine block? Triumph 12
F Wanted BJ8 Engine Block Austin Healey Classifieds 1
R For Sale 100 engine block w/head Austin Healey Classifieds 3
Sopwith_Camel what is this on the block? Jaguar 13
BoyRacer Mystery 3000 Engine Block Austin Healey 2
jfarris TR2/3/3A Plug/cap sizes to block off heater Triumph 5
healeynut For Sale 100/4 block and head Austin Healey Classifieds 1
tj_tr3_tr6 Wanted Wanted / Need / TR4 Engine Block for 62 Tim from So California Triumph Classifieds 3
Chuck9482912 Letters Cast Inside Engine Block Austin Healey 0
A Land Rover V8 3.9L long block core for sale Rover / Land Rover 1
P TR2/3/3A Block treatment post cleaning Triumph 17
Bayless Ready for final block sanding Spridgets 5
Joel Lester TR2/3/3A "TR3" painted on the engine block Triumph 13
R Rust in Block? Help needed! Austin Healey 6
D TR6 Disconnecting pipe from engine block to oil pressure gauge Triumph 6
HealeyRick For Sale Bare 29F Block, Cylinder Head and Manifold Austin Healey Classifieds 2
T For Sale Triumph TR6 N.O.S engine block [late] Triumph Classifieds 2
nichola TR6 Classic Technologies front sealing block Triumph 7
nichola TR6 Aluminum block engine Triumph 8
M 948 Cylinder Block Studs - Sequence on Cylinder Block Spridgets 4
CinneaghTR TR4/4A Hole at Bottom of Threaded Stud Hole in Block Triumph 6
F TR2/3/3A SU 1 3/4 Carb to Manifold Insulating Block; '59 TR3A Triumph 6
Bremer TR2/3/3A Block deck height? Triumph 10
Bayless Memory block Spridgets 3
Got_All_4 TR6 Should I paint the inside of the block? Triumph 17
T Oil filter block plate - really? Austin Healey 13
6 1275 Head to block dowel pins Spridgets 10
D New Fuse Block Configuration Austin Healey 21
Sarastro TR4/4A Engine block deck flatness Triumph 9
KVH TR4/4A Block Water Outlet Valve Triumph 13
D 3000 engine block Austin Healey 0
H Machined Engine Block - Cleaning before assembly and paint. Not sure what to do? Spridgets 5
S BJ7 frozen temperature sensor to block Austin Healey 17
D mystery of the day... pedal block? Austin Healey 5
simon1966 Numbers stamped into a BN1 block? Austin Healey 5
M TR6 Front sealing block Triumph 11
H Post-War Other Herald rear suspension lower block installation Triumph 3
D Engine Block Austin Healey 14
jfarris TR2/3/3A Head stuck on block Triumph 8

Similar threads

Top