Hi Greg,
<span style="color: #3333FF">>>>You'll probably need to trim either the slug or the cut-out.</span>
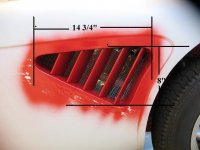
Actually, the saw kerf was the same widdth as the thickness of the steel strip, but I have also sanded the ID of the die and the OD of the slug to make for a smooth fit.
<span style="color: #3333FF">>>>It won't mar or stretch the metal as much.</span>
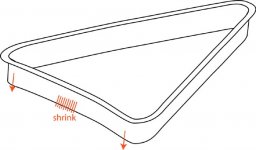
I don't think that marring will be much of a problem and the part of the metal strip protruding MUST stretch, especially around the corners. That is what will hold the shape of the triangle.
<span style="color: #3333FF">>>>Good idea if you don't have access to a shrinker/stretcher.</span>
I have a stretcher/shrinker, but the flange is not the area to match. Especially on the vertical front edge of the triangle, the center of the front edge needs to be "taller" than the upper & lower corners to follow the vertical contour of the fender surface.
If the vertical contour of the fender is not followed, the flat flanged triangle will try to force the contoured fender to be flat. THAT is what Steve was warning about...
The way around that is to contour the top of the "die" to match the fender contours fefore the flange is rolled over.
<span style="color: #3333FF">>>>With the seam on the flat part of the panel, any kind of filler you might use will be more durable than if it was applied to an edge (gasp, BONDO!) </span>
You are probably right that it will be easier to cut and step-flange the hole and fit the vent from the outside, then fill the step-flange with filler.
I try not to use Bondo on steel. In my early days at "Car-ing", I became pretty good at using lead to do bodywork. Nowadays, I use 60/40 bar solder, a good paste flux, and a torch. I don't get too much practice any more, but I think that I still have the "touch". It's like riding a bicycle....
That said... This whole project has been a "challenge".
Tim

 Hey Guest!

 Hey - did you know if you click on the title of a thread it will take you to the first unread post since you last visited that thread?
 but were afraid to ask:
  STOP!! Never post your email address in open forums. Bots can "harvest" your email! If you must share your email use a Private Message or use the
  smilie in place of the real @
 Pretty Please - add it to our Events forum(s) and add to the calendar! >>