-
 Hey Guest!
British Car Forum has been supporting enthusiasts for over 25 years by providing a great place to share our love for British cars. You can support our efforts by upgrading your membership for less than the dues of most car clubs. There are some perks with a member upgrade!**Upgrade Now**
(PS: Upgraded members don't see this banner, nor will you see the Google ads that appear on the site.)

Tips
- We have a special forum called "Member Articles" where you can submit actual articles for consideration for publication. Learn More
- Don't have an Avatar? If not, your avatar will default to the 1st character in your username. Go into "Account Details" to change your Avatar.
- Some basic forum navigation info: click
 Hey - did you know if you click on the title of a thread it will take you to the first unread post since you last visited that thread?
- Hey Guest - Is your British Car Club in our Clubs database? If not, send me a PM - Basil

- Looking for a local club? Click the "Clubs" tab above and browse hundreds of clubs world-wide.
- Add Android or iPhone APP: click
- Did you know - any picture or video you add in your posts in any marque-specific forum will also get added to the Media Gallery automatically.
- A few more tips about posting and replying: click
- Hey there Guest - be sure to keep your profile page up to date with interesting info about yourself: learn more
- More tips and tricks on Posting and Replying: click
 but were afraid to ask:
  STOP!! Never post your email address in open forums. Bots can "harvest" your email! If you must share your email use a Private Message or use the
  smilie in place of the real @
- Want to mention another member in a post & get their attention? WATCH THIS

- So, you created a "Group" here at BCF and would like to invite other members to join? Watch this!
- Hey Guest - A post a day keeps Basil from visiting you in the small hours and putting a bat up your nightdress!
- Hey Guest - do you know of an upcoming British car event?
 Pretty Please - add it to our Events forum(s) and add to the calendar! >> Here's How <<
- Hey Guest - you be stylin' Change the look and feel of the forum to fit your taste. Check it out
- If you run across an inappropriate post, for example a post that breaks our rules or looks like it might be spam, you can report the post to the moderators: Learn More
- If you would like to try some different "looks" or styles for the site, scroll to the very bottom, on the left and click the Style Selector.
You are using an out of date browser. It may not display this or other websites correctly.
You should upgrade or use an alternative browser.
You should upgrade or use an alternative browser.
TR4/4A Wood Finish on 4A Dashboard
- Thread starter karls59tr
- Start date


Online
When I re-veneered my TR6 dash in walnut, I built a clamping jig to keep pressure on the dash until the glue dried. Usually the veneered piece is placed into a vacuum press but since I did not have access to one, I built the clamping jig.
Also, I used precatalyzed resin to adhere the veneer to the dash. Precatalyzed resin holds up lots better to heat and moisture than contact adhesives.
Also, I used precatalyzed resin to adhere the veneer to the dash. Precatalyzed resin holds up lots better to heat and moisture than contact adhesives.
trrdster2000
Luke Skywalker
Offline
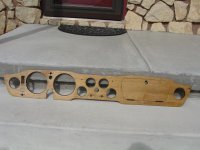
Karl, the dash on the TR4A was a dark walnut and was what was called "book ends" as it was two pieces end to end that met in the middle and were identical on both sides. I had one and the veneer was thicker than on the TR6. I think Moss may have one, just to look at and see what it looked like.
Wayne
Wayne
TR3TR6
Jedi Warrior
Offline
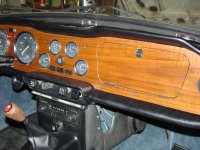
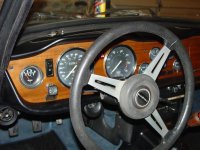
This is how I did my TR6 dashes. First of all I purchased the veneer off of Ebay where you can get some good deals because you don't need a full sheet. Made sure you use paper backed veneer and not raw veneer or you have to attach it using a different method then what I used. If you use contact cement, you need to spray it on, using a brush will result in it being uneven and you will have to apply more pressure to get any lumps out. I used Permatex Headliner & carpet adhesive # 27828. What I did was tape using blue masting tape all the edges that were exposed including gauge openings switches etc. before I sprayed the adhesive. After applying the adhesive, I removed the tape and then applied the veneer which already had the adhesive on it. I did this to keep the gauges, etc. from sticking to the dash after they were installed. The first dash I did in Birch, the second one in Walnut. I used Helmsman Spar Urethane for the finish spraying about 7 to 8 coats which gives a nice finish. You can use high gloss or satin. I've included some pictures. The Walnut dash is installed in my car which is in the garage (I'm working on the brakes), so I had to use a flash which makes it look a lot lighter in color then what it is. After attaching the veneer, I used a sharp x-acto knife to cut out for the gauges, switches, etc.