• Hi Guest!
    You can help ensure that British Car Forum (BCF) continues to provide a great place to engage in the British car hobby! If you find BCF a beneficial community, please consider supporting our efforts with a subscription.

    There are some perks with a member upgrade!
    **Upgrade Now**
    (PS: Subscribers don't see this gawd-aweful banner
Tips
Tips

TR4/4A What kind of wood and finish for the dashboard?

Sarastro

Yoda
Gold
Country flag
Offline
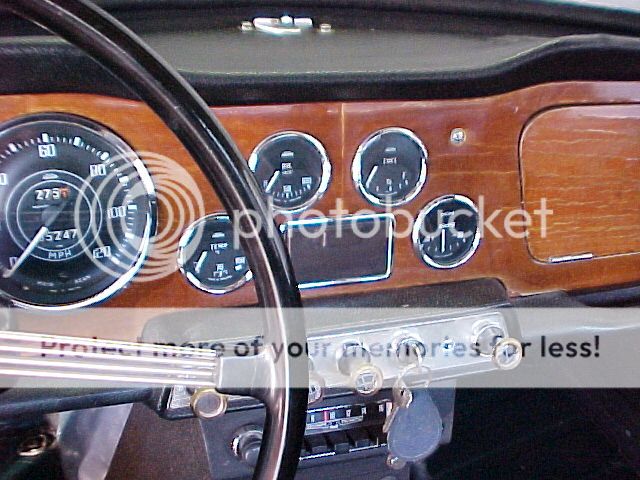
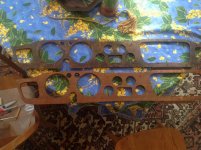
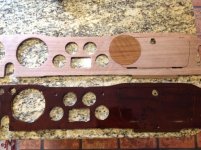
I realize I'm getting way ahead of myself, as I won't be ready to replace the dash for some time, but here's the question anyway. What kind of finish and wood was used originally in the TR4A dash?

I had a TR4A in the 1960s, and I seem to remember walnut with a very heavy varnish, so it almost looked like a plastic coating. However, I've seen a few statements that it was originally some other kind of wood. I'm not a stickler for originality, but this is one thing I'd like to look original.

Also, assuming I'm correct, how would you produce such a finish?
 
One thing I recall that differentiates the originals is that they were bookmatched. An effect that would be possible but perhaps difficult to duplicate (but I'm not a wood-worker).

Some restorers use a pour on epoxy finish to get a mirror-like (as you say, almost plastic) look.
 
Thanks. I hadn't thought of epoxy; I wouldn't be surprised if that's what was done originally. On my MG, I tried multiple coats of gloss polyurethane varnish, with progressively finer sanding between coats. It looked good, but it wasn't what I was looking for.

I think the book-matched veneer is beyond my capabilities, but I can live without that. I don't remember it from my first TR4A, but I was a clueless young guy back then (today I'm no longer young), and I probably wouldn't have made note of it.
 
I had good luck just chipping off the old finish on my dash, cleaning it up, and putting some polyurethane on it. It does show a little grain on the surface, but I don't mind if wood looks like wood.
 
My TR4A dash is original and not bookmatched. I don't know that I have ever seen a TR4 or 4A with a bookmatched wooden dash.
 
TRF references it in their catalogue:

https://trf.zeni.net/summerlong14/106.php?s_wt=1366&s_ht=768

Here is a period photo of the dash on my TR4 (can't really see the grain but the seam from the bookmatch is visible):

t58_zpsiq7whmgf.jpg


Maybe some were and some weren't.
 
I've stripped and re veneered several TR4a dashes and they were all book matched. I did one in a single sheet of plain grain walnut with a pre 64 Winchester stain and it looked very original. I've also done a few in walnut burl book matched and they came out great...one original I had was dark walnut burl and it was too dark. I think they used a variety of English walnut of varying grades finished in a 'plastic' that was very similar to Browning shotguns of the period...very tough to remove, but also very prone to cracking since there were no uv inhibitors.
Rut
 

Attachments

  • image.jpg
    image.jpg
    88.9 KB · Views: 183
  • image.jpg
    image.jpg
    88.2 KB · Views: 202
Thanks for the responses.

I just found a thread on this on another forum: https://www.triumphexp.com/phorum/read.php?7,1318870

It shows an early TR4A ad clearly stating that the wood was walnut. There is also a picture of an original dash, showing the thick, shiny coating. Not sure how it was done then, but today there are good urethane varnishes and pourable epoxy seems an option. I don't think I'll go to the trouble of book matching, if only because it's not much of an advantage when one side of the dash is mostly cut away for instruments.
 
Can the original dash just be sanded and refinished, instead of re-veneered, if the wood is otherwise good? Also, by the time you buy the wood and cut the holes and all that for a new dash, might one not wish they'd just ordered one. I still like the French Fiddleback Walnut made for me by Randy Keller in Palo Alto. Hope he's still in business.
 
Can the original dash just be sanded and refinished, instead of re-veneered, if the wood is otherwise good? Also, by the time you buy the wood and cut the holes and all that for a new dash, might one not wish they'd just ordered one. I still like the French Fiddleback Walnut made for me by Randy Keller in Palo Alto. Hope he's still in business.
I found re veneering a fun and easy project. If the wood underneath is in good shape there's no reason you can't strip it and refinish. The veneer is thin and you need to take care when sanding especially around the edges or you will sand thru. All of the dashes that I've re veneered had problems with the veneer lifting from the plywood substrate and refinishing would have been temporary at best. Fancy veneer is pretty cheap and you can get the exact look you want and if you like finishing wood it's a lot of fun.
To briefly explain my method you just strip the old veneer, sand the plywood with 80 grit with a flat backer, trim the new veneer with a 1/4-3/8" overhang, mix up a pre-catalyzed glue of the correct color, apply per directions with an adhesive roller, assemble and place in a food vacuum bag and pump out the air and leave it for 24 hours, remove and trim prior to finishing. You want to secure the glove box door to the dash with tape so the grain will match on the opposite (finished) side. You can buy a single sheet or book matched sheets for the original look.
Rut
 
That sounds really cool. I never would have thought of the idea of vacuum-bagging it. When I did my TD, I did a little research, as I hadn't done any veneering before, but didn't come across that. Is that your idea, or is it done generally?

I just sanded and varnished and sanded and varnished and... I think it came out OK, but still not what I'd like on the TR4A.

dash_complete_4831.jpg

I think that finished walnut wood is one of the most beautiful things in the known universe. And it's SO British--it just seems like the perfect material for a British car.
 
Vacuum bagging for veneers is a pretty standard practice. Bagging effectively puts up to around 15 pounds of pressure on every square inch of veneer. On a dashboard, this can be the equivalent of thousands of pounds of clamping pressure--and it's applied evenly. There are some pics at this link of the process:

https://bullfire.net/TR6/TR6-45/TR6-45.html

Ed
 
That sounds really cool. I never would have thought of the idea of vacuum-bagging it. When I did my TD, I did a little research, as I hadn't done any veneering before, but didn't come across that. Is that your idea, or is it done generally?

I just sanded and varnished and sanded and varnished and... I think it came out OK, but still not what I'd like on the TR4A.

View attachment 46403

I think that finished walnut wood is one of the most beautiful things in the known universe. And it's SO British--it just seems like the perfect material for a British car.
Steve,I think the only thing I changed about vacuum bagging was to use a food bagger vs one of the commercial or home made systems along with the disposable bags. The TR dashes lend themselves to food bagging because of size and shape making it cheap and easy to do. I use the same process on laminated bows and such. One thing I forgot to add is that the veneer on the backside needs to be in great shape or new veneer added to replace the old and the entire dash must be sealed everywhere or you will have future problems. Since veneer can have cracks and small voids (especially burls), the glue you use must be of the same tone/color as the finished dash. I bought most of my stuff from Joe and he was really helpful, accessible by phone and email.
Rut
https://www.veneersupplies.com
 
I had many challenges in restoring the car that took longer than anticipated such as needing to restore much of the rusted out seat frame bottoms by fabricating pieces and welding them in place, the dash was the rare pleasant surprises. The wood looked pretty good, but the finish was coming off, chipped and cracked. Most of the varnish came off by hand, a few pieces needed a little heat. I used some old Homer Formby's wood restore kit I had lying around from some home project from 20 years ago. It included an abrasive pad similar to a scotch Brite, a cleaner and a conditioner. I cleaned it up, let it dry, and applied 2-3 coats of min wax clear polyurethane. It turned out really nice, I was very surprised how much darker and richer the clear poly made the wood look as it soaked in.

I checked and don't see the kit available any more.
 
Back
Top