• The Roadster Factory Recovery Fund - Friends, as you may have heard, The Roadster Factory, a respected British Car Parts business in PA, suffered a total loss in a fire on Christmas Day. Read about it, discuss or ask questions >> HERE. The Triumph Register of America is sponsoring a fund raiser to help TRF get back on their feet. If you can help, vist >> their GoFundMe page.
  • Hey there Guest!
    If you enjoy BCF and find our forum a useful resource, if you appreciate not having ads pop up all over the place and you want to ensure we can stay online - Please consider supporting with an "optional" low-cost annual subscription.
    **Upgrade Now**
    (PS: Subscribers don't see this UGLY banner)
Tips
Tips

TR2/3/3A wet sanding and amonut of paint

sp53

Yoda
Country flag
Offline
Well I could not see the imperfection of the body tub clearly and did not like using the “Dry Coat Guide” so I sanded the tub with wet 400 to use the glare and the smoothness to see the body more clearly. It kinda worked and I have found a few sports to address. Would you guys primmer right over the 400 smoothness or rough it up with something like 150. This body work is a challenge especially when my perfectionism kicks in and my fear of spraying the actual paint on the tub starts pulling me around and around the car.

How much paint should I buy to paint the car? A gallon?

How many coats is usually put on

When people say base coat-- are they talking about the color and that latter I would put clear over that


steve
 

TomMull

Darth Vader
Silver
Country flag
Offline
I'm no expert but in my opinion 400 is fine prior to color coat. As for terminology base coat and color coat are generally the same, particularly in the the clear clear coat/ color coat context.
I use 3 coats of color and of clear or more if I mess it up.
I don't think a gallon will be enough but the nice thing about today's sophisticated mixing is that you can get more if you need it from the formula numbers.
Tom
 

PatGalvin

Jedi Warrior
Country flag
Offline
Hi Steve
You can spray a urethane primer (this is primer plus activator) over 400 grit scratches, although 400 grit is a final sand grit - I would use that to remove very fine scratches and not body work imperfections. 400 grit will just polish the top of the paint. If you have body work inperfections, you need at least a light cut to level surfaces. And use appropriately sized sanding blocks for sure. Dry Guide Coat is great stuff. It contrasts well with your primer color and shows all the imperfections. I use dry on my filler work and rattle can for finish sanding. You can use a spray guide coat or any contrasting color from a rattle can as well. Try it on a small spot and make sure it does not ball up on your sand paper.

I would spray a light coat of rattle can guide coat on my entire panel and then go over it all with a coarser grit, maybe 180 or 220. That will do some light cutting and will immediately show imperfections (hills and valleys). That is dry sanding, not wet sanding. Then, if you have low spots, scratch them with the 180 or 220 and get out your primer gun. Layer on a coat or two of urethane primer and let it cure. Extra coat where you want to fill. Then, do the guide coat again and block again. When you are happy at 180 or 220, then graduate to 320 and finally 400. For solid colors, 400 is sufficient. Especially if you use a sealer over your primer before body color paint. The sealer will fill very fine scratches.

You need to learn about paints if you don't understand basecoat clearcoat. Go to autobodystore.com and peruse their forum and tutorials. And try Southern Polyurethanes forum too. Lots of paint and body work tips and helpful folks. I learned so much on their websites. Was a huge help. Keep posting here. Happy to help you with your project.

Pat
001 (Large).jpg
 

PatGalvin

Jedi Warrior
Country flag
Offline
Oh, a few other things. BC/CC is a two step system where your color goes down first, you allow that to flash, and follow with layers of clear. That is a modern paint system. Many like to paint their LBCs with a single stage system where the clear is mixed with the color and sprayed. After you choose which system you are using, you can read the spec sheets for the paint. For BC/CC, you put enough color on to completely cover - for some colors, that's two coats. For others, that's 3 or 4 coats. And depends on color beneath and if you used sealer. Don't use more color than you need. That layer is weakest layer in paint system. For clear, you must decide if you will color sand or spray and drive. If color sand, you need extra clear so you have some material to remove during color sanding.

For single stage, you spray and drive. Or spray extra, and color sand and buff that.

Both are great systems. Single stage is a bit more authentic and it is easy to repair. If BC/CC, you can repair a scratch and spot in your color but then need to clear the entire panel. Not that big of a deal either.

These systems are mixed in different ratios so you need to figure out "sprayable gallons" and not just gallons of paint. For my TR3, I bought a gallon of BC but it diluted 1:1 so that was two gallons sprayable. Some paints have activators and reducers so you include volume from all these materials in your sprayable calculation. Most pros can spray a small car with a sprayable gallon of paint. I painted inner panels, and repainted where I screwed up. So, I probably used 1.75 gallons sprayable for the TR3. And I used about 1.5 gallons of clear, but I color sanded and had some left over.

Paint is expensive. Pick your system and then you can plan and purchase. Check those forums. The fellow from Southern Polyurethanes will answer lots of questions and they make a great clear which I used and continue to use.

Pat
 

PatGalvin

Jedi Warrior
Country flag
Offline
Here I'm using dry powder guide coat on light gray primer and block sanding the rear of the TR3A. You can easily see the scratches and imperfections that will ultimately need another coat of primer or two with more blocking.


carpecursusII

Jedi Trainee
Country flag
Offline
A gallon of paint should do fine for TR3. Remember that the paint is thinned anywhere from 2/1 to 4/1 so 1 gallon becomes 2-4. I've seen as many as 4 coats of color and 5 coats of clear on a car just to provide some extra material to work with in case or orange peel or other imperfections.
 

CJD

Yoda
Country flag
Offline
+1 to what Pat said!

The guide coat is handy until you learn to use lighting to show the low "shiny" spots. Shiny means it is too low for the block to reach, so it needs to be brought up with more primer/filler before you are ready to spray the base color.

1 gallon of base (pre thinning) will do a car if you have absolutely no issues that have to be re-sprayed, and you only use the recommended 1-2 "wet" coats. I would count on about a gallon and a half, and you will have a bit less than a quart to respray future dings.

You need to understand "dry" coats and "wet" coats. The first coat is normally put on dry, meaning barely more than a dusting. This coat will tack rapidly and provide the "sticky" to hold the wet coats without running. After the one dry coat, lay down all remaining coats wet.

A "wet" coat is layed down as thick as you can...without running. This is easier said than done. In the summer, you can almost spray as heavy as you want and not get runs. In the winter, a wet coat will run very easily. A good wet coat will flow into itself, so all the "orange peal" look will flow away into a perfectly smooth, flat, and shiny finish. "Orange peel" is the slight bumpiness you see when the air lays down the paint. In a thin or dry coat, the peal remains. In a good wet coat, the paint is layed down thick enough that the peal flows away. Any heavier and you get runs.

For sanding under primer...220 grit is best. If you use 220 or rougher grit under the base color coat, the scratches will show through. Use 400-600 grit under your final base color coat. I have even used 2000 grit, that looks like glass when your done...but microscopically the finish is roughed and the next coat will not lift. So, remember that...even 2000 grit will give you a solid bond with following coats!!!

A run in the color coat is bad. Unless you are REALLY good at micro sanding, a run in the color means a re-spray. A run in the clear coat can be sanded away and buffed out. This is a good thing, as the clear runs an order of magnitude more easily than the color does.

"Death march", is the long, drawn out crawl that a flying insect makes through your fresh paint before it dies...leaving wings, legs, and antenae for the entire length of the march. "Death march" also refers to the long path of thrown tools seen after a painter first sees the bug's Death March in his otherwise perfect paint job.
 

PatGalvin

Jedi Warrior
Country flag
Offline
"Death march", is the long, drawn out crawl that a flying insect makes through your fresh paint before it dies...leaving wings, legs, and antenae for the entire length of the march. "Death march" also refers to the long path of thrown tools seen after a painter first sees the bug's Death March in his otherwise perfect paint job.

Death March. Yep, I had a big fat bumble bee dance on my newly sprayed panel. Very funny John.

Great tips for Steve. Thanks
 

CJD

Yoda
Country flag
Offline
Just to demonstrate a use for 2000 grit, here is a little side project I did a couple weeks ago. OK, you caught me, this is what I was doing when I took a break from the TR2!?!


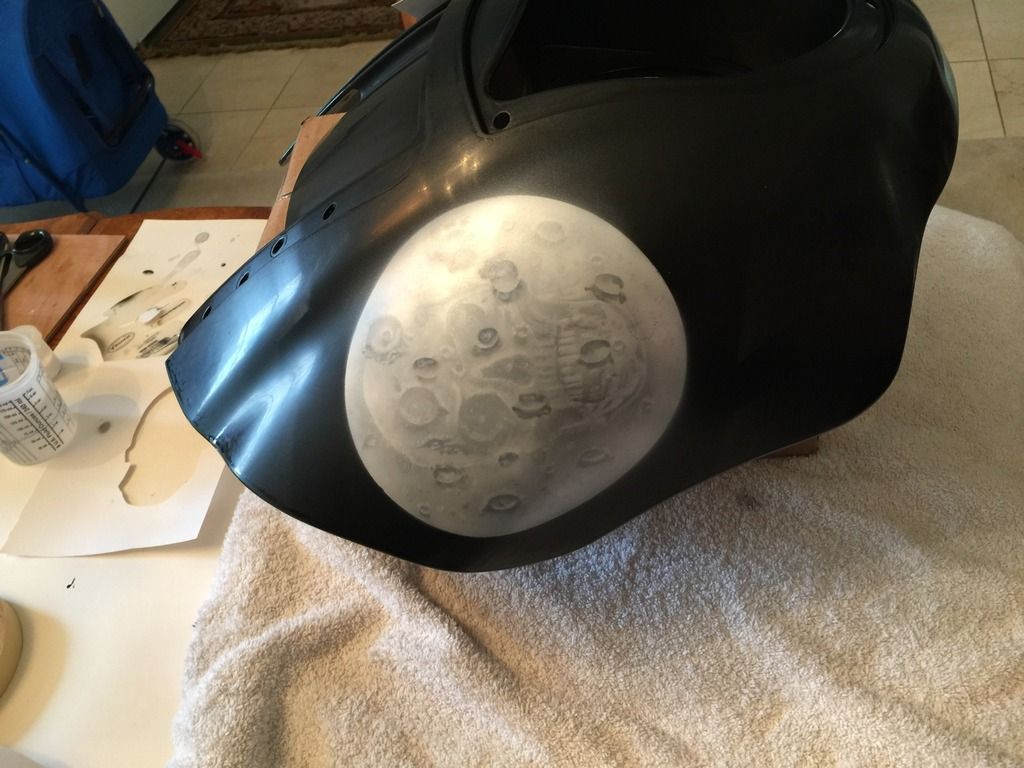
This is a small fairing for my Harley. I epoxy primed in black, to more closely match the color I planned to paint it. Matching the primer to the color allows you to lay less color without any "show through" if you get an area too thin (not intentionally, of course). I sanded the final primer with 400 grit, and then sprayed a base coat of PPG brand DBC black color, thinned 2-1 with "warm" temperature reducer.

I let the DBC dry overnight, and then sanded it completely with 2000 grit to give the airbrush paint a surface it could bond to. I then airbrushed the moon (with a skull on it if you look closely). The 2000 grit keeps the surface smooth, and is necessary since subsequent coats won't stick after 24 hours of drying.

Steve, if you look, the finish above still "looks" shiny. In reality it is very rough at the microscopic level. Shine is merely smaller scratches...but they are still scratches that subsequent coats can completely bond to.


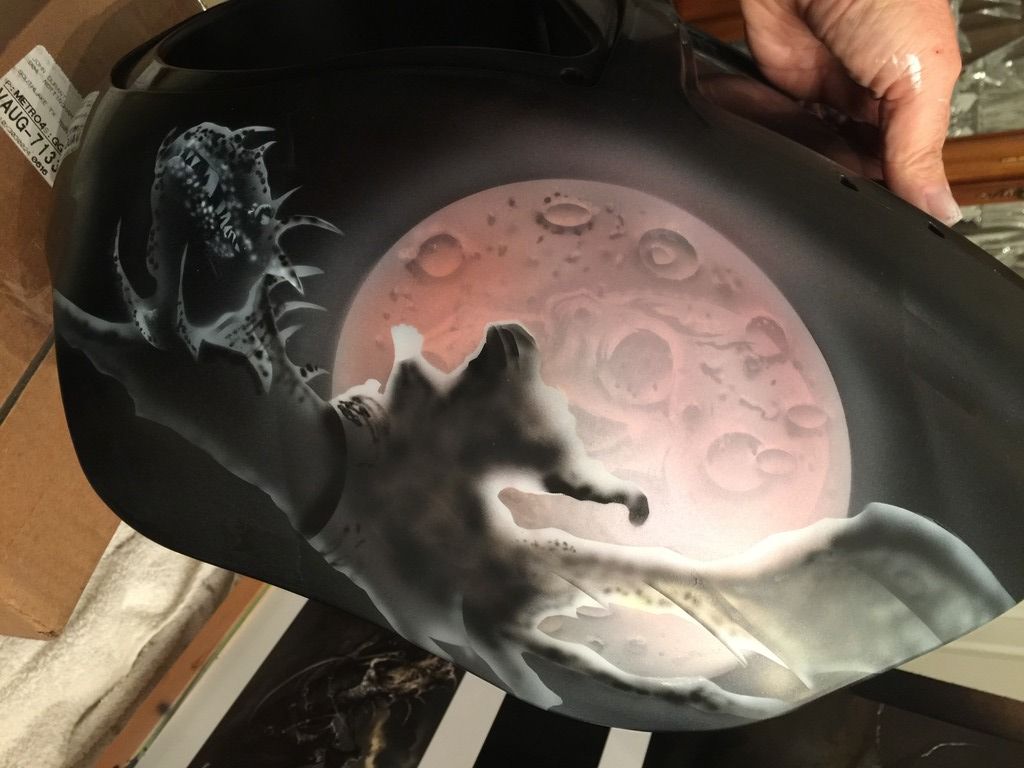
My son wanted a reaper. My daughter wanted a dragon (their school mascot). So I decided to make it a reaper riding his dragon during a harvest moon. This is the initial airbrushing.


The brushing was allowed to dry overnight. Again, I had to barely rough the design with 2000 grit...following the rule that after 24 hours the base MUST be roughed to facilitate a good adhesion of the next coat. If I were merely painting the fairing straight black under clear, I could have shot the clear after the color set for 30 minutes...and not had to rough the base at all.

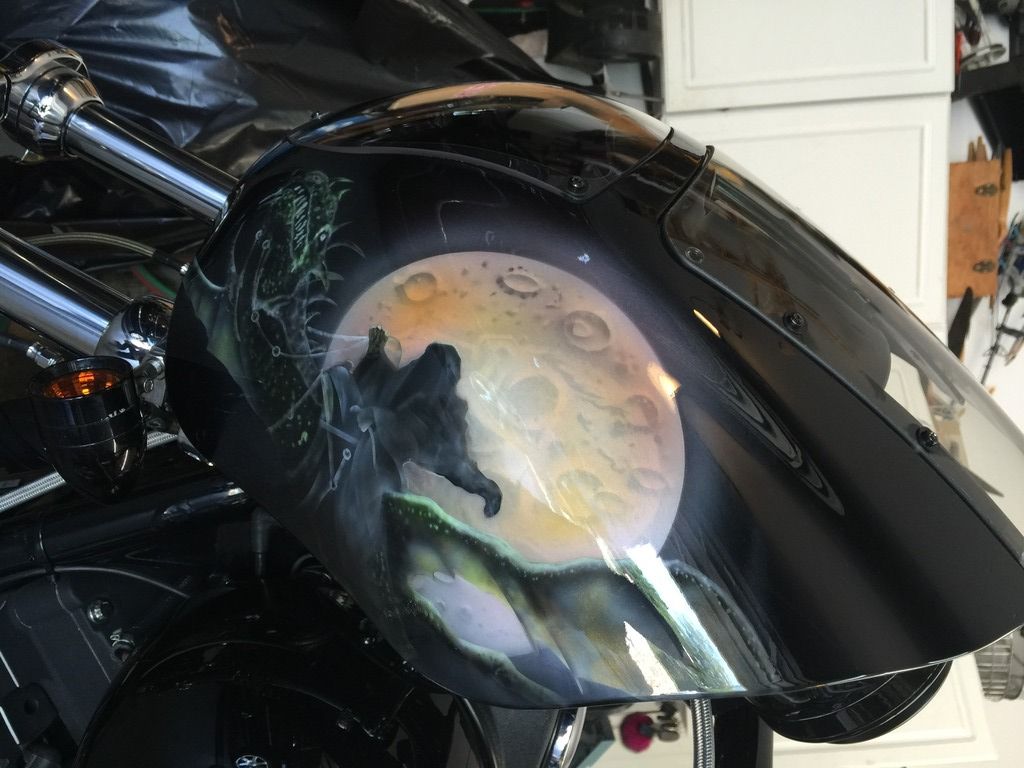
I finished with 3 coats of urethane clear. I used a "cool" temperature reducer and hardener...because I wanted it to dry fast. That way I could lay it very thick without running. As you can imagine, the airbrushed design comes out rough textured, and you cannot smooth it with sanding or you will loose part of the detail. Also, buffing such a small part would be a pain, so I needed to lay down very thick coats of clear, to smooth the brushing, but spray it just right, so it would flow smooth but not run.

I accomplished this by allowing a full 30 minutes between coats to prevent running. If you lay the coats down to fast, the previous coat will sag, causing the current coat to run. But do it just right, and the surface is absolutely smooth, flat and glossy. No buffing needed. If you lay too dry, you would have to fine sand to remove the orange peal and then buff with a wool buffing pad.

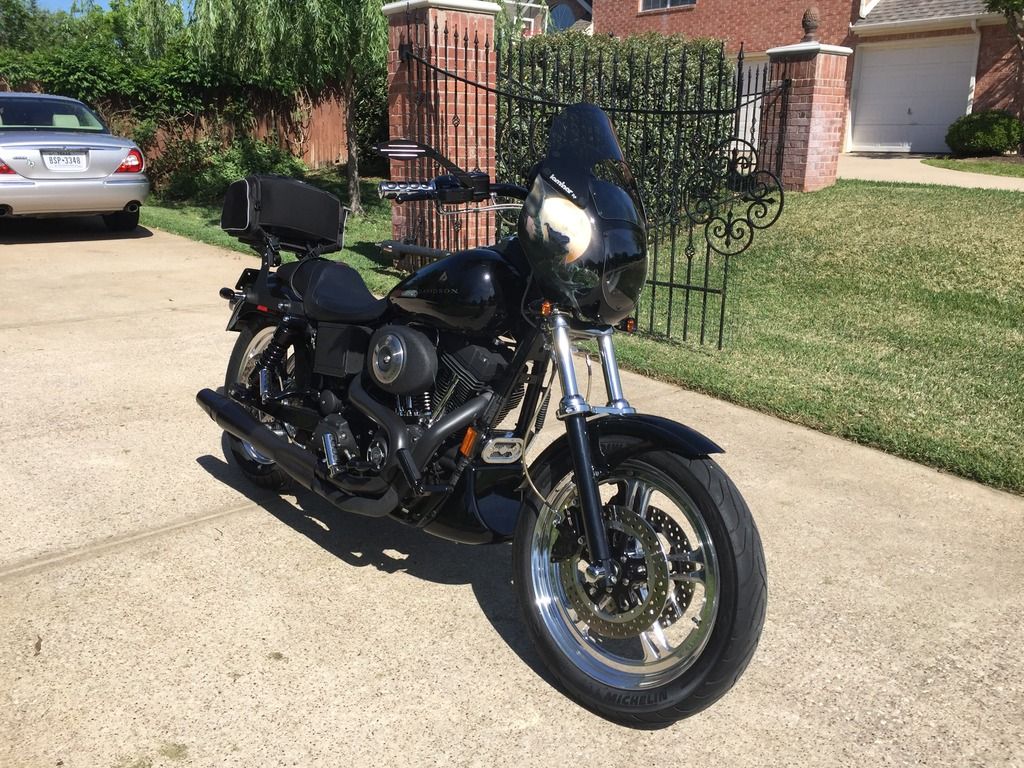
I know this job was off topic, but it shows how you have to understand your paint, and plan each step. You cannot be afraid to throw up your hands and say, "I don't like it"...and sand a bad top coat like it is primer so you can re-spray it. I did not like my first moon attempt...it got completely sanded off for the next try. Painful....frustrating!...but for the many years you will enjoy this paint job, it is a small price to pay!
 

PatGalvin

Jedi Warrior
Country flag
Offline
Beautiful work John. So you sanded the BC before applying the CC? The PPG DBU BC I used required a recoat with the BC if sanding was required (at least their info sheet indicated so). Thanks for the informative posts.

Pat
 
OP
S

sp53

Yoda
Country flag
Offline
Thank for posting you guys. That is a lot of information for this hillbilly. I was surprised to hear that the cooler paint is, it might run. Probably does not flow or something. what is a good temp for paint? I am working on the tub and have the panels in various stages. The cowling and the trunk area are in primmer and sanded with 400. I want to put primmer more on those areas to fill in some scratches. Can I just wipe the area clean and spray primmer over the 400 grit? It sounds like Pat said I can do that. My concern is the guys at the paint store want me to clean everything with wax and grease remover between every coat. But the car is clean, and I cannot see why. I am thinking I should be able to wipe it down between primmer coats and call it good and spray.
 

glemon

Yoda
Country flag
Offline
There can be airborne contaminants that cause the paint to fishery or have little holes all over it. If I was putting primer over primer and I had just sanded and cleaned it off it would probably be ok to skip the wax and grease remover. But I would probably still do a quick wipe with it.

Always wipe it down before you do the topcoat, as the color coat is much more sensitive to any surface contaminants.

Don't use the cheap stuff either, I got some dupli-color wax and grease remover at the autoparts store and it is pretty worthless (doesn't dry fast, seems to leave it's own residue on the surface) even the name brand remover isn't too expensive.
 

CJD

Yoda
Country flag
Offline
For primer...never paint below 55 degrees or over 95 degrees. To low temp and it will not cure right. To hot and it will dry mid-air before it hits your work.

For finish coats...never paint below 65 or above 90 degrees. Optimum is 70-75 degrees. The paint manufacturers make reducer for mid temp, hot temp (made to dry slower for better flow), and low temp (made to dry faster).

Before every coat I do a quick wipe down with a clean micro towel wet with thinner. Immediately before spraying I do a final dry wipe with my gloved hand or a tack rag to remove any dust.
 

CJD

Yoda
Country flag
Offline
Beautiful work John. So you sanded the BC before applying the CC? The PPG DBU BC I used required a recoat with the BC if sanding was required (at least their info sheet indicated so). Thanks for the informative posts.

Pat

I did, but it was with the very fine 2000 grit. If you try to clear after using 400-600 grit, the sand strokes would show through the clear. It is a no-no, but I have learned slowly through previous mistakes how much I can get away with!
 
Similar threads
Thread starter Title Forum Replies Date
7 Wet Sanding Austin Healey 22
Hamish Racing General TR 3 sisters sprint (uk) the wet one Triumph 2
Hamish Racing TR2/3/3A Fast and wet TR3a Triumph 0
J TR2/3/3A Head Torque - Wet or Dry Triumph 6
S TR2/3/3A Wet liner issues Triumph 6
DerekJ How to drive a Healey in the wet! Austin Healey 6
D TR2/3/3A Sealing Fo8's and Wet Liners Triumph 6
RickB MGB Crane Cams XR700 Fireball - wet conditions? MG 7
NutmegCT wet insulation Restoration & Tools 9
J Wet carpet Austin Healey 16
2billydavies TR2/3/3A Replacing the pistons and wet sleeves Triumph 15
Frankenhealey Goodwood Spring Sprint - It was WET Austin Healey 11
K Figure of 8 Gaskets for Wet Liner Engine? Triumph 5
G Tires for wet conditions Spridgets 4
jsfbond Wet snow conditions Triumph 3
M Wet Carpet MG 13
PatGalvin TR2/3/3A Wet Sleeve to Engine Block Deck Clearance, TR3A Triumph 4
T Think this explains my wet foot? Triumph 24
K Wet trunk Jaguar 1
livinginthepast Bugeye gets wet and wild ... Spridgets 5
Tabcon Thread Sealer on Wet Liners? Triumph 5
Tabcon Thread sealer on wet liners? Racing 0
TR4nut Wet Liner Engines & Valve Interference Triumph 18
equiprx I keep gettting a wet dizzy. Jaguar 1
T Click and Clack are all wet.... MG 2
C Wet left foot? Triumph 8
AltaKnight A wet weekend Triumph 1
RickB MGB-GT 70 BGT floor gets wet when it rains MG 23
beaulieu Wet sandblasting - anyone done it ? Restoration & Tools 1
G Wet & Wild Ride... Triumph 3
AUSMHLY wet rugs Austin Healey 21
Z Tire wet look Restoration & Tools 2
Bayless Ready for final block sanding Spridgets 5
K TR2/3/3A Scuff sanding a car to prep for a paint respray? Triumph 9
tomshobby color sanding done and first stage buffing Spridgets 4
D Block sanding vs. "freehand" Spridgets 17
H Sanding the paint, like rings on a tree Austin Healey 8
HealeyPassion Sanding and buffing new paint...Latest Austin Healey 8
bighealeysource sanding and buffing of paint job Restoration & Tools 12
B Sanding blocks Restoration & Tools 2
J Ready for sanding Spridgets 1
bash Sanding discs for air sander? Restoration & Tools 2
JPSmit Sanding epoxy primer Restoration & Tools 5
I TR6 Veneer sanding, TR6 dash Triumph 3
KLUTZ T-Series Stripping, Scraping, Sanding, Etching... MG 1
JPSmit I Love Power washers but - sanding question Spridgets 9

Similar threads

Top