• Hi Guest!
    You can help ensure that British Car Forum (BCF) continues to provide a great place to engage in the British car hobby! If you find BCF a beneficial community, please consider supporting our efforts with a subscription.

    There are some perks with a member upgrade!
    **Upgrade Now**
    (PS: Subscribers don't see this gawd-aweful banner
Tips
Tips

Under bonnet cleanup

NutmegCT

Great Pumpkin
Bronze
Offline
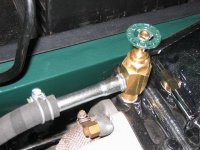
While waiting for my new light switch to arrive, I've been spending time cleaning up the engine bay. I think I've used more steelwool, degreaser, carb cleaner, toothpicks, putty knives, fingernails, and wirewheels than I ever thought possible. Much gnashing of teeth.

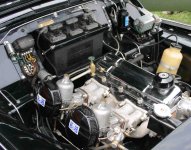
Entire bay was coated many years ago with some kind of flat black rubbery coating over the original signal red paint. I also polished the carbs to the best of my ability, made some new ignition wires, wrapped loose wiring harness, added a fuel filter, and generally tried to get the bay looking like a 1959 car which had been cared for.

Here's a before and after comparison - any suggestions certainly welcome. Also attaching higher-res pictures.

Tom
 
Tom - It looks so much better. May I suggest a few things. The rubber overflow tubes on the top of the float bowls should be half as long with a short length of steel pipe bent towards the air filters. You need to replace the top of your water valve to the heater with a green painted one. What is the white thing between the control box and the battery post ? If it's to cover the end of a wire, push it down out of sight. If it's an unknown black wire, then it's a ground that needs to be screwed with a pan-head screw to the rim of the flange for the battery box. There may be a hole for the screw hidden down tightly next to the RHS of the base for the voltage regulator (control box). If you were to putty that bug hole closed on the curve and brush paint it with red paint, it'll look even better. Then later, if you want, you can MIG weld the hole closed, grind it smooth and finish it completely. For what it's worth, the upper body number plate on my black TR3A was painted black and the lower one was bare brass when I bought my 1958 TR3A brand new. TRA judges say it can be body colour or it can be bare brass.
 

Attachments

  • 7380.jpg
    7380.jpg
    47.6 KB · Views: 82
  • 7381.jpg
    7381.jpg
    168.9 KB · Views: 119
Outstanding work Tom!!

It looks like an entirely different auto.

Makes the New Crusher all that more appealing
for a Crypty upgrade.

Again, nice job, I know how many hours and hours
of effort go into the details.

dale
 
WOW! You spent some time on that job! The transformation is stunning! That's work to be proud of. /bcforum/images/%%GRAEMLIN_URL%%/cheers.gif
 
I was over at Tom's earlier in the spring and saw the car not long after he got it. It looks MUCH better under there. Great job Tom!!
 
Looks like you've been working hard, Tom! Good job! The white thing Don is talking about looks like a wire nut. Get rid of it! Wire nuts are for house wiring and have no place in an airplane. I mean car. The only other thing that strikes me is that your battery hold downs appear to be the wrong way round.

But I'm getting too picky. It does look good!
 
Wow - to get compliments from you guys is quite an honor! Thanks!

Coupla things - it is indeed a white wirenut on that loose wire by the battery. The wire runs to what looks like a very old capacitor mounted next to the control box. Don't have a clue what the capacitor (?) is for, as there's no evidence of any radio having been present.

And thanks for pointing out the battery hold-down issue. I'll reverse them in the morning. Also make two new float overflow pipes.

Hope I can figure out how to remove and replace that heater valve knob. I wonder if the correct knob just screws on like on a water spigot?

TDskip - most of what you see is the original paint, altho' I did have to "touch up" a few places. I also wet sanded and rubbed out the inner wings. Almost looks like it's *too* good there.

Don - Did that "bug hole" have any original purpose?

Thanks all.
Tom
 
A Tinster stupid question, Doc.

My battery hold down is identical to Tom's.
A hook on one end and straight threads on the other.

How could the rod be rotated 180* and still
hook into the bottom piece? To what would the
rod threads and nut secure to?

Sorry to be so dense at times.

T
 
What a difference. Looks fantastic! It's not easy, but it's worth the time and trouble when done. Good job.
 
Tom - That was a typo. What I meant to type was "big hole". It has no pupose except for some previous owner. The round tap handle slides onto the stem. The hole in the handle is square and the top end of the stem is square so the handle doesn't spin when you want to open or close it. Look again at the photo above. You can see the small brass nut holding the tap handle to the valve stem. Yours looks like the "T" handle has been brazed onto the stem.

Tinster - As for the battery hold-down rods, the bottom end of each rod should be on the battery side of the "wing" and the acute bent hook tab should be towards the outside where you can see it. You can see what I mean in the photo above of my black TR3A engine compartment.
 
Nice job Tom. Just curious, why the quick-disconnect on the + pole of your battery. Usually these are put on the - pole. Note the color of the knob, green, which indicates this is for the negative pole. It might also behoove you to place an insulator cover over that + pole connector. Lotsa amps just looking you in the face there.
 
Tom,

The existing paint in my engine bay is also a disaster.
I'm guessing you went down to bare metal in yours.

What primer did you use?
What top coat did you use?
How many layers of top coat?

How did you apply the new primer and paint?
1. rattle can?
2. paint brush?
3. sponge brush?
4. any hand sanding between coats?

thanks,

dale
 
TR6BILL said:
Nice job Tom. Just curious, why the quick-disconnect on the + pole of your battery. Usually these are put on the - pole. Note the color of the knob, green, which indicates this is for the negative pole...

TR3's came from the factory with positive ground. So, unless Tom changed polarity, he has the cutoff switch on the negative side.
 
martx-5 said:
TR6BILL said:
Nice job Tom. Just curious, why the quick-disconnect on the + pole of your battery. Usually these are put on the - pole. Note the color of the knob, green, which indicates this is for the negative pole...

TR3's came from the factory with positive ground. So, unless Tom changed polarity, he has the cutoff switch on the negative side.

I realize but that sure looks like a ground strap on the right side of the photo. Hmmmmm.
 
Back
Top