
-
 Hey Guest!
British Car Forum has been supporting enthusiasts for over 25 years by providing a great place to share our love for British cars. You can support our efforts by upgrading your membership for less than the dues of most car clubs. There are some perks with a member upgrade!**Upgrade Now**
(PS: Upgraded members don't see this banner, nor will you see the Google ads that appear on the site.)
You are using an out of date browser. It may not display this or other websites correctly.
You should upgrade or use an alternative browser.
You should upgrade or use an alternative browser.
Ugly welds
- Thread starter bnw
- Start date
Offline
bnw said:I'd post pictures but I haven't seen how yet.
hit "reply" below the post (rather than just starting to type in the space provided) At the bottom of the page you will then see the file manager. click on it and follow it through. Not difficult except pics can't exceed 100k and I suspect you will also have to post one picture per post.

Offline
been thinking about this - and, before I make my suggestion be aware I have NO experience with this so, take anything I say with a grain of salt. I don't want to make it worse, but, you might want to throw a guide coat of paint/primer on your work to see where you need to continue working. The problem that I sometimes have is that I can't always tell what is OK and what isn't because of all the various repairs - if it is all one colour, it might not be as bad as you think.
Offline
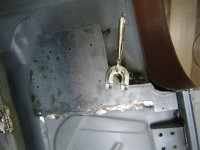
A lot of heat was used there. I wound not have spliced the panel in a flat area, as the weld will distort the panel...better to cut out the bad area near a pressing as the panel is stronger and makes blending easier. Too late for you now. Probably hammer and dolly time along with body filler for you?
Cheers,
D.
Cheers,
D.
GregW
Yoda
Offline
Hi Bnw,
I don’t think you’ll be able to hide those welds very well. One of the issues is the new piece you put on sits off the structure you welded to. One cause of that is you welded on the outside of the fold of the original piece (on the left side of your photo) causing a large gap. That made your edge welds that much thicker. It also looks like you are trying to form the metal after it has been welded in. I would suggest forming the piece before hand so if something goes wrong, you only need to make a better piece.
When I make a patch, I start by making a cardboard template.

From there I’ll trace the shape onto a piece of sheet metal. If there are folds involved, I’ll make sure that the fold doesn’t go outside the dimensions of the template. Any folds I didn’t have on the template, I’ll add onto the sheet metal. You can see that where I have the blue contour gauge making a 5/8” fold area.

I’ll also use the cardboard to make a buck for any weird curves that need to be folded. When I cut the plywood, I’ll cut it taking into account the thickness of the metal being folded. Once again, trying not to go outside the template dimensions.

To fold an inner curve like this I started with a round head plastic hammer then moved to a metal hammer to stretch the sheet metal into the final shape. Then it is a series of test fits and adjustments to get the new piece to fit.

Once that is accomplished, drill a bunch of holes spaced 1½”-2” apart along the edges that will be welded to the parent structure. I usually use a drillbit slightly smaller than a ¼”, but a ¼” would be good if your welding onto a thick piece of metal like the frame. Clean all surfaces and clamp the two pieces as tight as possible as you weld. You don’t have to clamp the entire piece all at once, just where you are welding at the time. As you do each plug weld, you may have to use a hammer to flatten any warpage from the heat. You should do this immediately before the metal cools.

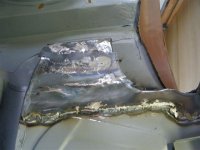
If you haven't, practice doing plug welds. There is a learning curve to melting the underlying piece before you cover it up. A bad weld will sometimes "pop" as it cools. The round welds in the last photo were done with a MIG welder. The butt weld on the right was done with Oxy-acetylene.
Hope this helps.
I don’t think you’ll be able to hide those welds very well. One of the issues is the new piece you put on sits off the structure you welded to. One cause of that is you welded on the outside of the fold of the original piece (on the left side of your photo) causing a large gap. That made your edge welds that much thicker. It also looks like you are trying to form the metal after it has been welded in. I would suggest forming the piece before hand so if something goes wrong, you only need to make a better piece.
When I make a patch, I start by making a cardboard template.
From there I’ll trace the shape onto a piece of sheet metal. If there are folds involved, I’ll make sure that the fold doesn’t go outside the dimensions of the template. Any folds I didn’t have on the template, I’ll add onto the sheet metal. You can see that where I have the blue contour gauge making a 5/8” fold area.
I’ll also use the cardboard to make a buck for any weird curves that need to be folded. When I cut the plywood, I’ll cut it taking into account the thickness of the metal being folded. Once again, trying not to go outside the template dimensions.
To fold an inner curve like this I started with a round head plastic hammer then moved to a metal hammer to stretch the sheet metal into the final shape. Then it is a series of test fits and adjustments to get the new piece to fit.
Once that is accomplished, drill a bunch of holes spaced 1½”-2” apart along the edges that will be welded to the parent structure. I usually use a drillbit slightly smaller than a ¼”, but a ¼” would be good if your welding onto a thick piece of metal like the frame. Clean all surfaces and clamp the two pieces as tight as possible as you weld. You don’t have to clamp the entire piece all at once, just where you are welding at the time. As you do each plug weld, you may have to use a hammer to flatten any warpage from the heat. You should do this immediately before the metal cools.
If you haven't, practice doing plug welds. There is a learning curve to melting the underlying piece before you cover it up. A bad weld will sometimes "pop" as it cools. The round welds in the last photo were done with a MIG welder. The butt weld on the right was done with Oxy-acetylene.
Hope this helps.
