
-
 Hey Guest!
British Car Forum has been supporting enthusiasts for over 25 years by providing a great place to share our love for British cars. You can support our efforts by upgrading your membership for less than the dues of most car clubs. There are some perks with a member upgrade!**Upgrade Now**
(PS: Upgraded members don't see this banner, nor will you see the Google ads that appear on the site.)

Tips
- We have a special forum called "Member Articles" where you can submit actual articles for consideration for publication. Learn More
- Don't have an Avatar? If not, your avatar will default to the 1st character in your username. Go into "Account Details" to change your Avatar.
- Some basic forum navigation info: click
 Hey - did you know if you click on the title of a thread it will take you to the first unread post since you last visited that thread?
- Hey Guest - Is your British Car Club in our Clubs database? If not, send me a PM - Basil

- Looking for a local club? Click the "Clubs" tab above and browse hundreds of clubs world-wide.
- Add Android or iPhone APP: click
- Did you know - any picture or video you add in your posts in any marque-specific forum will also get added to the Media Gallery automatically.
- A few more tips about posting and replying: click
- Hey there Guest - be sure to keep your profile page up to date with interesting info about yourself: learn more
- More tips and tricks on Posting and Replying: click
 but were afraid to ask:
  STOP!! Never post your email address in open forums. Bots can "harvest" your email! If you must share your email use a Private Message or use the
  smilie in place of the real @
- Want to mention another member in a post & get their attention? WATCH THIS

- So, you created a "Group" here at BCF and would like to invite other members to join? Watch this!
- Hey Guest - A post a day keeps Basil from visiting you in the small hours and putting a bat up your nightdress!
- Hey Guest - do you know of an upcoming British car event?
 Pretty Please - add it to our Events forum(s) and add to the calendar! >> Here's How <<
- Hey Guest - you be stylin' Change the look and feel of the forum to fit your taste. Check it out
- If you run across an inappropriate post, for example a post that breaks our rules or looks like it might be spam, you can report the post to the moderators: Learn More
- If you would like to try some different "looks" or styles for the site, scroll to the very bottom, on the left and click the Style Selector.
You are using an out of date browser. It may not display this or other websites correctly.
You should upgrade or use an alternative browser.
You should upgrade or use an alternative browser.
Ugh...
- Thread starter tdskip
- Start date
Don Elliott
Obi Wan
Offline
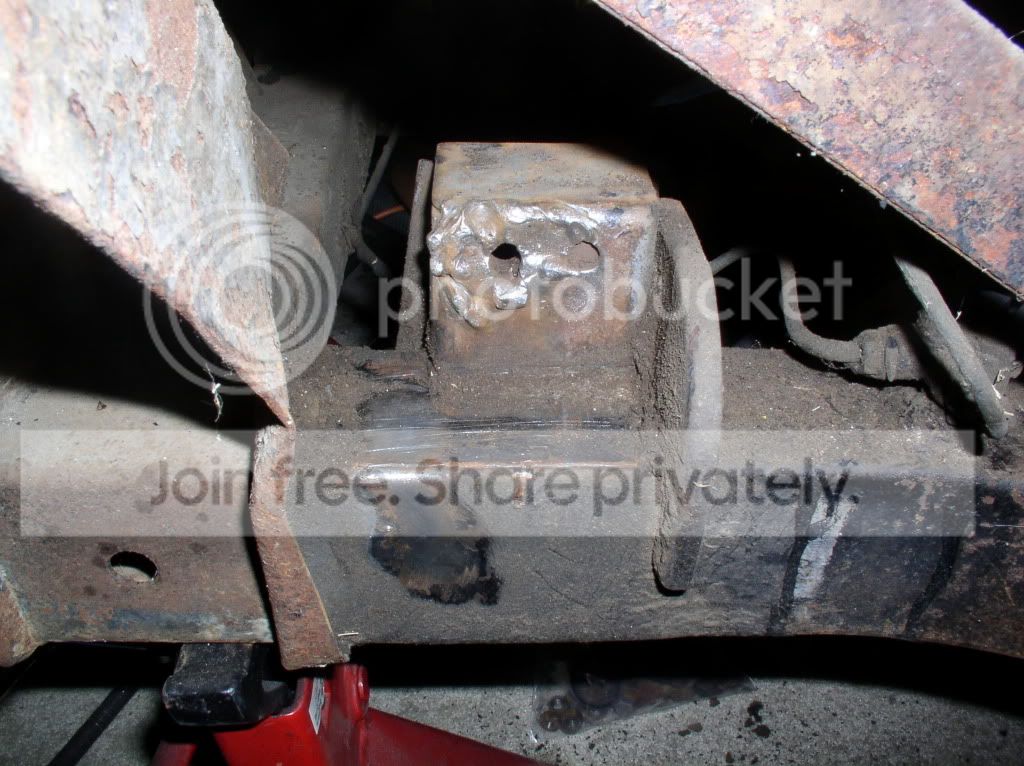
What car is this photo from ?
HerronScott
Darth Vader
Offline
The adaptation for a TR6 mounting bracket is to have a second hole below the first hole. This just looks like a bad repair where this mounting point started to tear at some point in the past.
Are you going to try and grind this down? Your other option would be to replace the whole mounting point. What's going on with the second hole since it seems to be blocked from the back side? Is there additional "work" back there?
Scott
Are you going to try and grind this down? Your other option would be to replace the whole mounting point. What's going on with the second hole since it seems to be blocked from the back side? Is there additional "work" back there?
Scott
Hi guys - the picture is of my 1968 TR4A IRS. Same car with the squared-off brake rotor, so I cam guess is that when the wheel came off and the rotor hit the pavement there was enough of a shock/stress that it likely tore the bracket metal where the stud goes through. Sound right? Other ideas?
The back side of the bracket seems to be intact, so much so that I didn't notice the front side until I started cleaning it in prep for the strengthening gusset.
The back side of the bracket seems to be intact, so much so that I didn't notice the front side until I started cleaning it in prep for the strengthening gusset.
PeterK
Yoda
Offline
Sounds logical. If the bracket is intact, you can probably grind it smooth and fill with more weld where required. Then drill the lower holes for your 2-stud setup. Keep in mind that if you face it with new metal, it would affect the alignment shims required.
New frame brackets have 4 holes drilled. Rear-most holes upper and lower are used for the 2-stud mounting. But it sounds like you don't need new frame brackets. At least I hope not. It's hard enough to weld the gussets in that confined spare.
New frame brackets have 4 holes drilled. Rear-most holes upper and lower are used for the 2-stud mounting. But it sounds like you don't need new frame brackets. At least I hope not. It's hard enough to weld the gussets in that confined spare.
PeterK said:At least I hope not. It's hard enough to weld the gussets in that confined spare.
Me too! Not really looking forward to this repair, but it has to be done.
I'll go after it with a grinder and then take some pictures later today/tonight.
Hi Don - I'm aware of the write ups but haven't actually done it yet.
I did order the reinforcements from TRF today.
I got in there with the "finger" grinder tonight and it now looks like this;
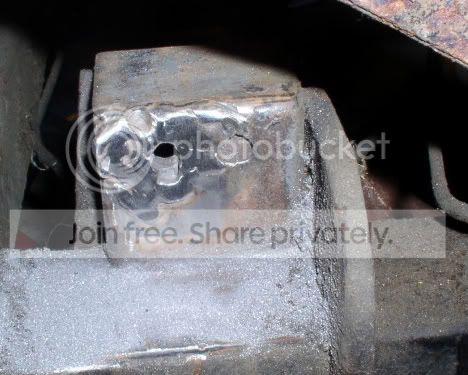
It appears that when the accident happened the bracket tore, and then a new plate was added in the back, and then someone who'd been drinking heavily took a MIG to the front of it. I believe the surface you are seeing is the original bracket face, and the surface behind is the other one that has been added.
Do the flat reinforcement plates go on the front or back? If on the back, any ideas on dealing with my situation since I already have an extra plate in the back that isn't flush with the original bracket?
Would you guys add the flat plate in the front and then the side gusset?
Thanks!
I did order the reinforcements from TRF today.
I got in there with the "finger" grinder tonight and it now looks like this;
It appears that when the accident happened the bracket tore, and then a new plate was added in the back, and then someone who'd been drinking heavily took a MIG to the front of it. I believe the surface you are seeing is the original bracket face, and the surface behind is the other one that has been added.
Do the flat reinforcement plates go on the front or back? If on the back, any ideas on dealing with my situation since I already have an extra plate in the back that isn't flush with the original bracket?
Would you guys add the flat plate in the front and then the side gusset?
Thanks!
Re: Ugh... TR4A Front Suspension Bracket
Good morning Peter! Fortunately the bracket itself is still firmly attached to the frame.
So I have four DC49 in route from TRF.
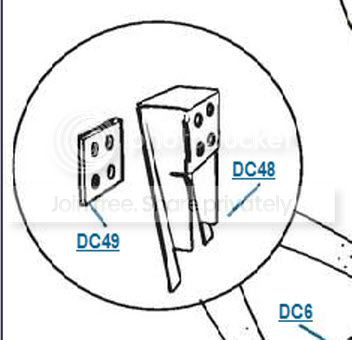
These are designed to mount in the rear (engine side) of the brackets, correct? Since they fit in the back of the bracket welding on the gusset side reinforcements can be done at any time since they don't actually interfere with each other, correct?
Thanks guys!
Good morning Peter! Fortunately the bracket itself is still firmly attached to the frame.
So I have four DC49 in route from TRF.
These are designed to mount in the rear (engine side) of the brackets, correct? Since they fit in the back of the bracket welding on the gusset side reinforcements can be done at any time since they don't actually interfere with each other, correct?
Thanks guys!
HerronScott
Darth Vader
Offline
Re: Ugh... TR4A Front Suspension Bracket
Peter,
That's what I was thinking as well.
Scott
Peter,
That's what I was thinking as well.
Scott
Re: Ugh... TR4A Front Suspension Bracket
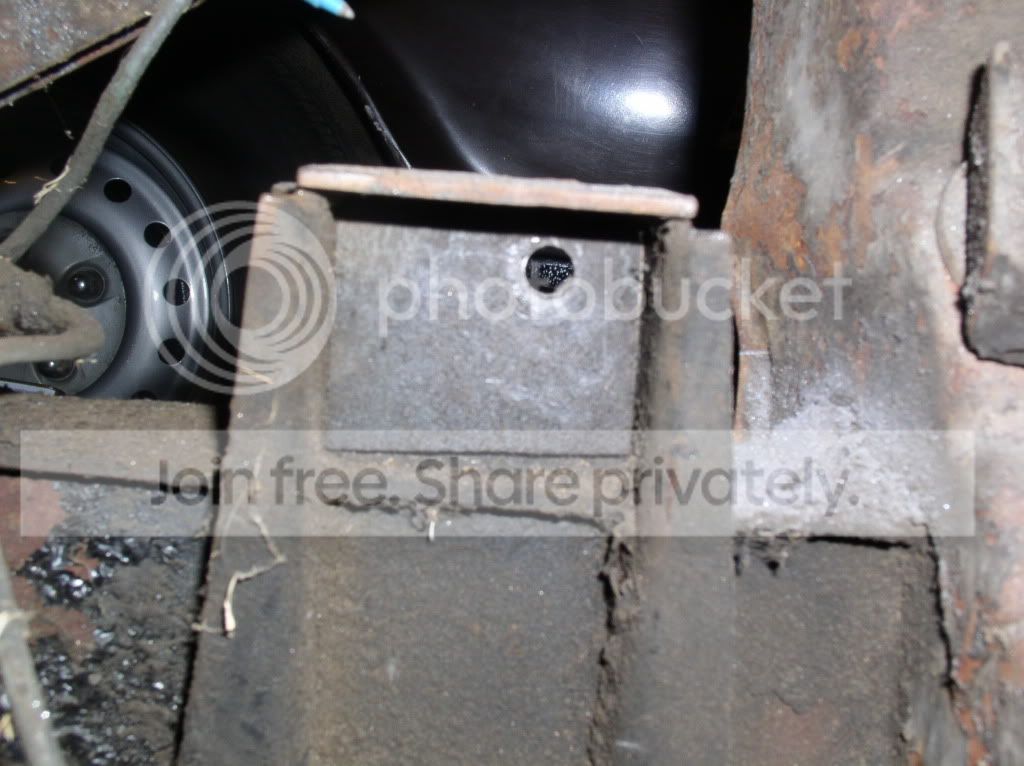
Gusset in welded in place....
(ugly but should be strong welds)

Next up, dressing the welds and touch up. I was thinking of waiting until I have the correct backing plate reinforcement welded in place before trying to to fix the front mounting hole area. What do you think?
Gusset in welded in place....
(ugly but should be strong welds)
Next up, dressing the welds and touch up. I was thinking of waiting until I have the correct backing plate reinforcement welded in place before trying to to fix the front mounting hole area. What do you think?
HerronScott
Darth Vader
Offline
Re: Ugh... TR4A Front Suspension Bracket
Note that I don't believe the backing plate reinforcement is typically welded in. I would wait though before doing any cleanup around the holes since hopefully the backing plate reinforcement can serve as a guide for the hole locations. I made my own so I don't know how tight-fitting the pre-made one is going to be inside the mounting point.
Scott
bgbassplyr
Darth Vader
Offline
Re: Ugh... TR4A Front Suspension Bracket
They will be sandwiched between the bolt head and the existing bracket. After all is bolted up, you might just tack it at the corners to stop any future 'rattles'.
They will be sandwiched between the bolt head and the existing bracket. After all is bolted up, you might just tack it at the corners to stop any future 'rattles'.