Hey Guest!

 Hey - did you know if you click on the title of a thread it will take you to the first unread post since you last visited that thread?
 but were afraid to ask:
  STOP!! Never post your email address in open forums. Bots can "harvest" your email! If you must share your email use a Private Message or use the
  smilie in place of the real @
 Pretty Please - add it to our Events forum(s) and add to the calendar! >>

Offline
Today was the final day of the Week of Tunebuggery; a day of cleaning and identifying the next set of projects. I pulled all my boxes of parts off the shelves, and went through them all looking for any bits that I'll need to complete the car. Any parts that I'll be using were left on the floor, grouped by assembly. A few of those pieces will need to be cleaned up and painted, so I put them aside so I won't forget to work on them.

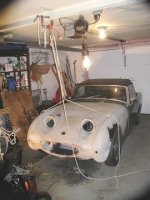
<span style="font-style: italic">The next projects, ready to go (mostly)</span>
Once all the parts were organized, I spent some time going over the work still to do and put together a list, incomplete I'm sure, of all that's still to do. It's not too bad of a list, really. Some of it will get done this week, the rest will come soon. I'm still on track for starting up the motor in June.
In no particular order:
<ul style="list-style-type: disc">[*]Finish front suspension/brakes once replacement shock arrives Finish front suspension/brakes once replacement shock arrives[*]Front tie rod ends[*]Front end alignment[*]Brake lines[*]Clutch line/slave cylinder[*]Transmission rebuild[*]Attach transmission to the engine[*]Paint pulley for the generator, and acquire a spacer[*]Clean/balance the drive shaft[*]Install fuel tank, lines, pump, and fuel gauge[*]Fix heater tap[*]Install parking brake split pins[*]Acquire fan belt[*]Tighten A-arm bolts once the engine is in place[*]Install engine/transmission[*]Get the headers coated and installed[*]Install exhaust and muffler[/list]
Tonight I'll spend some time going through this list and refining it. I'll also add details of each project so I can make sure that I've got all the parts I need, and make up a list of what needs to be ordered. There's not too much left to order, just a few last bits.
<span style="font-weight: bold">Summing it all up</span>
So was it all worth it, taking a week off to work on the Tunebug? Absolutely. Not only did I get a bunch of work done on the car, but I've also rekindled my motivation for getting this all done. For the first time in a long time I can envision driving the car in the near future. This last week has been a great jump-start, and now I just have to keep the efforts going.
I was able to get pretty much everything I had planned done this past week. The brake lines I messed up, and the leaking shock put me back a week or so, but those are minor things. I should have the front suspension done later this coming week, and with that I'll be able to have all four wheels back on. Really, these were just the sort of minor things that come up during any sort of restoration work. I'm really pleased with the progress I made -- now I just have to keep it going!
A huge thank you to everyone here for all the help and advice. Truly, I couldn't have done this without y'all. More questions to come, for sure!