• Hey Guest!
    British Car Forum has been supporting enthusiasts for over 25 years by providing a great place to share our love for British cars. You can support our efforts by upgrading your membership for less than the dues of most car clubs. There are some perks with a member upgrade!

    **Upgrade Now**
    (PS: Upgraded members don't see this banner, nor will you see the Google ads that appear on the site.)
Tips
Tips

Triumph TR Transmission Rebuild

TR3driver said:
TR6oldtimer said:
I ground the inner race so it would slip easily onto the shaft and used it to set the clearances (swapping spacer washers). If this makes no sense to you, it will in time.
But be sure to check the clearances again with the 'real' bearing. I tried the same trick when doing my Stag diff; and the new bearing needed some .025" more clearance than the old one did.

Yep, I compensated for that. It sure made it easier then pressing on and off that press fit bearing.
 
glemon said:
Thanks if the cerclip on the mainshaft is the one accessible when you take the cover behind the release bearing off
Unfortunately, no. That's the input shaft. You can't get to the hard one until the mainshaft is already out of the box.

There was a special tool to make removing this one circlip easier, but my attempt to duplicate the tool did not work out. Likely I should have used better metal, and hardened it; as the circlip just shaved mine like it was cheese. But I quit trying to duplicate the original, and used the "3 screwdriver" approach like almost everyone else does.

This is the earlier tool, the later one only has 3 fingers.
 
A tool that also helps,

This is a simple tool to remove the input shaft from the front of the transmission. I used 1 1/2 inch galvanized pipe and cap for the puller and 2 inch pipe for the hammer. Three bolt holes tapped for 5/16 bolts at 120 degrees apart attach to the shaft.

P2170005.jpg
 
Re: A tool that also helps,

Now thats some cool looking cheap but effective garage engineering Ray, thanks, that type of tool certainly looks doable with my limited skills and budget.
 
Re: A tool that also helps,

If you pull the layshaft first (allowing the cluster gears to drop into the bottom of the case, which you'll need to do later anyway), and remove the circlip that holds the mainshaft to the rear bearing, you can just tap the mainshaft forward until it pushes the input shaft bearing out of the housing.

Not exactly by the book, but works for me.

On the boxes with the loose needle bearings, it's best if you put in a dummy layshaft to hold the needles in place. But you can disassemble without it, it's really only necessary for reassembly. A length of unthreaded rod from the hardware store, cut to length (so it can drop down inside the case), works great for the dummy layshaft.
 
Re: A tool that also helps,

Progress, I got the front shaft and mainshaft out, I am now to the circlip on the mainshaft, I know a guy, it is always good to know a guy, he has worked on British and european sports cars since the late 50s, semi retired, still has his shop full of tools, I am going to pay him a visit and see how it turns out.

Greg
 
Re: A tool that also helps,

This is great, good luck w/ the next step and please continue to keep us posted. I took my gearbox out today. In the morning going to take coffee and sit and stare at it all day looking for a sign and courage to do it myself.
 
Re: A tool that also helps,

You can do it, especially with the site linked at the front of this topic, but you are right to take yout time, take pictures, think through each step.

Where are you at in Iowa? I used to have a '66 4A, solid axle, great car, yours looks nice in the little pic.
 
Re: A tool that also helps,

Cedar Rapids. Where in NE? 250 is nice car. Bet you are anxious to drive it further than up the driveway. I have had mine running some the last two summers.
Now there is a rebuilt OD on my workbench along with a bunch of other parts to get it more trustworthy. There is a british show in Des Moines June 6. I hope to drive it there if I can set the coffee down and get to work. This one is a driver, not a show'er.
 
Re: A tool that also helps,

I am in Lincoln, I have heard about the Des Moines show, but have never made it, maybe next year when the car is done.

Greg
 
Re: A tool that also helps,

I got the circlip that holds the gears on the mainshaft out, for those that have not gone there I don't know if you need any special tools. I used the screwdriver method, trickiest part was just getting is started to come up on one end once you have pried it out. I used a small jewelers screwdriver to get the initial pry up, then just keep slipping it around and pry it out and up over the top of the next spline until you have made it all around and Bobs your uncle, as they say.

I would have been easier had I had the thing in a soft jawed vice rather than between my legs, but the vice is out in the garage where it is cold.

I have made a cyber friend of John at Quantum Mechanics, time to order the kit and see how the rest of it goes, you guys have me worried about getting the clearences right, which is probably a good thing, you had me worried about the circlip and it turned out to be not so bad.

I would rather go in thinking it will be hard than thinking it will be easy and finding out otherwise.
 
Re: A tool that also helps,

Rebuild kit arrived Monday, as per the Buckeye Triumph rebuild site I started with what is probably the simplest part, the input or first motion shaft, the spigot bearing was not inclined to come out. I tried the drift through the bearing method, but was not satisfied with my headway, which was limited. So I tried something else, the old reliable dremel and a carbide bit, careful grind and she came out once I had worked all the way through the outer race of the bearing top to bottom.

No special tool machined to drive on the spigot bearing, I used two sockets, one deep socket that just fit inside the bearing to keep it streaight, one just the right size to fit around the circumference of the bearing. I would call the dremel a better way to get the bearing out, the sockets worked fine and were there, unlke getting a special piece machined to push the bearing in.

Driving the big front bearing on used a vice, rags, wooden block, etc. worked fine, don't have a press, but try to hammer with everything protected and stabilized as much as possible.

So far so good. On to the Countershaft and mainshaft.
 
Re: A tool that also helps,

I got the big pieces back together last night, driving in the front and rear bearings was a bit of a challenge, I evertthing in order from the mainshaft on a rod when I took it apart, but somewhere along the line (cleaning I think) it of course got muddled up, so I put the 3rd/4th gear synchro hub on backwards and could tell things were out of whack when I got the mainshaft and first motion shaft installed.

For the record the internal part of the synchro is offset internally to one side, if I recall correctly the offset goes to the rear of the tranny, not the front, you sure can't tell from the manual pics.

In the process of working in it I managed to knock the synchro hub off the little balls twice--getting it back on while in the tranny proved to be a littel difficult (you have two hands to press three balls down, one is inaccesable at all times).

Anyway, turned out I could swap the turned around hub out by just pulling the front bearing, which of course didn't want to come out, but did eventually after much more or less friendly but forcefull persuasion.

After I put it back together the second time it all turns and shifts much better.

Yipee! Only on question, did chip some shaving of aluminum into the box while pushing the front bearing out to turn the synchro around, after all that effort to make it perfectly clean.

I am NOT going to take it all apart again, what would be a good liquid to flush it out with to get those pieces out, I was thinking gasoline (upside, relatively cheap, thin good cleaner, downside will disslove all the oil on my bearings, good for making things blow up) Marvel Mystery Oil (not as good for the job as gas but fewer downsides) or maybe one of those gallon containers of WD40. Any thoughts on the right studd would be appreciated.

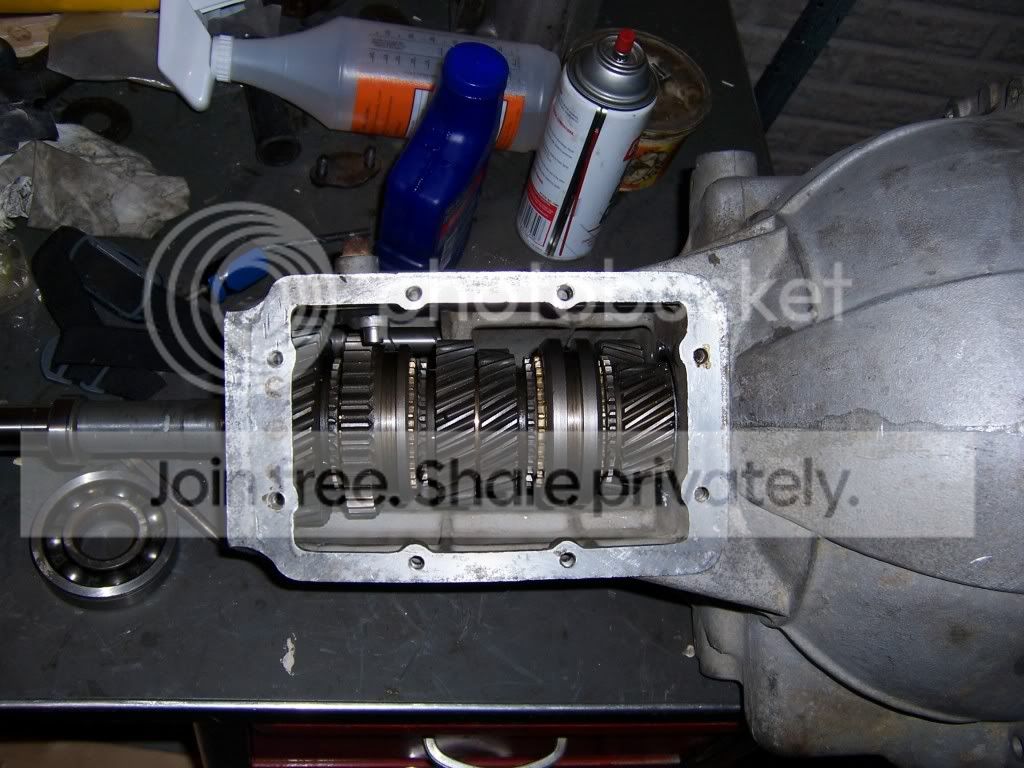
Here is a shot of it with the mainshaft in. Havent tried to fit the later O/D but understand it is very straightforward compared to the early ones with all the springs.

trannygearsin.jpg
 
Re: A tool that also helps,

You are on a roll, way to go. Someone will have an idea on flush. My only thought would be to first vacuum. Maybe tape a small diameter hose like gas line on the end to get in there.

How did your measurments go? Today I took my first look at gear float and I am seeing the minimum .004". Tomorrow have a second look and put everything on the shaft to see how that looks. Hate to buy new bushes but........
 
Re: A tool that also helps,

I had to buy the a new top hat bush because it was broken, the others specced out within range, If I recall about .005 or .006. I actually ordered bushes from Moss, but they were on back-order, I re-measured and used a better tool for the flat surface, and it measured out better. The part I feared most, lining up the counter gear after pulling the countershaft and putting the mainshaft in. But it actually cant fall that far so washers stay in and you can get in the channel for the shaft and line it up fairly easily.

I hope to be able to do a driving test in a few months---
 
Re: A tool that also helps,

I think any thin motor oil would be the best bet for the flush.
 
Re: A tool that also helps,

I ended up cranking up the old compressor to a little over 100lbs and blasting her out, then twisting the gearsets a few times and doing it again for good measure, seemed to work pretty well.
 
Re: A tool that also helps,

I think I'd let that aluminum shaving spin and mix with the Red Line like a fine herb.
 
Back
Top