Hey Guest!

 Hey - did you know if you click on the title of a thread it will take you to the first unread post since you last visited that thread?
 but were afraid to ask:
  STOP!! Never post your email address in open forums. Bots can "harvest" your email! If you must share your email use a Private Message or use the
  smilie in place of the real @
 Pretty Please - add it to our Events forum(s) and add to the calendar! >>
T
Tinster
Guest
Guest
Offline
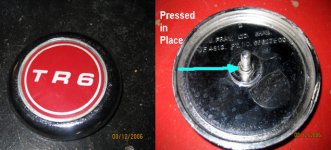
A while back someone asked about the screw stud
that attaches the chrome TR6 center emblem to the
spring tensioned black plastic hubcaps on the wheels.
I have my back wheels off and took apart the hubcap
today to take a look and post the photo of the emblem
with the mounting screw stud.
It appears the metal mounting screw stud is pressed into
place like a wheel stud but in miniature. I could not
determine how it might be possible to press out the small
stud without damaging the TR6 emblem.
The chrome in my 4 wheel emblems is shiny but pitted.
I am thinking kinda old and might represent original technology .
Hope the photo helps some folks.
regards,
Tinster in Puerto rico