• Hi Guest!
    You can help ensure that British Car Forum (BCF) continues to provide a great place to engage in the British car hobby! If you find BCF a beneficial community, please consider supporting our efforts with a subscription.

    There are some perks with a member upgrade!
    **Upgrade Now**
    (PS: Subscribers don't see this gawd-aweful banner
Tips
Tips

TR6 TR6 - how many brake caliper shims?

ichthos

Darth Vader
Country flag
Offline
Hello,
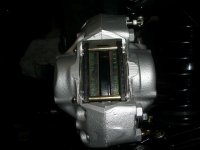
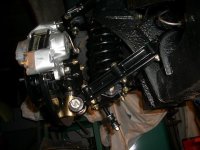
I put on new rotors, brake pads, and installed the brake caliper. This is the first time I have done this. When I tightened down the brake caliper, the wheel no longer turned. After looking in the Moss catalog, I noticed that it looks like I need brake caliper centering shims. The brake pad is pushing against the inside of the rotor at the moment. What is odd is there were no shims when I took it apart. How do you decide how many shims to put in? As always, any help would greatly be appreciated.
Kevin
 
Kevin, maybe a stupid question but did you push the pistions all the way bake in to the caliper? There were no shims on my TR6 and you do have a dust shield right? the bolts that hold the caliper on also holds the dust shield

Hondo
 
Hi Hondo,

I never mind being questioned about the basics - sometimes I admit I have overlooked simple things. Yes, I did push in the pison all the way. I do have a dust sheild. I still have the passenger side to compare my work to, so I know I have put things together correctly. I did put in anti-squeal strips, but it would have affected clearance on both sides. The caliper is definately not centered over the rotor now. The original rotor had been machined past recommended thickness, and the brake pads had very little left on them. Maybe the PO got away with it because there was so much clearance? I am anxious to get this solved so I can tear down the other side and finish my suspension rebuild. Any other ideas?

Kevin
 
Kevin
so it sounds like you replace the rotor, is it seated all the way on would be the first question,did you replace the bearings too? all I can suggest is jack up both side and look at the other side and compair each other to the one just finished and see if you notice something out of the ordinary, the anit squeal shims should not be an issue cause I have them too, if the rotor is not centered in the caliper then something is amiss, any way you can take and post a few pics?

Hondo
 
The bearings were fine so I just cleaned, repacked them with grease, and then snugged them back up. I finger tightened the two caliper mounting bolts. I noticed that before I even fully tightened them that the wheel would no longer turn. It is obvious that they are off center. I did compare my work to the passenger side, but I will look again tonight. I did repaint all the parts when I rebuilt the suspension. I wonder if that effected anything? I am at work and will not be home at the earliest until 7pm. I'll take a picture and post (if I can remember how to do it.) Thanks,

Kevin
 
Kevin-
Just a thought... are the two pins (3/16"?) that allow the brake pads to move in good shape? Could they possibly be bent therby not allowing the pads to move freely?
 
New rotors? Compare new with old for disc offset in relation to the hub face. May have wrong disc.
 
Elliot, the old pins were ok, but I decided that since I have gone this far and there was some noticeable wear, I might as well replace them too. So, basically that is not a problem. Jim, I did compare the old rotor with the new ones before I put them in. Except for the old ones being less than the minimum thickness and very thin, they appear to be about the same height. I bought all of my parts from TRF and they have never sent me wrong parts yet. I will double check them when I get home. I did order some shims today. I will double check everything tonight, but I don't see what I could have done wrong. I forgot how to post a picture. If I ever get home tonight, can someone review for me how to do this?

Kevin
 
Kevin-
To add photo just click "File Manager" at the bottom of the dialog box where you type your reply. You can then browse and add your photo. Max size is 100kb. Hope this helps.
 
Here is a close up of the brake caliper showing the pads against the rotor.
 

Attachments

  • 16979.jpg
    16979.jpg
    52.3 KB · Views: 267
looks pretty good to me maybe take the anti squeel pads out and see if you have clearance, the calipers have a slot in the top and if you remove the pins that hold the pads in place we could see better how much off center between the caliper and rotor there is, could be less than 1/16 and that could be paint thickness just a thought
 
I know it makes it difficult to see the clearance because I painted non functioning surfaces black, but there does seem to be enough clearance if it were centered. I will take out the pads when I get home and post another pic. I am tempted to take apart my passenger side so I can complete my front end suspension/steering restoration, but I would probably regret it later. How frustrating to have to wait for the shims until next week. I guess on the bright side, there have been record rain levels for this month. I wouldn't be driving it anyway since I don't have my top installed yet.

Kevin
 
another option is to get some 80 grit sand paper and sand down the offending pad till it stops binding, not the correct soluting but maybe the pads were made just a little to thick
 
In my experience with brakes... they always rub at first when brand new. You should still be able to turn it by hand, with the wheel installed, with some resistance but not to the point where you cant turn it with 1 hand. But then again, I have yet to see any brake job come out uneven as in your pictures.

Pull the pads back out and ensure they are both the same thickness... you may have the inside pad on the outside and vise versa.
 
There are only a few things that would cause the rotor to be closer to the vertical link. You said you painted all components before assembly, did this include the mating surfaces of the hub and rotor? If so, that would add additional material and move the rotor inward. Depending on the type of paint and your application of it, a significant build up could have been layed down.

When I replace rotors, all I do is apply a light coat of oil to the clean bare metal and put them together.
 
Dumb thought: could you not purchase (or make via grinding) thin washers to go between the caliper and the mount? Doesn't look like it would take much, but I think I'd prefer that approach -- until the "proper" shims arrive -- to modifying brake components themselves.

The above assumes that everything truly is seated/bolted as it should be, as seems to have been covered in above posts!
 
I did not paint any machined mated surfaces. One thing I did not check was the thickness of the pads. I didn't know they came in differing thicknesses - are they supposed to be? I'm at work so I can't check. I will be emarrassed if that ends up being the problem, but atleast the problem would be solved. Thanks for all of your suggestions - I'll go at it again tonight and make all of the suggested checks.

Kevin
 
Pads are the same thickness. Something is not mounted properly. There should be no shims... I recommend you pop the caliper off, pop the rotor off and recheck the fit of the rotor to the hub. Make sure it is seated fully. Then reinstall the caliper. The caliper is designed to sit centered over the rotor.
 
I checked the new pads I got from Moss and install a week or two ago. They are each about 1/2 inch thick. The brake material is around 3/8 of an inch. Sorry I could only get an approximation because the tires are mounted.

I hope this helps.
 
Back
Top