• Hi Guest!
    You can help ensure that British Car Forum (BCF) continues to provide a great place to engage in the British car hobby! If you find BCF a beneficial community, please consider supporting our efforts with a subscription.

    There are some perks with a member upgrade!
    **Upgrade Now**
    (PS: Subscribers don't see this gawd-aweful banner
Tips
Tips

TR4/4A TR4A top install details

OP
D

DK66

Freshman Member
Silver
Country flag
Offline
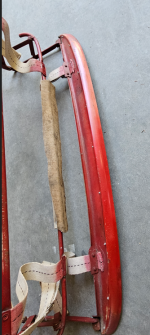
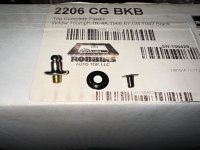
I have a 66 TR4A with a top frame only and no top so I have no reference as to how the old top was installed and how to install a new (Robbins) top.

So, some questions.

It seems at the trunk end the top uses lift-a-dots and snaps on the two sides. If that's the case when having the top down do you unsnap the lift-a-dots and side snaps to install the tonneau cover or boot cover? I've had a couple TR6 and don't recall having to do that when the top is down and the tonneau is in use. Maybe my memory is faulty in that regard - please confirm.

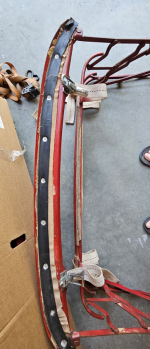
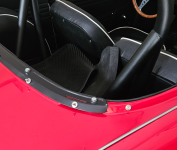
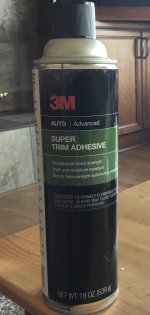
Second question, the new top I have has an unfinished edge where attaches to the front frame header. From what I gather this somehow gets glued to the frame and maybe there are some channels underneath that gets riveted once glued? This is confusing to me and not sure how finished the top would look if only glued and riveted.

I've attached a picture of my frame - any help or better pictures of how your top is attached to the frame on the windshield end as well as showing those elusive channels.

Thanks

DK66
 

Attachments

  • Screenshot 2024-08-06 083130.png
    Screenshot 2024-08-06 083130.png
    462.1 KB · Views: 63
  • Screenshot 2024-08-06 083206.png
    Screenshot 2024-08-06 083206.png
    587.6 KB · Views: 57
If you can score a copy of "How to Restore Triumph TR2, 3,,3A,4, and 4A" by Roger Williams, that will be a big help. The section on tops isn't perfect, but it's the best I've found.

Originally, the rear of the TR4A top was secured under a long, thin bar and riveted to it by the lift-the-dot pegs. The bar bolted to the car's body. The side flaps were secured by snaps, but it's common to replace them with lift-the-dots or other, more secure fasteners.

IMG_3214.JPG


IMG_3215.JPG

The front end is glued, and the top is further secured by three bars, riveted on. Those pieces also hold a gasket that prevents leakage between the top and windshield frame. You will have to trim that end of the top.

IMG_3216.JPG


As for trimming--Williams suggests installing the rear parts first, then marking where the front edge of the top reaches the front edge of the frame. Then pull it on an extra half inch before attaching it. That will insure a nice, tight fit.

IMG_3224.JPG


IMG_3225.JPG


I hope this isn't too hard to understand. The pictures of my top installation are not very comprehensive.
 
Sarastro, thanks so much for the pictures extremely helpful and explain a lot.

I also looked through my library and I do have that restore the tr4a book by Roger Williams and also extremely helpful.

So, it confirms my belief that the main means of attaching the top to the header is glue and the riveted channels are really just secondary.

I was confused but now that I understand I can decipher the old original top was white and a PO just riveted a rubber strip to the header
in an attempt to make a seal. I think I need the three seal retainer channels and seal to make a proper fit.

I have the trunk side bar as you described so do the terminal end of the straps go through the slots shown in this pic and more or less clamped there by the bar? If so, then over the bar and then through the slot? Is that why you have your rear bar off?

Thanks so much

DK66
 

Attachments

  • Screenshot 2024-08-06 104844.png
    Screenshot 2024-08-06 104844.png
    580.5 KB · Views: 67
I always assumed that the webbing goes straight through the slots, from the top, and the pin keeps them in place. There is room for it under the rear retaining bar. Fig. 19-17 in Williams shows the installation.

Re the front: yes, copying the last guy's installation of anything in these cars can be dangerous. People like to jury-rig things, even if a correct installation is easier. The seal-retaining channels for the front work pretty well, both for retaining the top fabric and sealing against water, and it's hard to see how anyone could improve on them.
 
Echoing Steve - the Williams book is great. Make sure you get enough tension in the top (to keep it from buzzing at highway speeds), and make sure the top is warm and soft (i.e. stretchy) during installation. (I rolled up the windows, placed a heater inside the car and a heated blanket on top of the roof. Others have used outdoor sunshine on a hot day.) White chalk is your friend to mark things (I stretched, marked with chalk, then relaxed the top and attached in a "non-stressed" state to the marks).

Also there are a few videos out there, anything TR4A-TR5-TR6 is relevant, although the frame gets more sophisticated with the later models. TR4 and earlier have different construction. Point being, watching videos was very helpful for me to visualize how to do it.
 
You are missing critical hardware.The 3 piece channel in the front to hold the seal.
(guaranteed to leak no matter what) There is also the rear strip that fits into the top with rivets,
and several seal retainers on the sides, and velcro.
The part where most DIY guys go mad is the webbing, find someone who has done it to help you.
Once this is right it gets a lot easier. Use 3M black weather sealer and gloves to glue the material.
Mad dog
 
Mad dog

I understand about the channels on the header frame, and I've ordered the (3) channels along with the seal for the header bar.

I'm not sure what you are referring to as the rear strip that fits into the top with rivets? Is there an additional piece in the rear other than the bar that bolts to the car as shown in my picture which the top snaps to?

If there is that may answer one of my questions. Having owned two TR6's a while ago I don't recall if I had to unsnap the top along the trunk when it's folded in order to use a boot cover or tonneau cover. Does the top share the same snaps as the tonneau cover?

Correct me if I'm wrong but I think the TR6 had the side channels, seals and Velcro and the TR4A does not.

As far as the webbing is concerned, the old frame has it in place and I plan on copying the dimensions between bars when installed and before replacing the webbing.

thanks
DK66
 
Regarding adhesives. I would suggest 3M Super Trim adhesive rather than using black weatherstripping adhesive. 3M Super Trim is designed for installing header and automotive vinyl. It’s heat resistant (so won’t reactivate on hot days like contact cement will), has a high bonding strength, and unlike contact cement will allow you to reposition the material over the first few minutes in order to get the vinyl correctly positioned. Black weather sealant is thick, messy, and will leave an irregular surface on the vinyl. Permatex make a similar product also for headliners etc

MY QUESTION IS: How are the rear liftadot pegs (for the boot) attached? The base is similar to that used to attach snaps but because of the peg you are not able to press the two together with a snap tool.
 

Attachments

  • IMG_0744.jpeg
    IMG_0744.jpeg
    529.3 KB · Views: 55
My experience with top installation over the last 50 or so, has left me a fan of different adhesives
for different aps. The product as pictured is fine for some things but is very expensive and oversprays
if you are not careful. It is ,IMHO, not for convertible top installation. When it needs to stay, use the "black death"
weatherstrip adhesive. Treat it as a contact adhesive, (a dab on both sides spread thin)
All glues are a mess, clean it up with kerosene (wont hurt the vinyl or paint).
You lost me on the lift a dot question, perhaps a picture of the bits that are at issue.....
Mad dog
 
Unlike the 250 and 6 there are liftadot pegs rather than snaps that are used to hold the boot/tonneau. These are peened onto the back plate.

WHAT TOOLS ARE NEEDED AND HOW IS THIS DONE? Im referring to just installing/fixing the pegs in place, not the process of installing the top.

Snaps can be attached using a snap tool which can’t be used in this situation.

The attached picture shows the peg (and some other fasteners which a don’t know if they are used with the peg or the other fasteners). There are pictures in some of the earlier posts of this thread showing them installed at the back of a green and red car.
 

Attachments

  • IMG_3272.JPG
    IMG_3272.JPG
    1.9 MB · Views: 55
Last edited:
Boy, I'm trying to remember what I did. I think those things need to be flared like rivets; but I don't recall how I did it? Maybe a hammer and a large ball bearing??

I'm not much help here, sorry!
 
When confronted with the weird, make a tool.I suggest an old punch ,with the end ground down to a rounded /tapper
end that will mushroom out your snap, You will need an assistant and a block of wood with a smallish hole to capture
the end of the snap, ALSO some BEER !!
Mad dog
 
Back
Top