
-
 Hey Guest!
British Car Forum has been supporting enthusiasts for over 25 years by providing a great place to share our love for British cars. You can support our efforts by upgrading your membership for less than the dues of most car clubs. There are some perks with a member upgrade!**Upgrade Now**
(PS: Upgraded members don't see this banner, nor will you see the Google ads that appear on the site.)

Tips
- We have a special forum called "Member Articles" where you can submit actual articles for consideration for publication. Learn More
- Don't have an Avatar? If not, your avatar will default to the 1st character in your username. Go into "Account Details" to change your Avatar.
- Some basic forum navigation info: click
 Hey - did you know if you click on the title of a thread it will take you to the first unread post since you last visited that thread?
- Hey Guest - Is your British Car Club in our Clubs database? If not, send me a PM - Basil

- Looking for a local club? Click the "Clubs" tab above and browse hundreds of clubs world-wide.
- Add Android or iPhone APP: click
- Did you know - any picture or video you add in your posts in any marque-specific forum will also get added to the Media Gallery automatically.
- A few more tips about posting and replying: click
- Hey there Guest - be sure to keep your profile page up to date with interesting info about yourself: learn more
- More tips and tricks on Posting and Replying: click
 but were afraid to ask:
  STOP!! Never post your email address in open forums. Bots can "harvest" your email! If you must share your email use a Private Message or use the
  smilie in place of the real @
- Want to mention another member in a post & get their attention? WATCH THIS

- So, you created a "Group" here at BCF and would like to invite other members to join? Watch this!
- Hey Guest - A post a day keeps Basil from visiting you in the small hours and putting a bat up your nightdress!
- Hey Guest - do you know of an upcoming British car event?
 Pretty Please - add it to our Events forum(s) and add to the calendar! >> Here's How <<
- Hey Guest - you be stylin' Change the look and feel of the forum to fit your taste. Check it out
- If you run across an inappropriate post, for example a post that breaks our rules or looks like it might be spam, you can report the post to the moderators: Learn More
- If you would like to try some different "looks" or styles for the site, scroll to the very bottom, on the left and click the Style Selector.
You are using an out of date browser. It may not display this or other websites correctly.
You should upgrade or use an alternative browser.
You should upgrade or use an alternative browser.
TR4/4A TR4A alternator conversion wiring question
- Thread starter tdskip
- Start date
TR3driver
Great Pumpkin - R.I.P
Offline
Nope, if the light is on with the wire disconnected from the alternator, then the problem is outside the alternator.
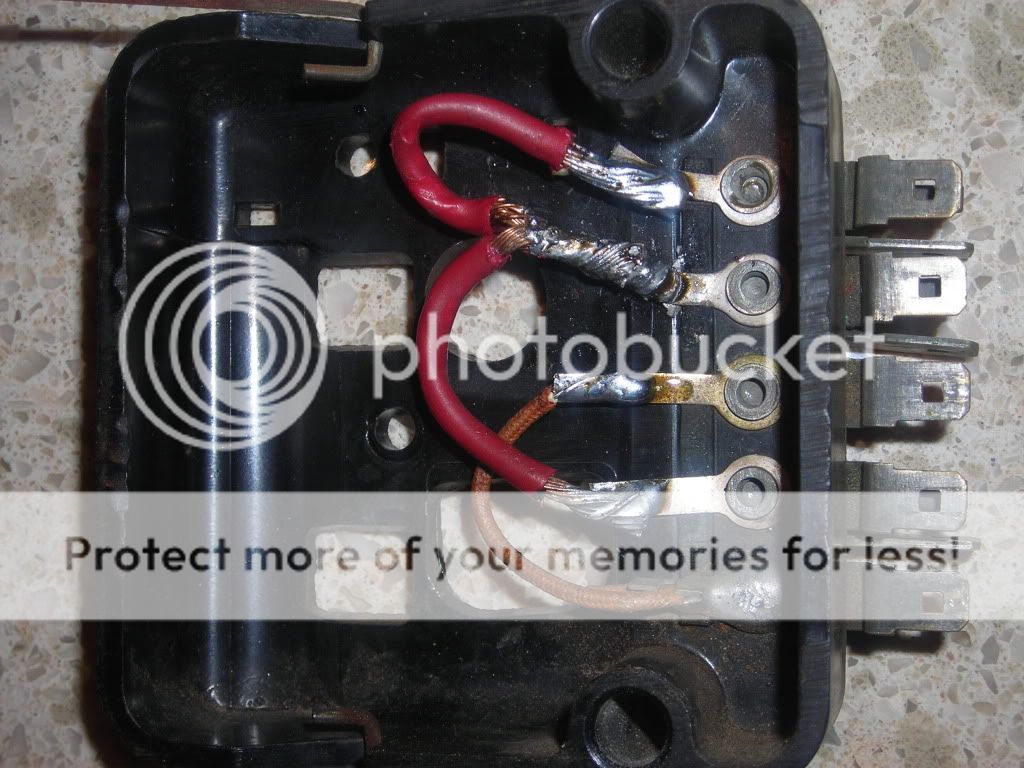
In fact, I think I see the problem in your photo above. In your new configuration, terminal 1 of the alternator should connect only to one side of the light on the dash. But your photo seems to show connections between all of the control box terminals, so you can't be using them as a tie point. How did you route the wire to the light?
In fact, I think I see the problem in your photo above. In your new configuration, terminal 1 of the alternator should connect only to one side of the light on the dash. But your photo seems to show connections between all of the control box terminals, so you can't be using them as a tie point. How did you route the wire to the light?
TR3driver
Great Pumpkin - R.I.P
Offline
Well, originally I believe the brown/green would have gone to the middle 'F' terminal. However, the light would have been wired with a brown/yellow to the 'D' terminal, which has been linked to A and A1 in your photo.
So if the brown/yellow from the light is still connected to 'D', that would explain why the light comes on as soon as you connect the battery.
I'm a little surprised that Dan suggested using the brown/green wire for terminal 1, but maybe it's just because it already had a suitable connector on it. After all, the electrons don't know what color the insulation is! But somewhere it is going to have to meet the brown/yellow to the dash light.
TR3driver said:After all, the electrons don't know what color the insulation is!
Yeah, they are annoying like that. That makes them as bad as me at following directions. Ha!
TR3driver said:I'm a little surprised that Dan suggested using the brown/green wire for terminal 1, but maybe it's just because it already had a suitable connector on it.
Dan didn't directly, I picked that up from some articles I found. <span style="font-weight: bold">I don't want to have anyone think any of this is the result of Dan - it's not.</span> Sorry for not being more clear about that.
So Ipulled the alternator as I mentioned and had it tested at PepBoys, it failed. Bummer. But on the way out the guys says "you know, our testing rig is kinda funny. Bring it to Autozone". So I brought it to AutoZone. It passed. Cool.
OK - now back to the charging light issue. Is the best approach at this point to run a new wire from #1 to the charging light?
If I leave the brown/green disconnected at the alternator should I disconnect it at the control box?
TR3driver
Great Pumpkin - R.I.P
Offline
Up to you, I guess. But after all that work to make the original control box look realistic, I would want to continue with that approach.tdskip said:OK - now back to the charging light issue. Is the best approach at this point to run a new wire from #1 to the charging light?
Besides, I think maybe the solution is as simple as pulling the small brown/yellow off of the 'D' terminal and putting it on either 'F' or 'E'. Note in Randy's photo above where he has brown/yellow on 'E'. But it would help if you would tell me how they are connected now.
<div class="ubbcode-block"><div class="ubbcode-header">Quote:]If I leave the brown/green disconnected at the alternator should I disconnect it at the control box?
[/QUOTE]
You lost me here. Disconnecting the brown/green didn't do any good, so why are you considering leaving it that way? But to answer your question, it doesn't matter.
TR4nut
Yoda
Offline
Yes, the two small wires Brown/Yellow and Brown/Green should use the F and E terminals as they are jumpered together in the picture. Then the remaining big wires get tied together with the other three terminals. That would be the first place to look, its hard to see how that warning light is getting current unless there is a misconnection at this control box.
<div class="ubbcode-block"><div class="ubbcode-header">Quote:]
Up to you, I guess. But after all that work to make the original control box look realistic, I would want to continue with that approach.[/QUOTE]
Yes, I was flailing a bit there. Thanks for keeping me on track.
<span style="font-weight: bold">That was it, I simply had it on the wrong terminal.</span>
I have everything connected properly know and the dash warning light is off now until it is supposed to come on.
Thanks for the coaching and <span style="text-decoration: underline">patience</span>, been fighting with a migraine most of this week and it has made me even more dense than usual (insert joke here: ___________________)
Up to you, I guess. But after all that work to make the original control box look realistic, I would want to continue with that approach.[/QUOTE]
Yes, I was flailing a bit there. Thanks for keeping me on track.
TR3driver said:Besides, I think maybe the solution is as simple as pulling the small brown/yellow off of the 'D' terminal and putting it on either 'F' or 'E'.
<span style="font-weight: bold">That was it, I simply had it on the wrong terminal.</span>
I have everything connected properly know and the dash warning light is off now until it is supposed to come on.
Thanks for the coaching and <span style="text-decoration: underline">patience</span>, been fighting with a migraine most of this week and it has made me even more dense than usual (insert joke here: ___________________)