• Hi Guest!
    You can help ensure that British Car Forum (BCF) continues to provide a great place to engage in the British car hobby! If you find BCF a beneficial community, please consider supporting our efforts with a subscription.

    There are some perks with a member upgrade!
    **Upgrade Now**
    (PS: Subscribers don't see this gawd-aweful banner
Tips
Tips

TR4/4A TR4 Rear Brake Drum Removal - Basic Question

Country flag
Offline
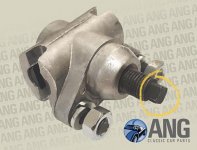
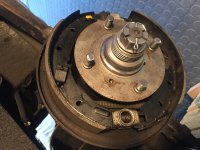
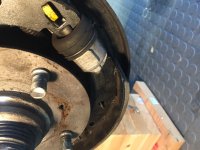
Hi all, just a simple question here - trying to inspect the rear brake shoes and trying to get the drum off for the first time (62 TR4) - I removed four bolts and two screws but it is not coming off even with light tapping. Do I need to remove the castle nut and assembly bit (I am pointing at it in the pic)? Looks like the drum pulls over it but
its not coming off. E brake is off. This is not elaborated on in the manual or in vids on YouTube that i can find. Thanks


IMG_5278.JPG
 
No you don’t remove that. That’s the axle /half shaft

sound's like you need to undo the brake adjuster on the rear of the back plate..
This will allow the brake shoes to move in away from the drum. it looks clean enough to just pull off.
This square adjuster is all that protrudes on the rear of the back plate. Circled in the pic
 

Attachments

  • 44B93F0F-B4AD-427B-88E1-EC1A19978211.jpeg
    44B93F0F-B4AD-427B-88E1-EC1A19978211.jpeg
    85.8 KB · Views: 99
You have removed all the right fasteners.

Yes release e-brake. Make sure it is releasing: you should be able to move the lever on the inside of the brakes where the cable attaches.

And like Hamish says, undo the adjuster, also on the backside. I generally forget which way to turn these things, but I believe ā€œoutā€ is looser. I turn them one way and see what happens (if tightening the wheel becomes harder to turn.)

If it has been a while since the drums came off, it might take some effort.
 
Sometimes you need to take a block of wood and a hammer and smack the faces of the brake drum to shock it lose from dirt and the spring tension. You want to hit it pretty well, but do not try and kill it. You will feel it vibrate loosen and probably hear it and see it. After that, you still may have to lose the shoes with the adjuster. Once you get it to move, the drum will probably bind on the brakes shoes as you pull it off and you will need to tease it off and probably losing the brakes shoes more.

One important thing when the drums are off--- do not push the brake pedal inside the car----- because the brake shoes have nothing to stop them from expanding and will come apart.

steve
 
I got the drum off - thanks everyone - few quick questions before I put the drum back on and look at the passenger side (I didnt want to pull the e brake to do the passenger side until the driver side was back together - thanks for that tip sp53!)

I see newer brake shoes with plenty of life from what I can tell. I see absolutely no leakage anywhere in the drum or from the cylinder. The lower spring (the one by the cylinder) has the spring hook backwards but the manual seems to show that as correct. Is there anything you guys see here I should address before putting it back together again? Personally i see nothing wrong here.


Reminder of my issues with the brakes were:

A: I hear squealing when applying the brakes which could just be dirt - should I clean the shoes or anything like that?

B: When I press the pedal it eventually ends up at near the floor - when i let up and press again there is full pressure - does that make sense - like no play. Is that normal or is there an issue do guys think?

Master cylinder is full - not cloudy - no leaking - seems totally fine

Front brakes - pads look newer, calipers look newer, flex lines are fine - absolutely no leaking.

Maybe im just being overly cautious - im not sure if this is how these brakes should feel - this is my first vintage car and only had it for a month or so.
 

Attachments

  • IMG_5284.JPG
    IMG_5284.JPG
    2.2 MB · Views: 99
  • IMG_5285.JPG
    IMG_5285.JPG
    1.4 MB · Views: 91
  • IMG_5290.JPG
    IMG_5290.JPG
    1.3 MB · Views: 86
Last edited:
That's not normal; you have a problem somewhere. I had that issue, and swore I have no leak, but then I found one. It was in one of the front hoses. Make sure you've bled with a buddy depressing the pedal. Give each wheel a few good pumps before you release the bleed screws. Watch the reservoir level. A pedal going to the floor or varying in height as you depress the pedal is not acceptable.
 
That’s all very clean In The drum. But for future you could buy a clutch / brake cleaner spray. It’s what pro shops use to displace dust.
From the start - your issue of a soft peddle would not warrant rear drum removal in the first instance.
Bleeding the system is very much on the initial agenda and both front and back and probably fixed after doing the front !
If the front calipers are new or refurbished the piston flexi dust rubbers could be too stiff and be dragging the pistons back. Its a known issue here in the uk. This gives long peddle travel on first application. But it’s also symptomatic of air in the fluid.
So bleed all 4 wheels first. And if still an issue use a stick/broom handle to press the brake on hard for a couple days to allow the rubbers to find the ā€œnew normalā€ .

good two person bleeding needed I think and a good litre or more of brake fluid to keep the system topped up ( if it runs dry you have to start again so keep checking the reservoir)
As to brake fluid you need to use the same spec (probably ? ) ie dot 4 not necessarily the same make.
( caveat make sure it’s not silicon fluid as this won’t mix with the usual mineral type)
Good luck
 
Your issue with the pedal falling on light pressure, but holding on heavy pressure is most likely a bad master cylinder piston seal. Squealing is more common with the front disc brakes...
 
The rear brakes look fine. I would put the drums back on and tighten up the rear brakes as much as you can. Often it is best to tighten rear brakes up and then back them off a click, but a little rubbing will bed in and I think make the whole system work better. With these systems, I like the rear brakes tight. The E brake works better when the adjustment on the shoes is correct and the pedal should be harder.

If tightening the rear brakes does not fix your problem then get a new master cylinder. With a new master cylinder you will not be questioning if that is the problem. I have spent a lot of time chasing problems when I should have got a new master cylinder.

steve
 
You guys are great. Thanks all. What's your opinion on rebuild the master cylinder vs new one? Assuming most will say buy new that way I know everything is new and no pits in the metal which is not handled in the rebuild.
 
There was a time I would say just buy new, if you can. New is often as cheap as rebuilding. But then, we have had a lot of issues with "new"...
 
The tr3/4 master cylinder is quite easy to build, and since "chineeseium" is often sold
as a replacement, I say just do it. Sometimes the inner bits on the AM are wrong or missing
making them impossible to bleed completely.
Mad dog
 
You mention the pedal was a little low on the first time you used the brakes and then after second time you hit the pedal the pedal came up. If that little bit is only like and 1/8 of an inch, I would drive the car and not worry about it. My one tr3 does that. It could be something like the front discs have move back that little bit and then reset after the first pedal hit. These cars are not knew style, but I understand brakes are important.

Driving the car around for a while will give you a feel for the LBC. Your brakes look great. I highly doubt you will have a brake failure. Having said that, make sure your E-brake works so there is no self-fulfilling prophecy.

Buy new and buy a rebuild kit---- welcome to the LBC world. There are places that put sleeves inside the cylinders. I polish the inside of cylinder with fine polish when i can and sometimes I buy new and pop it in.

steve
 
A timely post for me; last weekend TRF had a sale on master cylinders and I bought a pair after nearly 20 years. I’ve rebuild both MCs every 4-5 years, and the plastic pieces inside are pretty chewed up. These might be the original MCs.

I’m curious to see how the new compare to the old, maybe I’ll put the new ā€˜guts’ into the old MC bores? A new Summit Racing Girling rebuild kit was only $6 less than the new TRF MCs, so I took a gamble.
 
Back
Top